一、微信小程序 1.1小程序项目结构 1 2 3 4 5 6 7 8 9 10 11 12 13 ├── app.js
1.2小程序生命周期函数 App
1 2 3 4 5 6 7 8 9 10 11 12 13 14 15 16 17 18 19 20 21 22 App ({onLaunch : function (options ) {console .log (options);console .log ("onLaunch" );onShow : function (options ){console .log ("================" );console .log (options);console .log ("onShow" );onHide : function (console .log ("onHide" );console .log (username);onError : function (msg ){console .log (msg);globalData : {userInfo : null
Page
1 2 3 4 5 6 7 8 9 10 11 12 13 14 15 onLoad : function (console .log ('index页面加载' )onShow :function (console .log ('index页面显示' )onReady :function (console .log ('index页面加载完成' )onHide :function (console .log ('index页面被隐藏' ) # 如页面跳转onUnload :function (console .log ('index页面被卸载' ) # 返回到上一页
1.3超全局变量 多个页面之间共享的变量
app.js
1 2 3 globalData : {name :"user1"
获取
index.js
1 2 3 4 const app = getApp ()onLoad : function (console .log (app.globalData .name )
修改全局变量的值
1 app.globalData .name = 'user3'
1.4数据缓存 设置缓存
index.js
1 2 3 onLoad : function (setStorageSync ('age' , 20 )
获取缓存
1 wx.setStorageSync ('age' , 21 )
修改缓存中的值
1 2 3 4 onLoad : function (setStorageSync ('age' , 20 ) setStorageSync ('age' , 21 ) # 重新赋值即可
1.5页面参数传递 参数传递
index.js
1 2 3 4 5 bindViewTap : function (navigateTo ({url : '../logs/logs?name="user1"&age=20'
参数获取
1 2 3 4 5 onLoad : function (options ) {var name = options.name var age = options.age console .log (name,age)
多个参数的传递
1 2 3 4 5 6 7 8 9 bindViewTap : function (var users = [name :"user1" ,age :20 },name :"user2" ,age :21 }navigateTo ({url : '../logs/logs?users=' +JSON .stringify (users) # json字符串
多个参数的获取
1 2 3 4 onLoad : function (options ) {var users = JSON .parse (options.users ) # 解析成js对象console .log (users[0 ])
1.6数组遍历 数组遍历
1 2 3 data : {num :[1 ,2 ,3 ,4 ,5 ,6 ]
index.wxml
循环中,默认的下标名称是index,默认的值的名称是item。如果想要修改循环列表的值和下标的名称,那么可以通过wx:for-index和wx:for-item来指定。示例代码如下:
1 <view wx:for ="{{num}}" wx:for-item ="item" wx:for-index ="numIndex" > {{item}}-{{numIndex}}</view >
对象遍历
1 2 3 4 5 6 data : {user1 :{"name" :"小明" ,"age" :20
1 <view wx:for ="{{user1}}" wx:for-item ="value" wx:for-index ="key" > {{key}}-{{value}}</view >
1.7顶部导航栏样式 全局设置,对所有页面都生效
app.js
1 2 3 4 5 "window" :{"navigationBarBackgroundColor" : "#fff666" , # 背景颜色"navigationBarTitleText" : "Weixin" , # 文字"navigationBarTextStyle" :"black" # 文字颜色
单独修改某个页面,如index.js,会覆盖全局样式
1 2 3 {"navigationBarTitleText" : "首页"
自定义顶部导航栏
1 2 3 {"navigationStyle" : "custom"
1.8js与wxml的数据交互 index.wxml
1 <view wx:for ="{{num}}" data-index ="{{index}}" bindtap ="onclick" > {{item}}</view >
index.js
1 2 3 4 5 6 7 8 data : {num :[1 ,2 ,3 ]onclick :function (e ){var index = e.currentTarget .dataset .index console .log (index)
1.9标签元素的显示与隐藏 方法一
index.wxml
1 <view wx:if ="{{isShow}}" > 微信小程序</view >
index.js
1 2 3 data : {isShow :true
方法二
index.wxml
1 <view style ='display:{{style}}' > 微信小程序</view >
index.js
1 2 3 data : {style :"none"
隔行换色效果
1 2 3 4 <view wx:for ="{{num}}" data-index ="{{index}}" bindtap ="onclick" > <text wx:if ="{{index%2==0}}" style ='color:red' > {{item}}</text > <text wx:else > {{item}}</text > </view >
三目运算符的使用
1 2 3 <view wx:for ="{{num}}" data-index ="{{index}}" bindtap ="onclick" > <text style ="color:{{index%2==0 ? 'red':'blue'}}" > {{item}}</text > </view >
1.10小程序页面跳转 跳转到某个页面
1 2 3 4 5 6 bindViewTap : function (navigateTo ({url : '../logs/logs'
跳转到底部导航栏页面
1 2 3 4 5 bindViewTap : function (switchTab ({url : '../my/my'
返回上一个页面
1 2 3 bindViewTap : function (navigateBack ()
1.11数据渲染 index.js
1 2 3 4 5 6 7 data : {num :[1 ,2 ,3 ],person :{"name" :"user1" ,"age" :20
index.wxml
1 2 3 <view > {{person.name}}</view > <view > {{person.age}}</view > <view > {{num[0]}}</view >
1.12block渲染多个标签 index.wxml
1 2 3 4 5 6 7 <block wx:if ="{{isShow}}" > <view > {{person.name}}</view > <view > {{person.age}}</view > <view > {{num[0]}}</view > </block >
1.13wx:key的作用 1、提高渲染性能,当数据改变触发渲染层重新渲染的时候,会校正带有 key 的组件,框架会确保他们被重新排序,而不是重新创建,因为如果不使用,那么以后重新渲染的时候,就会把之前组件销毁掉,然后重新创建,性能会很低。
2、如果列表中项目的位置会动态改变或者有新的项目添加到列表中,并且希望列表中的项目保持自己的特征和状
态(如 switch 标签的选中状态),需要使用 wx:key 来指定列表中项目的唯一的标识符。
示例代码如下:
index.wxml
1 2 3 4 5 6 7 <view wx:for ="{{lines}}" wx:key ="id" > <switch > {{item.name}}</switch > </view > <button bindtap ="tapEvent" > 更新</button >
index.js
1 2 3 4 5 6 7 8 9 10 11 12 13 14 15 16 17 18 19 20 21 22 23 24 25 26 27 28 29 30 31 32 33 34 data : {lines : ["id" : 1 ,"name" : 'switch1' "id" : 2 ,"name" : 'switch2' "id" : 3 ,"name" : 'switch3' "id" : 4 ,"name" : 'switch4' tapEvent : function (event ){var lines = this .data .lines ;splice (0 ,0 ,{id : 5 ,name : 'switch5' this .setData ({lines : lines
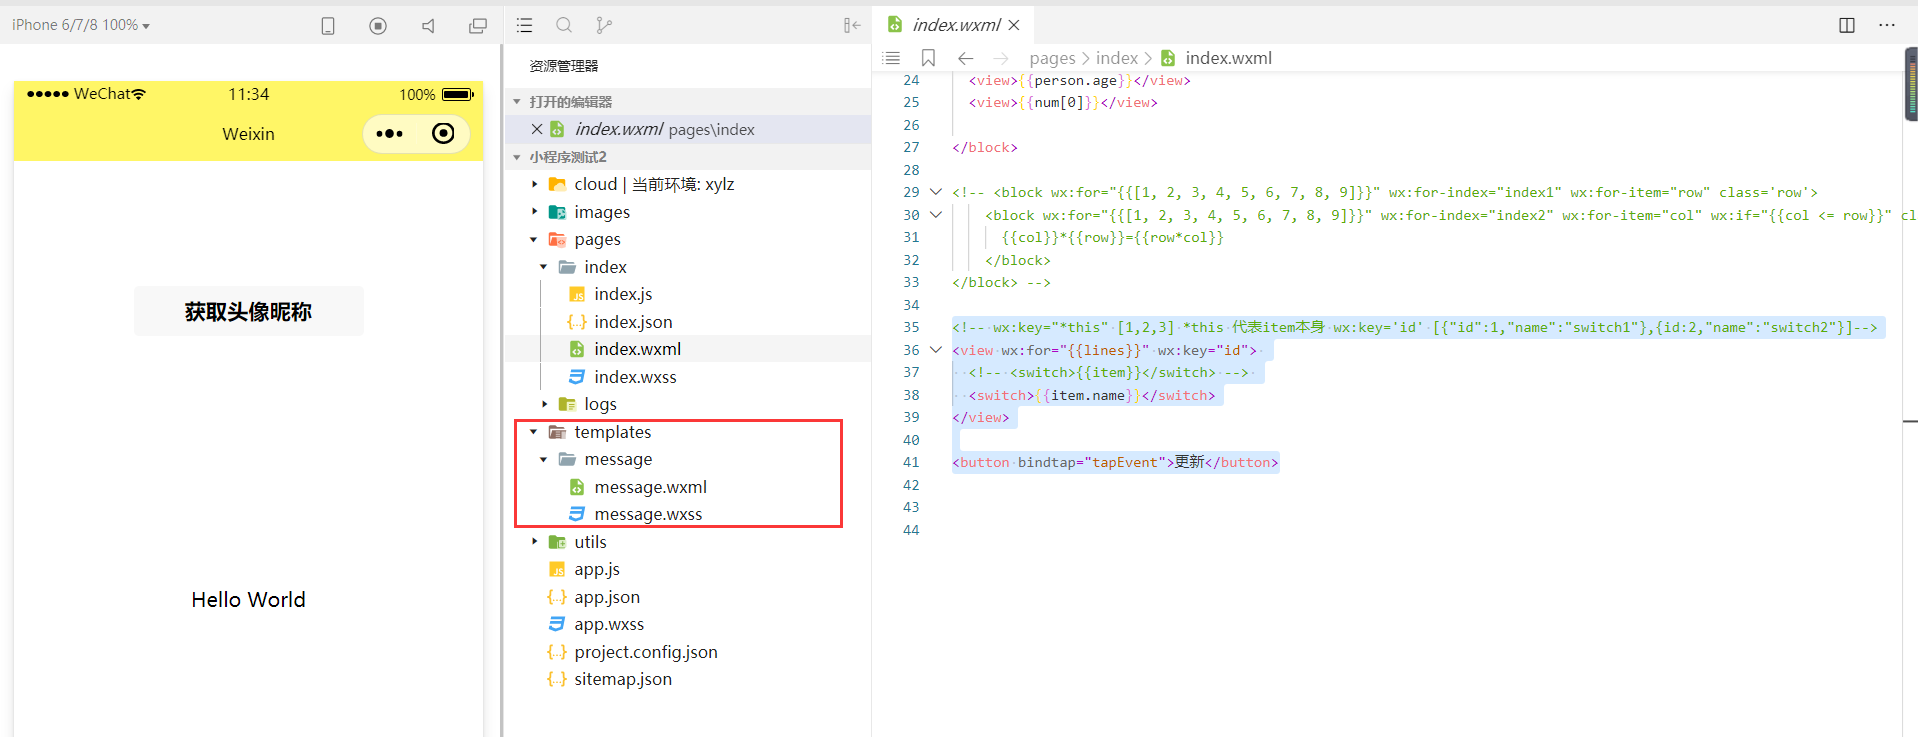
1.14wxml模板引用 1、在pages同级目录下创建一个目录templates用于定义模板
1、模板的定义
message.wxml
1 2 3 4 5 6 7 <template name ='message' > <view class ='message-group' > <text class ='content' > {{content}}</text > <text class ='friend' > {{friend}}</text > <text class ='time' > {{time}}</text > </view > </template >
message.wxss
1 2 3 4 5 6 7 8 9 10 11 12 13 14 15 16 .message-group {height : 60px ;line-height : 60px ;padding : 10px ;border-bottom : 1px solid #e4e4e4 ;.message-group .content {float : left;.message-group .friend {float :right ;font-size : 12px ;color : burlywood;
2、模板的引用
index.wxml
1 2 3 4 5 6 7 8 <import src ="../../templates/message/message.wxml" /> <template is ="message" wx:for ="{{messages}}" data ="{{content:item.content,friend:item.friend}}" > </template > <template is ="message" wx:for ="{{messages}}" data ="{{...item}}" > </template >
index.js
1 2 3 4 5 6 7 8 9 10 11 12 data :{messages : [content : '今天晚上我们一起去唱歌吧!' ,friend : '周杰伦' content : '今天晚上给我你做十二道锋味!' ,friend : '谢霆锋'
index.wxss
1 @import "../../templates/message/message.wxss" ;
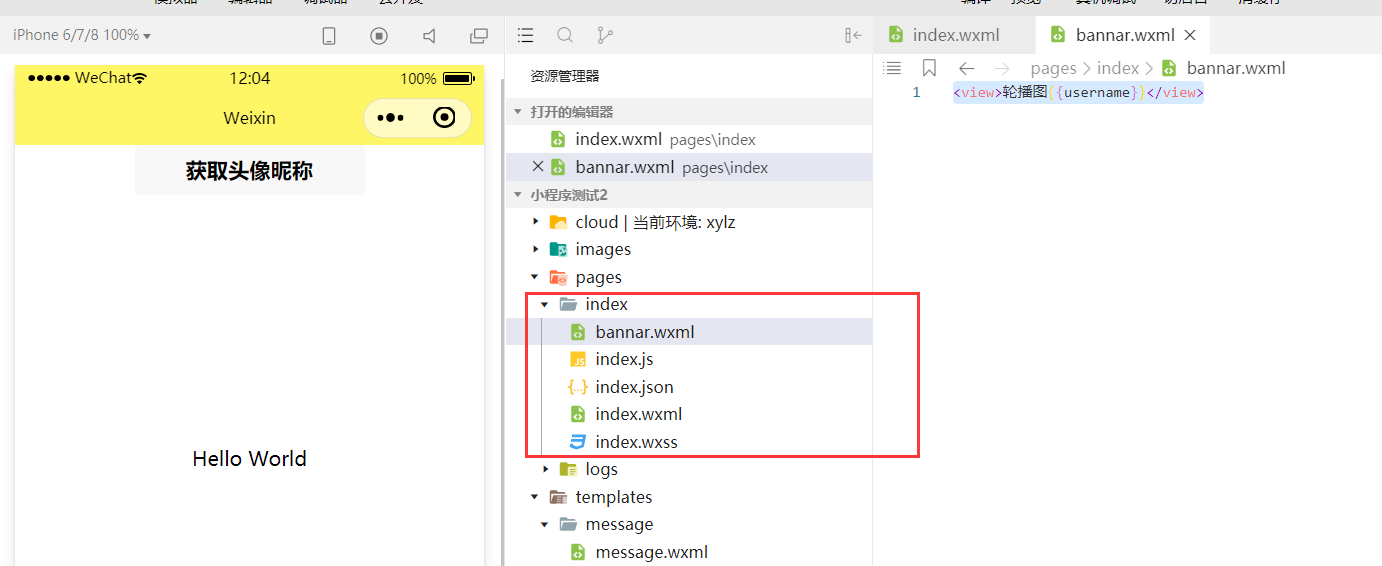
include模板引用
include 相当于ctl + c,然后 ctl + v引用模板
index.wml
1 <include src ="bannar.wxml" />
bannar.wxml
1 <view > 轮播图{{username}}</view >
index.js
1 2 3 data :{username :"user1"
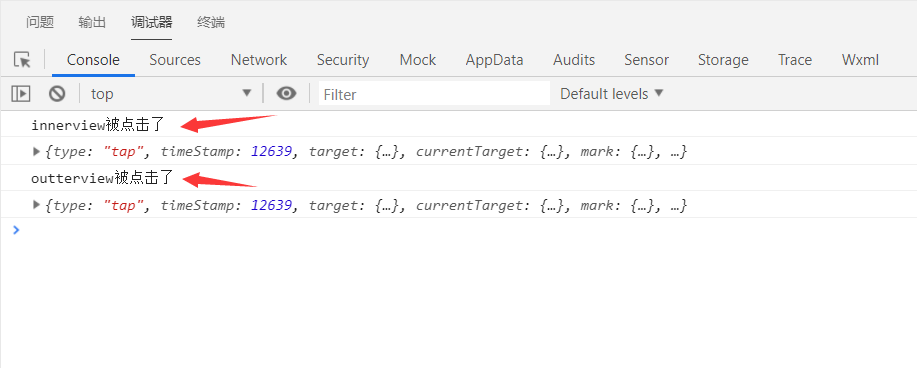
1.15事件的冒泡和阻止 事件的冒泡
index.wxml
1 2 3 <view id ='outter' class ='outterview' bind:tap ="onOutterViewClick" data-id ="xx" > <view id ='inner' class ='innerview' bind:tap ="onInnerViewClick" > </view > </view >
index.wxss
1 2 3 4 5 6 7 8 9 10 11 .outterview {background : pink;width : 200px ;height : 200px ;.innerview {background : blue;width : 100px ;height : 100px ;
index.js
1 2 3 4 5 6 7 8 9 10 11 12 13 14 15 onOutterViewClick : function (event ){console .log ("outterview被点击了" );console .log (event);onInnerViewClick : function (event ){console .log ("innerview被点击了" );console .log (event);
结果如下
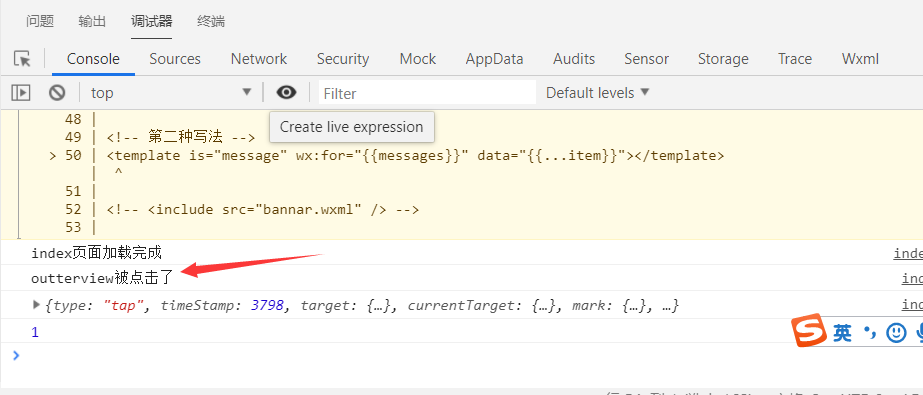
事件冒泡的阻止
1 2 3 <view id='outter' class ='outterview' bind :tap="onOutterViewClick" data-id="xx" ><view id ='inner' class ='innerview' bind:catch ="onInnerViewClick" > </view >
效果如下:
1.16小程序样式布局 当设置宽度为100%之后,设值padding会无效,示例代码如下:
index.wxml
1 2 3 4 5 6 7 8 9 10 11 12 <view class ='news-group' > <view class ='info-group' > <view class ='title' > 外卖行业首先会员通,餐饮新零售升级!</view > <view class ='more-group' > <text class ='author' > 范卓君</text > <text class ='time' > 10月24日</text > </view > </view > <view class ='thumbnail-group' > <image class ='thumbnail' src ='https://static-image.xfz.cn/1540350506_257.jpg-website.news.list' > </image > </view > </view >
index.wxss
1 2 3 4 5 6 7 8 9 10 11 12 13 14 15 16 17 18 19 20 21 22 23 .news-group {height : 200 rpx;border-bottom : 1px solid #e4e4e4 ;padding : 30 rpx 20 rpx;.news-group .info-group {float : left;width : 470 rpx;.news-group .thumbnail-group {width : 200 rpx;height : 140 rpx;float : right;.thumbnail-group .thumbnail {width : 100% ;height : 100% ;
解决办法:设置box-sizing:border-box这是因为box-sizing设置的属性是border-box,这会将border和padding算到width之内
Flex布局
水平方向:
1 justify-content : space-between;
垂直方向:
修改水平主轴方向子元素的排列方式
1 flex-direction :row-reverse;
修改水平主轴的方向
垂直方向均匀排布设置代码如下:
1 2 flex-direction :column;justify-content : space-evenly;
换行
水平方向元素排列不下的时候换行
多行
1 align-content : flex-start;
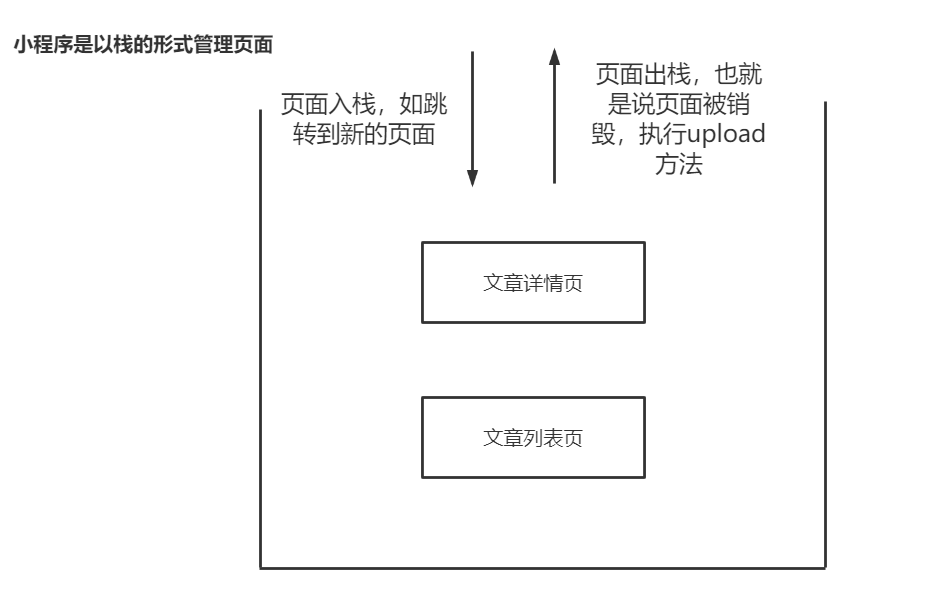
1.17小程序的页面栈管理
获取当前页面的栈信息,示例代码如下:
1
2
3
4
onLoad : function (options ) {var pages = getCurrentPages ();console .log (pages);
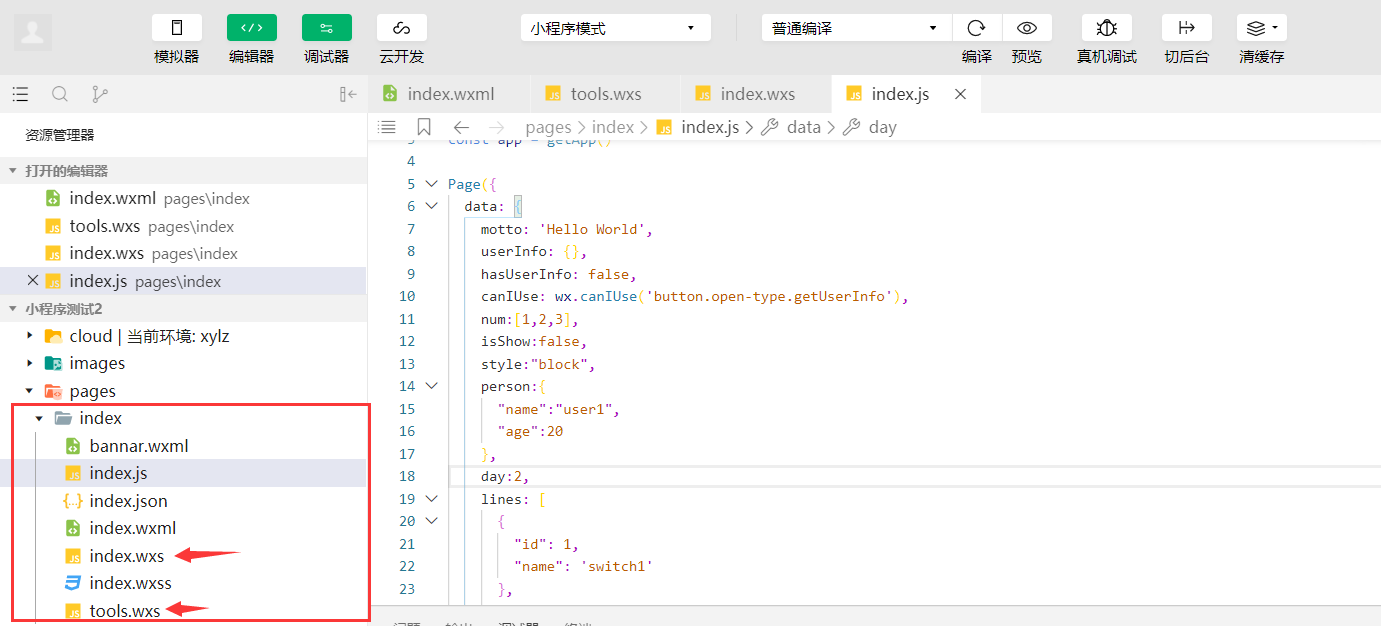
1.18wxs语法 什么是wxs,其实就是wx + javascript s指的是:script,类似于在网页开发在html文档写一段js代码
示例代码如下:
index.wxml
1 2 3 4 5 6 7 8 9 10 11 12 13 14 15 16 17 18 19 20 21 22 23 24 25 26 27 28 29 30 31 32 33 34 <wxs module ="m" > </wxs > <view > {{m.getWeekDay(day)}}</view >
index.js
外部引用wxs文件
index.wxs
1 2 3 4 5 6 7 8 9 10 11 12 13 14 15 16 17 18 19 20 21 22 23 24 25 26 27 28 29 30 var getWeekDay = function (day ) {var weekday = "" ;switch (day) {case 1 :'星期一' ;break ;case 2 :'星期二' ;break ;case 3 :'星期三' ;break ;case 4 :'星期四' ;break ;case 5 :'星期五' ;break ;case 6 :'星期六' ;break ;case 7 :'星期天' ;break ;default :'错误的日期' ;return weekday;module .exports .getWeekDay = getWeekDay;
index.wxml
1 2 <wxs src ="index.wxs" module ="m" /> <view > {{m.getWeekDay(day)}}</view >
在一个wxs文件引用另一个wxs文件,示例代码如下:
tools.wxs
1 2 3 var weekdays = [ '星期一' , '星期二' , '星期三' , '星期四' , '星期五' , '星期六' , '星期天' ] .exports .weekdays = weekdays;
index.wxs
1 2 3 4 5 6 7 8 9 10 11 12 13 14 var tools = require ("tools.wxs" );var getWeekDay = function (day ) {var weekdays = tools.weekdays ;if (day < 1 || day > 7 ){return "错误的日期" ;else {return weekdays[day-1 ]return weekday;module .exports .getWeekDay = getWeekDay;
1.19获取手机设备信息 index.js
1 2 3 var systemInfo = wx.getSystemInfoSync ();var windowHeight = systemInfo.windowHeight ;var windowWidth = systemInfo.windowWidth ;
二、小程序配置以及常用组件 app.json
1 2 3 4 5 6 7 8 9 10 11 12 13 14 15 16 17 18 19 20 21 22 23 24 25 26 27 28 29 30 31 32 33 34 35 36 37 { "pages" : [ "pages/index/index" , "pages/course/course" ] , "window" : { "backgroundTextStyle" : "dark" , "navigationBarBackgroundColor" : "#ccc" , "navigationBarTitleText" : "首页" , "navigationBarTextStyle" : "black" , "navigationStyle" : "default" , "backgroundColor" : "pink" , "enablePullDownRefresh" : true } , "tabBar" : { "color" : "#8a8a8a" , "selectedColor" : "#1AAD16" , "backgroundColor" : "#fff" , "borderStyle" : "white" , "position" : "top" , "list" : [ { "pagePath" : "pages/index/index" , "text" : "微信" , "iconPath" : "images/tabbar/tabbar1.png" , "selectedIconPath" : "images/tabbar/tabbar1_selected.png" } , { "pagePath" : "pages/course/course" , "text" : "通讯录" , "iconPath" : "images/tabbar/tabbar2.png" , "selectedIconPath" : "images/tabbar/tabbar2_selected.png" } ] } , "debug" : false }
横向滚动,示例代码如下
index.wxml
1 2 3 4 5 6 7 <scroll-view class ='scroll-view' scroll-x > <view class ='scroll-item bg_red' > </view > <view class ='scroll-item bg_blue' > </view > <view class ='scroll-item bg_green' > </view > <view class ='scroll-item bg_yellow' > </view > <view class ='scroll-item bg_red' > </view > </scroll-view >
index.wxss
1 2 3 4 5 6 7 8 9 10 11 12 13 14 15 16 17 18 19 20 21 22 23 24 25 26 27 28 29 30 31 .scroll-view {width : 100% ;height : 100px ;white-space : nowrap;.scroll-view .scroll-item {display : inline-block;width : 100px ;height : 100px ;.bg_red {background : red;.bg_yellow {background : yellow;.bg_blue {background : blue;.bg_pink {background : pink;.bg_gray {background : gray;
竖向滚动,示例代码如下:
index.wxml
1 2 3 4 5 6 <scroll-view class ='scroll-view-y' scroll-y > <view class ='scroll-item-y bg_red' > </view > <view class ='scroll-item-y bg_yellow' > </view > <view class ='scroll-item-y bg_blue' > </view > <view class ='scroll-item-y bg_pink' > </view > </scroll-view >
index.css
1 2 3 4 5 6 7 8 9 10 11 12 13 14 15 16 17 18 19 20 21 22 23 24 25 26 27 28 29 30 .scroll-view-y {width : 100% ;height : 100px ;background : gray;.scroll-view-y .scroll-item-y {width : 100% ;height : 50px ;.bg_red {background : red;.bg_yellow {background : yellow;.bg_blue {background : blue;.bg_pink {background : pink;.bg_gray {background : gray;
1.2swiper组件 index.wxml
1 2 3 4 5 6 7 8 9 10 11 12 13 14 <swiper class ='swiper' autoplay indicator-dots indicator-color ='#fff' indicator-active-color ='red' style ='width:{{width*2}}rpx;height:{{height*2}}rpx;' interval ="3000" duration ="100" circular > <swiper-item > <image src ='../../images/1.jpg' > </image > </swiper-item > <swiper-item item-id ="second" > <image src ='../../images/2.jpg' > </image > </swiper-item > <swiper-item > <image src ='../../images/3.jpg' > </image > </swiper-item > <swiper-item > <image src ='../../images/4.jpg' > </image > </swiper-item > </swiper >
index.wxss
1 2 3 4 .swiper image{width : 100% ;height : 100% ;
index.js
1 2 3 4 5 6 7 8 9 onload :function (var systemInfo = wx.getSystemInfoSync ();var width = systemInfo.windowWidth ;var height = width/4 ;this .setData ({width : width,height : height
1.3icon组件 index.wxml
1 2 3 4 5 6 7 8 9 <icon type ="success" size ="100px" color ="red" > </icon > <icon type ="success_no_circle" size ='100' > </icon > <icon type ="info" size ="100" > </icon > <icon type ="warn" size ="100" > </icon > <icon type ="waiting" size ="100" > </icon > <icon type ="cancel" size ="100" > </icon > <icon type ="download" size ="100" > </icon > <icon type ="search" size ="100" > </icon > <icon type ="clear" size ="100" > </icon >
1.4text组件 1 <text selectable > Hello World</text >
index.wxss
1 2 3 4 5 6 7 8 9 10 11 12 <form bindsubmit ='onSubmitEvent' > <view > <input name ="username" placeholder ='请输入用户名' > </input > </view > <view > <input name ='password' password placeholder ='请输入密码' > </input > </view > <button form-type ='submit' type ='primary' > 登录</button > <button form-type ='reset' > 清除</button > </form >
index.js
1 2 3 4 5 onSubmitEvent : function (event ){var value = event.detail .value ;var username = value.username ;var password = value.password ;
1.6自定义组件 1.1创建组件 1、自定义一个components文件夹,用来存放所有自定义的组件。
2、再针对每一个组件创建一个文件夹,用来存放这个组件相关的文件。比如mybox这个组件,那么可以创建一个mybox的一个文件夹。
3、在指定组件的文件夹中右键->新建Component创建组件。这样创建的目的是在json文件中添加"component": true,将其申明为一个组件。
mybox.wxml
1 2 3 <view class ="outter" > <view class ="inner" > inner</view > </view >
1.2组件的引用 1、在需要使用自定义组件的页面的
json文件中注册组件。示例如下代码:
1 2 3 4 5 { "usingComponents" : { "mybox" : "/components/mybox/mybox" } }
2、然后在wxml模板文件中使用组件:
1.3自定义组件添加属性 1、在组件的js文件中,在properties中添加属性,添加属性的时候,需要指定两个值,一个是type,代表的是这个属性的类型,一个是value,代表的是这个属性的默认值。示例代码如下:
1 2 3 4 5 6 7 8 9 10 11 12 13 14 15 16 17 18 19 20 21 22 23 24 25 26 27 28 29 30 31 32 Component ({properties : {innerText : {type : String ,value : "" outterSize : {type : Number ,value : 200 data : {outterText : "组件内的文本" methods : {
mybox.wxml
1 2 3 4 5 <view class="outter" style='width :{{outterSize}}px;height :{{outterSize}}px'>
mybox.wxss
1 2 3 4 5 6 7 8 9 10 11 .outter{
3、在使用组件的时候,可以直接在组件上给这个属性设置值:
1 <mybox innerText ="内部盒子" outterSize ="400" outterText ="abc" > </mybox >
1.4自定义组件添加节点 在使用小程序内置的组件的时候,比如view,我们还可以在view中添加其他的组件。这个功能可以通过slot节点来实现(先挖一个坑占位)。示例代码如下:
1 2 3 4 <view class ="outter" > <view wx:if ="{{showInner}}" class ="inner" > 知了课堂</view > <slot > </slot > </view >
以后在使用这个组件的时候,还可以添加自己的节点。示例代码如下:
1 2 3 <mybox showInner ="true" > <view > 占位内容</view > </mybox >
以上是添加一个slot,如果想要添加多个slot,那么需要在js文件中添加一个multipleSlots属性,示例代码如下:
1 2 3 4 5 Component ({options : {multipleSlots : true
然后在wxml文件中,需要给每一个slot都指定name。示例代码如下:
1 2 3 4 5 <view class ="outter" > <slot name ="before" > </slot > <view wx:if ="{{showInner}}" class ="inner" > 知了课堂</view > <slot name ="after" > </slot > </view >
最后在使用这个组件的时候,也需要指定放在那个slot中。示例代码如下:
1 2 3 4 <mybox showInner ="true" > <view slot ="before" > 这是before的组件</view > <view slot ="after" > 这是after的组件</view > </mybox >
1.5自定义组件事件监听 mybox.wxml
1 2 3 4 5 6 7 8 9 10 11 <view class ="container" > <view class ="header" > 这是header部分</view > <view class ="body" > <view class ="left-group" bindtap ='onBodyTapEvent' data-index ="0" > <slot name ="left" > </slot > </view > <view class ="right-group" bindtap ='onBodyTapEvent' data-index ="1" > <slot name ="right" > </slot > </view > </view > </view >
mybox.wxss
1 2 3 4 5 6 7 8 9 10 11 12 13 14 15 .body {width : 100% ;display : flex;.left-group {flex : 1 ;background : yellow;.right-group {flex : 1 ;background : blue;
mybox.js
1 2 3 4 5 6 7 8 9 10 11 12 13 14 15 16 17 18 19 20 21 22 23 24 25 26 27 28 29 30 31 32 Component ({options : {multipleSlots : true properties : {data : {outterText : "组件内的文本" methods : {onBodyTapEvent : function (event ){var index = event.target .dataset .index ;var detail = {"index" :index};var options = {};this .triggerEvent ("bodytap" ,detail,options);
index.wxml
1 2 3 4 <mybox bindtap ="onMyPageTapEvent" bindbodytap ="onMyPageBodyTapEvent" > <view slot ="left" > 这是左边的部分</view > <view slot ="right" > 这是右边的部分</view > </mybox >
index.js
1 2 3 4 5 6 7 8 9 10 11 12 13 14 15 16 17 18 19 20 21 22 const app = getApp ()Page ({data : {onLoad : function (onMyPageTapEvent : function (event ){console .log (event); onMyPageBodyTapEvent : function (event ){var index = event.detail .index ;console .log (index);
1.6自定义组件生命周期函数 1 2 3 4 5 6 7 8 9 10 11 12 13 14 15 16 17 18 19 20 21 22 23 24 25 26 27 methods : {onBodyTapEvent : function (event ){var index = event.target .dataset .index ;var detail = {"index" :index};var options = {};this .triggerEvent ("bodytap" ,detail,options);lifetimes : {created : function (console .log ("created被执行了~!" ); attached : function (console .log ("attached被执行了!" ); detached : function (console .log ("detached执行了~!" ); pageLifetimes : {show : function (console .log ("show 被执行了!" ); hide : function (console .log ("hide被执行了!" );
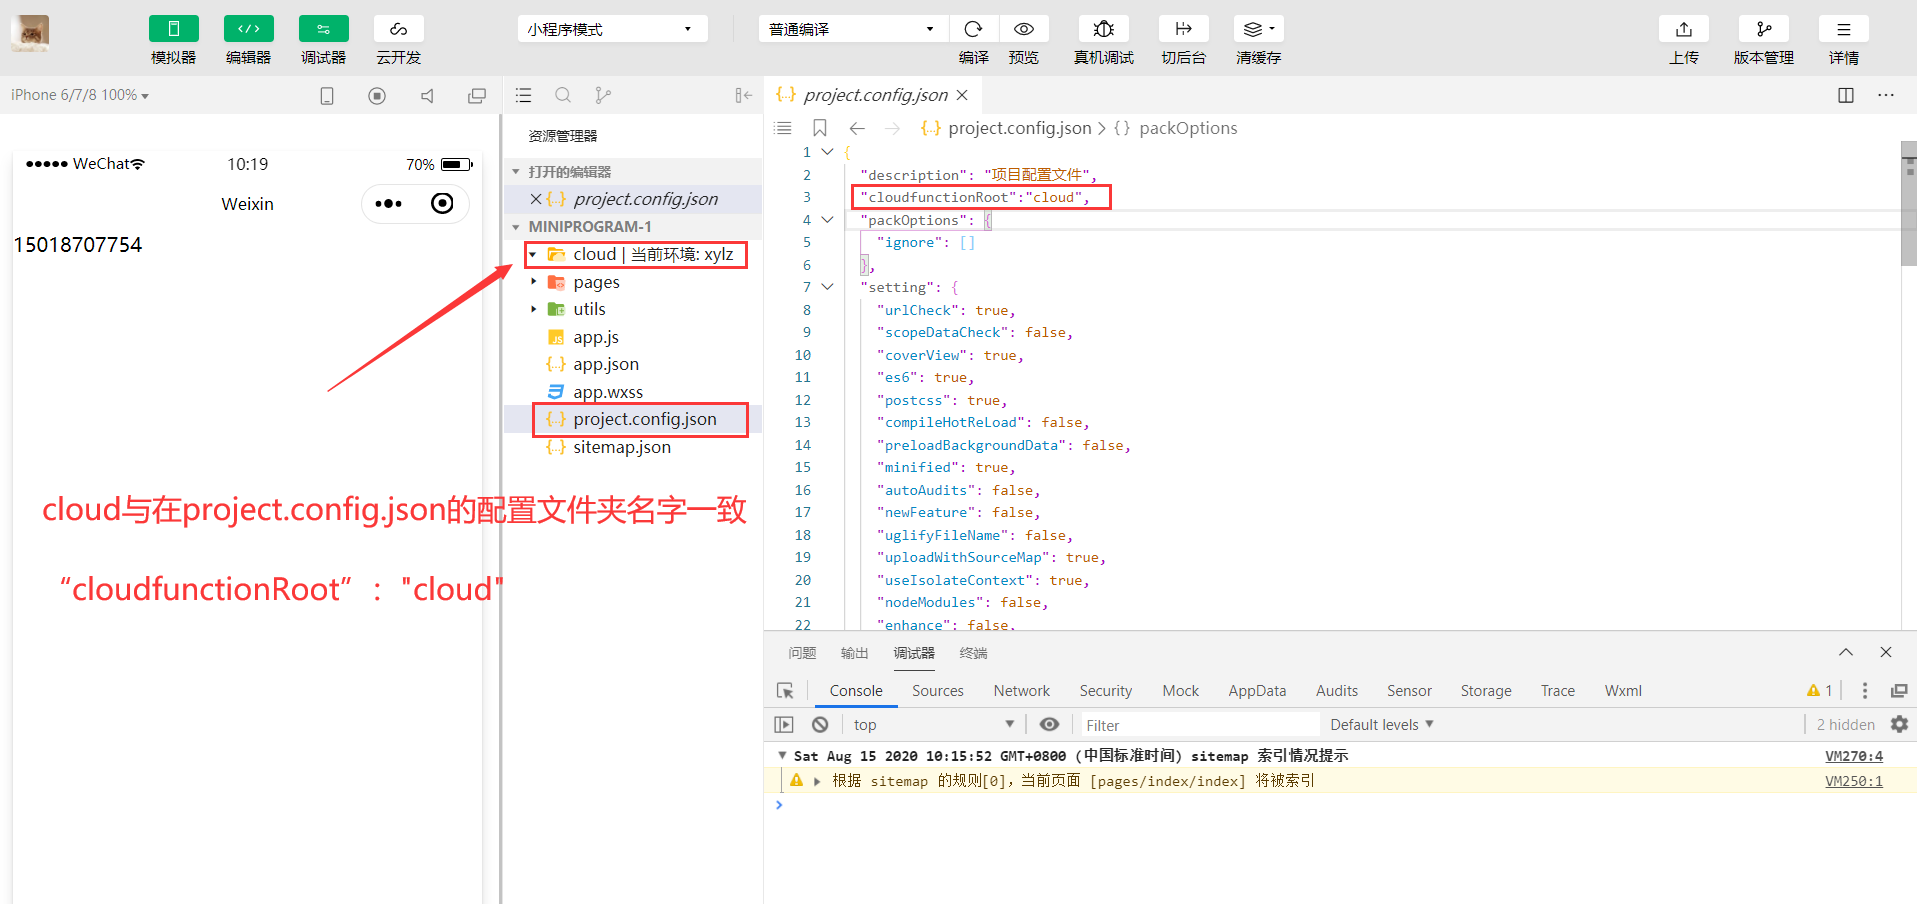
三、小程序云开发 1.1小程序云开发环境初始化 1、在project.config.json文件配置
1 "cloudfunctionRoot" :"cloud"
2、在根目录下新建一个cloud文件
3、在app.js中添加以下代码
1 2 3 4 5 6 7 8 9 10 App ({onLaunch : function (cloud .init ({env : "xylz-9nirz" ,traceUser : true
参数说明:
env : 小程序云开发环境ID
traceUser:是否在将用户访问记录到用户管理中,在控制台中可见。
1.2小程序操作数据库 1.1添加数据 1 2 3 4 5 6 7 8 9 10 11 12 13 14 const db = wx.cloud .database ();collection ("article" ).add ({data : {title : "learn cloud database" ,content : "very good!" success (res ){console .log ("添加数据成功" ,res)fail (res ){console .log ("添加数据失败" ,res)
1.2查询数据 1、获取所有数据
1 2 3 4 5 const db = wx.cloud .database ();collection ("article" ).get ().then (res =>console .log (res);
2、根据id获取数据
1 2 3 4 5 const db = wx.cloud .database ();collection ("article" ).doc ("article id" ).get ().then (res =>console .log (res)
3、根据条件获取数据
1 2 3 4 5 db.collection ("article" ).where ({title : "小程序操作数据库" get ().then (res =>console .log (res);
1.3删除数据 1、根据id删除数据
1 2 3 db.collection ("article" ).doc ("article id" ).remove ().then (res =>console .log (res);
1.4更新数据 1、根据id获取数据,更新某个字段
1 2 3 4 5 6 7 db.collection ("article" ).doc ("article id" ).update ({data : {title : "云开发数据库" then (res =>console .log (res);
2、根据id获取数据,更新多个字段
1 2 3 4 5 6 7 8 db.collection ("article" ).doc ("article id" ).set ({data : {author : "abc" ,content : "1111" then (res =>console .log (res);
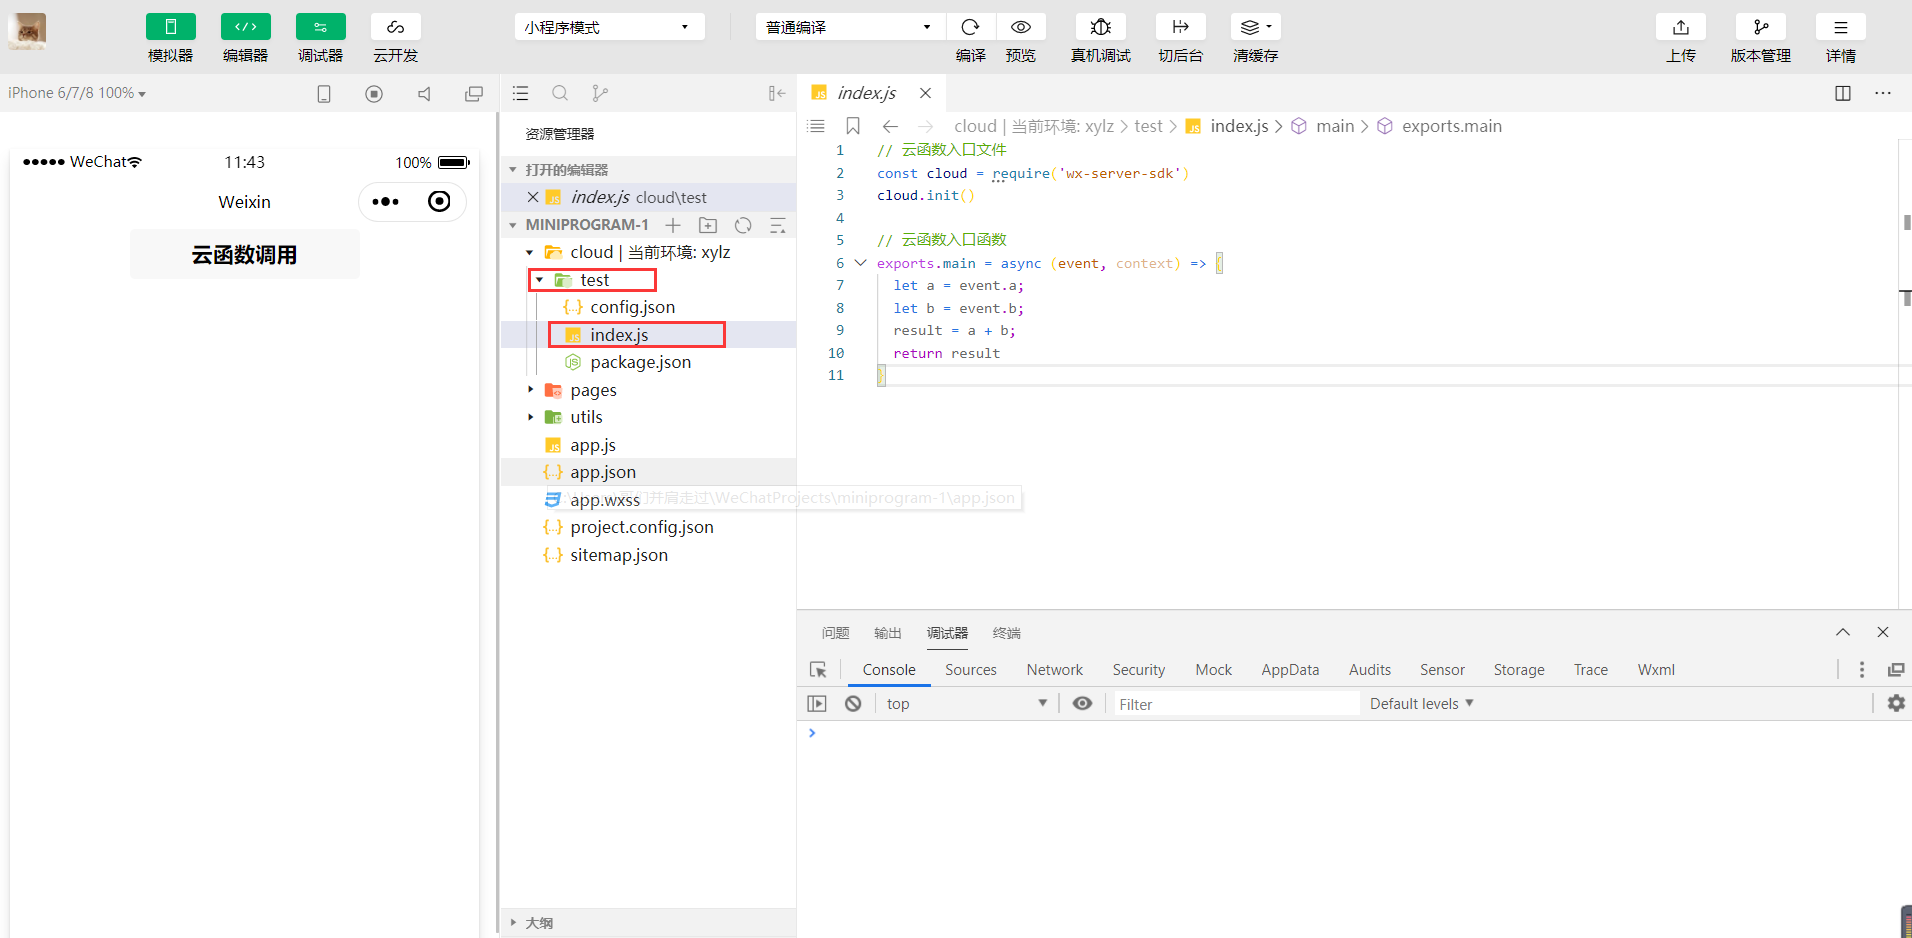
1.3云函数的创建 在cloud目录下创建一个云函数
在index.js文件夹下编写云函数
1 2 3 4 5 6 7 8 9 10 11 const cloud = require ('wx-server-sdk' )init ()exports .main = async (event, context) => {let a = event.a ;let b = event.b ;return result
云函数的调用如下:
1 2 3 4 5 6 7 8 9 10 11 12 13 wx.cloud .callFunction ({name :"test" ,data :{a :1 ,b :2 success (res ){console .log (res)fail (res ){console .log (res)
1.1获取用户openid openid :用户唯一标识
云函数的编写
1 2 3 4 5 6 7 8 9 10 const cloud = require ('wx-server-sdk' )init ()exports .main = async (event, context) => {const wxContext = cloud.getWXContext ()let openid = wxContext.OPENID ;return openid
1.2云函数操作数据库 云函数操作数据库,示例代码如下:
1 2 3 4 5 6 7 8 9 10 11 12 const cloud = require ('wx-server-sdk' )init ({env : "xylz-9nirz" ,traceUser : true const db = cloud.database () exports .main = async (event, context) => {return db.collection ("article" ).get ();
注意事项:const db = cloud.database()需要放在cloud.init之后,否则会报错。
1.3云函数批量添加、修改、删除数据 批量添加数据
小程序端
1 2 3 4 5 6 7 8 9 10 11 12 wx.cloud .callFunction ({name :"test" ,data :{users :[{name :"user1" ,age :20 },{name :"user2" ,age :22 }] # 两条记录success (res ){console .log (res)fail (res ){console .log (res)
云函数
1 2 3 4 5 6 7 8 9 10 11 12 13 14 15 16 17 18 19 20 21 22 23 24 const cloud = require ('wx-server-sdk' )init ({env : "xylz-9nirz" ,traceUser : true const db = cloud.database () exports .main = async (event, context) => {const wxContext = cloud.getWXContext ()var users = event.users var res = await db.collection ("test" ).add ({data : users # 参数传递形式 [{},{}]return {
批量更新数据
小程序端
1 2 3 4 5 6 7 8 9 wx.cloud .callFunction ({name :"test" ,success (res ){console .log (res)fail (res ){console .log (res)
云函数端
1 2 3 4 5 6 7 8 9 10 11 12 13 14 15 16 17 18 19 20 21 22 23 24 25 26 const cloud = require ('wx-server-sdk' )init ({env : "xylz-9nirz" ,traceUser : true const db = cloud.database () exports .main = async (event, context) => {const wxContext = cloud.getWXContext ()var res = await db.collection ("test" ).where ({age :22 update ({data :{age :28 return {
批量删除数据
1 2 3 4 5 6 7 8 9 10 11 12 13 14 15 16 17 18 19 20 21 22 23 const cloud = require ('wx-server-sdk' )init ({env : "xylz-9nirz" ,traceUser : true const db = cloud.database () exports .main = async (event, context) => {const wxContext = cloud.getWXContext ()var res = await db.collection ("test" ).where ({age :28 remove ()return {
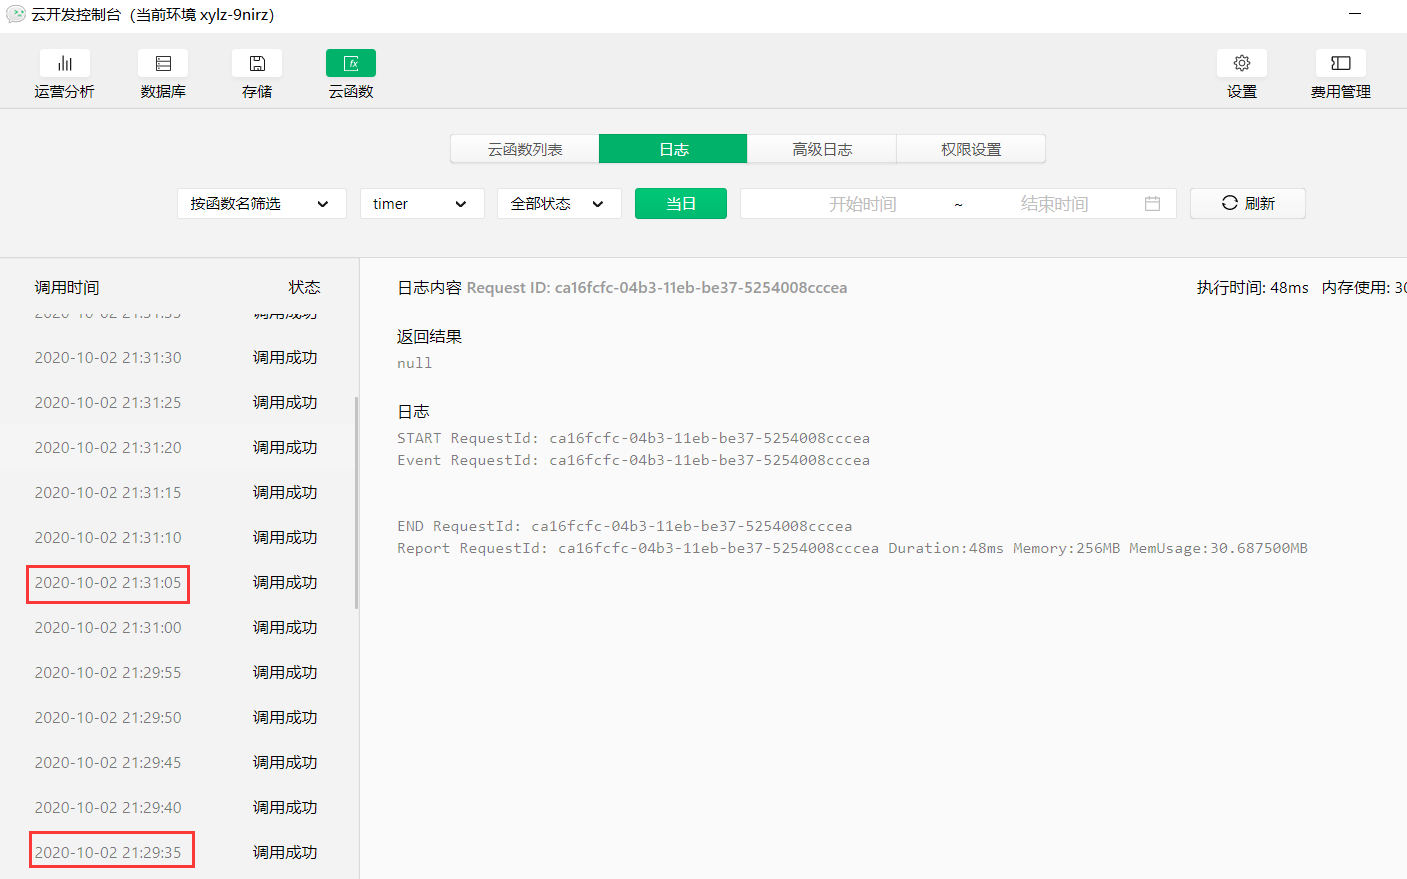
1.4云函数触发器(定时器) 触发器其实就是定时器
官方文档:https://developers.weixin.qq.com/miniprogram/dev/wxcloud/guide/functions/triggers.html
云函数业务逻辑
1 2 3 4 5 6 7 8 9 10 11 12 13 14 15 16 17 18 19 20 21 // 云函数入口文件
config.json触发器(定时器)
1 2 3 4 5 6 7 8 9 {"triggers" : ["name" : "myTrigger" ,"type" : "timer" ,"config" : "*/5 1/2 * * * * 2020" # 2020 年 每隔2 分钟执行一次,30 秒为一次间隔执行云函数 具体规则参考小程序官方文档
编写完触发器后需要上传到云服务器
云函数调用效果如下:
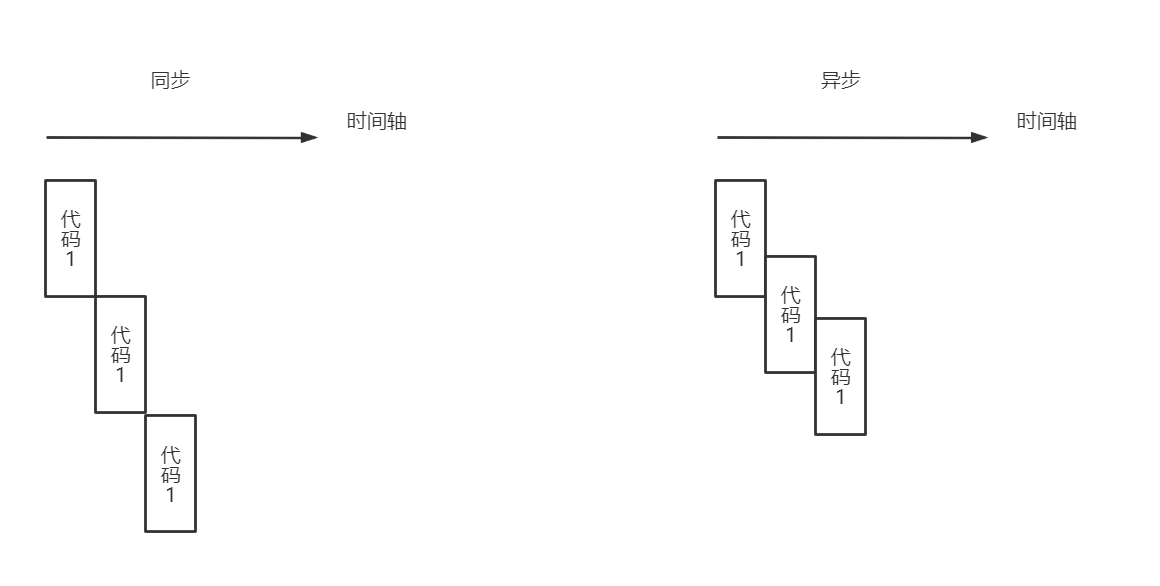
1.5程序的同步和异步
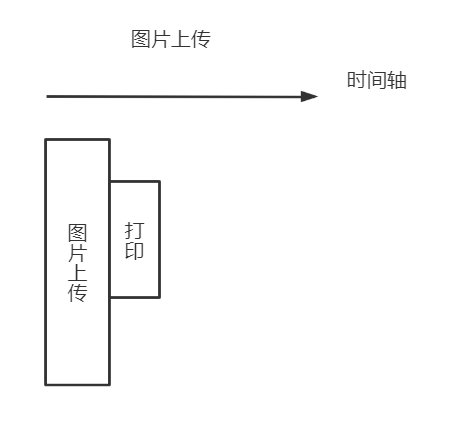
举个例子:图片上传
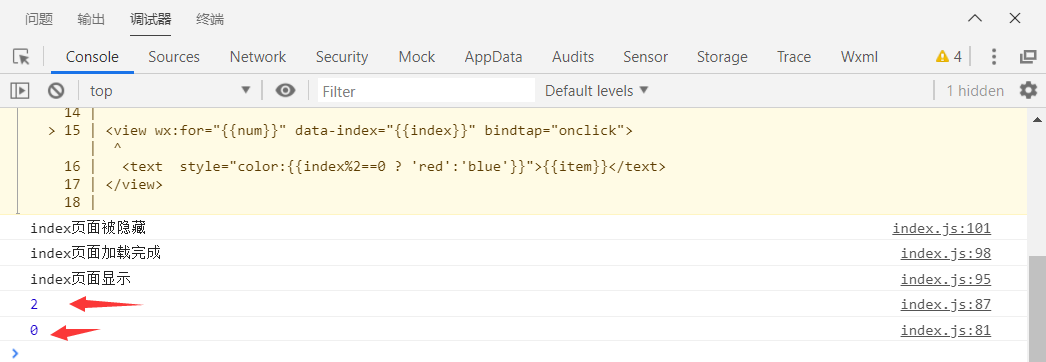
1 2 3 4 5 6 7 8 9 10 11 12 13 14 15 16 17 18 19 wx.chooseImage ({count : 1 ,sizeType : ['original' , 'compressed' ],sourceType : ['album' , 'camera' ],const tempFilePaths = res.tempFilePaths ; cloud .uploadFile ({cloudPath : 'example.png' , filePath : tempFilePaths[0 ], success : res =>console .log (0 ) fail : res =>console .log (1 ) console .log (2 )
打印结果如下:
先打印2,再打印1。因为上传图片wx.cloud.upload接口是异步的,图解如下
1.4小程序云存储 1.1图片上传 1、选择图片,获取图片临时路径
2、上传图片
示例代码如下:
1 2 3 4 5 6 7 8 9 10 11 12 13 14 15 16 17 18 wx.chooseImage ({count : 1 ,sizeType : ['original' , 'compressed' ],sourceType : ['album' , 'camera' ],const tempFilePaths = res.tempFilePaths ; cloud .uploadFile ({cloudPath : 'example.png' , filePath : tempFilePaths[0 ], success : res =>console .log (res)fail : res =>console .log (res)
1.2视频上传 1、选择视频,获取视频临时路径
2、上传视频
示例代码如下:
1 2 3 4 5 6 7 8 9 10 11 12 13 14 15 16 17 18 wx.chooseVideo ({sourceType : ['album' ,'camera' ],maxDuration : 60 , camera : 'back' , success (res ) {var tempFilePath = res.tempFilePath cloud .uploadFile ({cloudPath : "xx.mp4" , filePath : tempFilePath, success : res =>console .log (res)fail : res =>console .log (res)
1.3Word、Excel、PPT文档上传 1、选择文档,获取临时路径
2、上传文档
示例代码如下:
1 2 3 4 5 6 7 8 9 10 11 12 13 14 15 16 17 18 19 20 21 wx.chooseMessageFile({1 ,type : 'all' ,"xx.docx" , // 云存储保存路径0 ].path, // 视频临时路径
文档展示
1、下载文档
2、打开文档
1 2 3 4 5 6 7 8 9 10 11 12 13 wx.cloud .downloadFile ({fileID : 'cloud://xylz-9nirz.7879-xylz-9nirz-1259463966/xx.docx' then (res =>var tempFilePath = res.tempFilePath openDocument ({filePath : tempFilePath,success : function (res ) {console .log ('打开文档成功' )catch (error =>console .log (error)
四、小程序实际开发经验 1.1JS特效 1.1选项卡切换效果 index.wxml
1 2 3 4 5 6 7 8 9 10 11 12 13 14 15 16 17 18 19 20 21 22 23 24 25 26 27 28 <view class ="container" > <view class ="left" > <view class ="list" > <view bindtap ="selected" data-item ="{{item}}" wx:for ="{{leftList}}" wx:key ="index" class ="{{item.id==currentData.id? 'list-item-selected' :'list-item'}}" > {{item.name}}</view > </view > </view > <view class ="right" > <view class ="content" > <view class ="content-img" > <image src ="{{currentData.imgurl}}" > </image > </view > <view class ="content-text" > <view class ="content-text-title" > <text > 文本标题</text > </view > <view class ="content-text-main" > <text > 文本内容</text > </view > </view > </view > </view > </view >
index.css
1 2 3 4 5 6 7 8 9 10 11 12 13 14 15 16 17 18 19 20 21 22 23 24 25 26 27 28 29 30 31 32 33 34 35 36 37 38 39 40 41 42 43 44 45 46 47 48 49 50 51 52 53 54 55 56 57 58 59 60 61 62 63 64 65 66 67 68 69 70 71 72 73 74 75 76 77 78 79 80 81 82 83 84 85 86 87 88 89 90 91 92 93 94 95 96 97 98 99 100 101 102 103 104 105 106 107 page {background-color : #fafafa ;.container {width : 100% ;display : flex;flex-direction : row;.left {width : 26% ;background-color : #f7f7f7 ;.list {width : 95% ;background-color : #f7f7f7 ;.list-item {width : 100% ;height : 100 rpx;line-height : 100 rpx;text-align : center;background-color : #f7f7f7 ;color : #b3b3b3 ;font-size : 30 rpx;.list-item-selected {width : 100% ;height : 100 rpx;line-height : 100 rpx;text-align : center;background-color : rgb (231 , 111 , 59 );color : white;font-size : 30 rpx;.right {width : 74% ;height : auto;min-height : 300 rpx;display : flex;flex-direction : row;align-items : center;justify-content : center;.content {width : 95% ;height : auto;min-height : 400 rpx;border-radius : 15 rpx;margin-top : 10 rpx;background-color : #fcf6f5 ;display : flex;flex-direction : column;align-items : center;justify-content : center;.content-img {width : 100% ;height : 150 rpx;display : flex;flex-direction : column;align-items : center;justify-content : center;.content-img image {width : 129 rpx;height : 142 rpx;border-radius : 15 rpx;.content-text {width : 90% ;height : auto;min-height : 50 rpx;.content-text-title {width : 100% ;height : auto;min-height : 40 rpx;font-size : 30 rpx;color : #0f1012 ;font-weight :bold;padding-top : 20 rpx;padding-bottom : 20 rpx;.content-text-main {font-size : 28 rpx;
index.js
1 2 3 4 5 6 7 8 9 10 11 12 13 14 15 16 17 18 19 20 21 22 23 24 25 26 27 28 29 30 31 32 33 34 35 36 37 38 39 40 41 42 43 44 45 46 47 48 49 50 51 52 53 54 55 56 57 58 59 60 61 62 63 64 let dataList = [{id : 0 ,imgurl : '../../images/HouseholdfoodWaste.jpg' ,title :"标题1" ,content :"内容1" id : 1 ,imgurl : '../../images/RecycleableWaste.jpg' ,title :"标题2" ,content :"内容2" id : 2 ,imgurl : '../../images/HouseholdfoodWaste.jpg' ,title :"标题3" ,content :"内容3" id : 3 ,imgurl : '../../images/RecycleableWaste.jpg' ,title :"标题4" ,content :"内容4" Page ({data : {leftList : [{id : 0 ,name : '选项卡1' id : 1 ,name : '选项卡2' id : 2 ,name : '选项卡3' id : 3 ,name : '选项卡4' ,onLoad : function (options ) {this .setData ({currentData : dataList[0 ]selected (e ) {var id = e.currentTarget .dataset .item .id ;this .setData ({currentData : dataList[id]
1.2WXS时间格式化 index.wxml
1 2 <wxs src ="tools.wxs" module ="tools" /> <view > {{tools.timeFormat(time)}}</view >
index.js
1 2 3 4 5 6 7 8 9 10 11 12 13 14 15 16 17 18 19 20 onload :function (var date = new Date ();var Y = date.getFullYear (); var M = (date.getMonth () + 1 < 10 ? '0' + (date.getMonth () + 1 ) : date.getMonth () + 1 ); var D = date.getDate () < 10 ? '0' + date.getDate () : date.getDate ();var h = date.getHours (); var m = date.getMinutes (); var s = date.getSeconds ();var time = Y + "/" + M + "/" + D + " " + h + ":" + m + ":" + s; this .setData ({time : time
tools.wxs
1 2 3 4 5 6 7 8 9 10 11 12 13 14 15 16 17 18 19 20 21 22 23 24 25 26 27 28 29 30 31 32 33 var timeFormat = function (time ){var date = getDate (time); var date_seconds = date.getTime () / 1000 ;var now = getDate ();var now_seconds = now.getTime () / 1000 ;var timestamp = now_seconds - date_seconds;var timeStr = "" ;if (timestamp < 60 ){"刚刚" ;else if (timestamp >= 60 && timestamp < 60 *60 ){var minutes = parseInt (timestamp / 60 );"分钟前" ;else if (timestamp >= 60 *60 && timestamp < 60 *60 *24 ){var hours = parseInt (timestamp / 60 / 60 );"小时前" ;else if (timestamp >= 60 *60 *24 && timestamp < 60 *60 *24 *30 ){var days = parseInt (timestamp / 60 /60 /24 );"天前" ;else {var year = date.getFullYear ();var month = date.getMonth ();var day = date.getDate ();var hour = date.getHours ();var minute = date.getMinutes ();"/" + month + "/" + day + " " + hour + ":" + minute;return timeStr;module .exports = {timeFormat : timeFormat,weekdays : weekdays
1.3上拉加载更多数据 index.html
1 2 3 4 <view wx:for ="{{newses}}" class ='news' > {{item}}</view > <button wx:if ="{{hasMoreData}}" class ='loading' loading > 正在加载...</button > <button wx:else class ="loading" > 没有更多数据</button >
index.wxss
1 2 3 4 5 6 7 8 9 10 11 12 .loading {font-size : 14px ;color : #ccc ;.loading ::after {border : none;.news {padding : 20 rpx;
index.js
1 2 3 4 5 6 7 8 9 10 11 12 13 14 15 16 17 18 19 20 21 22 23 24 25 26 27 28 29 30 31 32 33 34 35 36 37 38 39 40 41 42 43 44 45 46 47 48 49 50 51 52 53 54 55 56 57 58 59 60 61 62 63 64 65 66 67 68 69 const app = getApp ()Page ({data : {sources : ['国务院发文支持自贸区深化改革创新 具有五项特点' ,'特朗普再替沙特辩护:卡舒吉之死可能是世界的错' ,'我国成功验证大型航天器回收技术 回收重量超7吨' ,'江苏落马副省长:执政风格霸道 被指是仇和影子' ,'茅台清查电商公司 业内:专卖店或是下步调整重点' ,'奥运冠军何姿买房被坑 法院判决退定金70万+赔160万' ,'足协未来或派审计机构入驻各队 俱乐部耍小聪明将受严厉处罚' ,'曼联新款特制球衣谍照爆出 野性与美感并存 博格巴这下开心了' ,'马拉松神童!中国9岁男孩3小时47分完赛 你能跑过他吗?' ,'英媒盘点穆帅在曼联的11笔引援 花费3.7亿却鲜有成功典型' ,'中超俱乐部要改中性名再次被提出 恒大上港可以改哪些队名?' ,'120+得分成为火箭“制胜密码”?达到场次胜率高达98.1%' ,'金球奖赔率魔笛大幅领先已无悬念 皇马名宿:今年非他莫属' ,'因伤缺席国家队 赵睿:不甘心 伤愈后争取再入选' ,'穆帅强硬回击卡西:嘴上说不对抗我 暗中没少搞事情' ,'索拉里转正后的三大挑战:逆袭巴萨 世俱杯三连冠' ,'iG副总裁藏马微博晒中奖信息 网友:iG夺冠的原因找到了!' ,'金英权下家曝光:已与大阪钢巴接触 恒大外援一下走仨?' ,'韩国羽毛球内讧继续再出黑料 羽协高管被曝挥霍+推卸责任' ,'里皮对国足哀莫大于心死?突然发布工资帽打击国脚状态' ,'谦逊的坎特终于有了缺点 遵纪守法的好公民却爱吃霸王餐' ,newses : [],hasMoreData : true onLoad : function (var that = this ;var sources = that.data .sources ;var newses = [];for (var index=0 ;index<10 ;index++){var news = sources[index];push (news);setData ({newses : newsesonReachBottom : function (var that = this ;var newses = that.data .newses ;var newsesLength = newses.length ;var sources = that.data .sources ;var sourcesLength = that.data .sources .length ;if (newsesLength === sourcesLength){setData ({hasMoreData : false return ;var start = newsesLength;var end = Math .min (start + 9 , sourcesLength - 1 );for (var index = start; index <= end; index++) {var news = sources[index];push (news);setData ({newses : newses
1.4云开发实现搜索功能实现 1 2 3 4 5 6 7 8 9 10 11 12 13 14 15 16 17 18 19 search (var key = this .data .key collection ('notice' ).where ({name : db.RegExp ({regexp : key,options : 'i' ,get ().then (res =>this .setData ({"messages" :res.data .reverse ()catch (err =>console .error (err)hideLoading ();
1.2小程序ColorUI框架 1.1ClorUI样式的引用 1、导入icon.wxss、main.css
2、在app.wxss配置
1 2 @import "main.wxss" ;@import "icon.wxss" ;
3、在app.js中初始化顶部导航栏高度和全局变量GlobalData
1 2 3 4 5 6 7 8 9 10 11 12 13 14 15 16 17 18 19 20 21 22 23 24 25 26 27 28 29 30 31 32 33 34 35 36 37 38 39 40 41 42 43 44 45 46 47 48 49 50 51 52 53 54 55 56 57 58 59 60 61 62 63 64 65 66 67 68 69 70 71 72 73 74 75 76 77 78 79 80 81 82 83 84 85 86 87 88 89 90 91 App ({onLaunch : function (getSystemInfo ({success : e =>this .globalData .StatusBar = e.statusBarHeight ;let custom = wx.getMenuButtonBoundingClientRect ();this .globalData .Custom = custom; this .globalData .CustomBar = custom.bottom + custom.top - e.statusBarHeight ;globalData : {ColorList : [{title : '嫣红' ,name : 'red' ,color : '#e54d42' title : '桔橙' ,name : 'orange' ,color : '#f37b1d' title : '明黄' ,name : 'yellow' ,color : '#fbbd08' title : '橄榄' ,name : 'olive' ,color : '#8dc63f' title : '森绿' ,name : 'green' ,color : '#39b54a' title : '天青' ,name : 'cyan' ,color : '#1cbbb4' title : '海蓝' ,name : 'blue' ,color : '#0081ff' title : '姹紫' ,name : 'purple' ,color : '#6739b6' title : '木槿' ,name : 'mauve' ,color : '#9c26b0' title : '桃粉' ,name : 'pink' ,color : '#e03997' title : '棕褐' ,name : 'brown' ,color : '#a5673f' title : '玄灰' ,name : 'grey' ,color : '#8799a3' title : '草灰' ,name : 'gray' ,color : '#aaaaaa' title : '墨黑' ,name : 'black' ,color : '#333333' title : '雅白' ,name : 'white' ,color : '#ffffff'
4、在pages同级目录下新建一个components文件用于存放自定义组件,导入顶部导航栏组件
5、在appj.json配置组件
1 2 3 4 5 6 7 8 { "window" : { "navigationStyle" : "custom" , } , "usingComponents" : { "cu-custom" : "/components/cu-custom" } , }