开发
1、项目经理
负责界面布局设计,以及页面的跳转逻辑
2、UI设计
负责页面的UI设计
3、编程开发
负责功能的实现
4、测试
负责产品测试
1.模块划分
用户模块
新闻模块
2.页面划分
登录注册页面
用户个人中心
新闻列表
新闻详情
3.组件开发
组件开发步骤
1.确定布局方式
2.考虑具体样式
标签
html
1
2
3
4
5
| <html lang="en">
</html>
lang: en/zh-CN
|
img
1
2
3
4
5
6
7
8
| <img src="" alt="" width="" height="" title="">
src: 图片路径
alt: 当图片加载失败时显示
width: 图片宽度
height: 图片高度
title: 当鼠标悬停在图片上显示
|
a
1
2
3
4
5
6
7
8
9
10
| <a href="" target=""></a>
<!-- 属性值 -->
href: 跳转地址
特殊值
# 回到顶部
javascript:; 阻止a标签的默认行为
target: 在新的标签页打开
target: _blank
|
a链接的应用场景-锚点
1
2
3
4
5
6
| <a href="#introduction">周杰伦简介</a>
网页其他内容
<h2 id="introduction">周杰伦简介</h2>
<p>
周杰伦(Jay Chou),1979年1月18日出生于台湾省新北市,祖籍福建省泉州市永春县,中国台湾流行乐男歌手、原创音乐人、演员、导演、编剧,毕业于淡江中学。
</p>
|
base
1
2
3
4
5
6
7
8
9
10
11
12
13
14
15
16
17
18
19
20
| <! DOCTYPE html>
<html>
<header>
<meta charset="UTF-8">
<title>网页学习</title>
<base href="https://pic.qiushibaike.com/" taget="_blank">
</header>
<body>
<a href="">
<img src="system/pictures/12426/124263521/medium/P7GKM06F5HR51RXQ.jpg" alt="123" id="img">
</a>
</body>
</html>
base: 配置全局链接地址
href: 链接地址
target: 在新的标签页中打开链接
|
div
span
1
2
3
| <span></span>
无具体语义: 着重展示文本元素
|
列表
描述一组相关数据
无序列表
1
2
3
4
5
6
7
8
| <ul type="">
<li>item1</li>
<li>item2</li>
<li>item3</li>
</ul>
type: square(方形)/circle(空心圆)/disc(实心圆)
|
有序列表
1
2
3
4
5
6
7
8
9
10
| <ol type="" start="10" reversed>
<li>item1</li>
<li>item2</li>
<li>item3</li>
</ol>
type: 1/a/A
start: 开始索引值
reversed: 逆序
|
自定义列表
1
2
3
4
5
6
| <dl>
<dt>爱好</dt>
<dd>item1</dd>
<dd>item2</dd>
<dd>item3</dd>
</dl>
|
表单
基本结构
1
2
3
4
5
6
7
8
9
| <form action="https://www.baidu.com/s" target="_blank">
<label>
请输入查询关键字: <input type="text" name="wd">
</label>
<input type="submit" value="检索">
</form>
|
1
2
3
4
5
6
7
8
9
10
11
12
13
14
15
16
17
| <form action="" enctype="">
<input type="" name="" maxlength="" minlength="" accept="" placeholder="" disabled autofocus required>
</form>
type: text/password/radio/checkbox/hidden/file/image/submit/reset/button
accept: 接受的文件类型(上传文件时使用) accept="image/gif, image/jpeg"
enctype: multipart/form-data(上传文件时必须携带的参数)
placeholder: 占位符
autofocus: 自动获取焦点
required: 必填字段
maxlength: 限制最大字符个数
minlength: 限制最小字符个数
image: 作用与submit相同, 先后台服务器提交数据
submit: 提交表单
reset: 重置表单
button: 结合js代发送网络请求
|
textarea
1
2
3
4
| <textarea name="" cols="" rows="" style="resize: none;"></textarea>
resize: 禁止拖拽内容文本框
|
下拉菜单
1
2
3
4
5
6
7
8
9
10
11
12
| <select name="place">
<optgroup label="广州">
<option>白云区</option>
<option>天河区</option>
</optgroup>
<optgroup label="揭阳">
<option>渔湖</option>
<option>炮台</option>
</optgroup>
</select>
name: 字段名
|
video
1
2
3
4
5
6
7
| <video src="" controls muted loop poster></video>
controls: 控制面板
muted: 禁音
loop: 循环播放
poster: 视频封面
|
audio
1
2
3
4
| <audio src="" controls></audio>
controls: 控制面板
|
表格
基本结构
1
2
3
4
5
6
7
8
9
10
11
12
13
14
15
16
17
18
19
20
21
22
23
| <table border="">
<caption>能源173班成绩统计</caption>
<tr align="">
<td valign="">11</td>
<td>12</td>
<td rowspan="">13</td>
</tr>
<tr>
<td>21</td>
<td>22</td>
</tr>
</table>
border: 表格边框
align: 水平对齐方式
valign: 垂直对齐方式
rowspan: 占据几行
|
字符实体
空格
大于号
小于号
CSS样式
选择器
标签选择器
类选择器
1
2
| .main {}
div.container {}
|
id选择器
关系选择器
子元素选择器
后代选择器(包括子元素)
联合选择器
伪类选择器
伪元素选择器
1
2
3
4
5
6
7
| <style>
span::before {
content: "$";
}
</style>
<span>100</span>
|
序选择器
1
2
3
4
5
6
7
| .box>p:first-child {}
<div class="box">
<p>1</p>
<p>2</p>
<p>3</p>
</div>
|
字体
1
2
3
4
5
6
7
8
9
10
| font-size: 字体大小
font-weight: 字体粗细
font-style: 字体是否倾斜
font-family: 选择字体
自定义字体
@font-face {
font-family: "";
src: ""
}
|
文本
1
2
3
4
| color: 文本颜色
text-decoration: 文本装饰
text-align: 文本对齐
line-height: 行高
|
背景
1
2
3
4
5
| bgckground-color: 背景颜色
bgckground-image: url() 背景图
bgckground-size: 100% auto 背景图片大小 宽/高
bgckground-repeat: 是否平铺
bgckground-position: 背景位置
|
鼠标
字体图标
阿里图片引用
网址:https://www.iconfont.cn/
方法一
1、选择图标,添加至项目
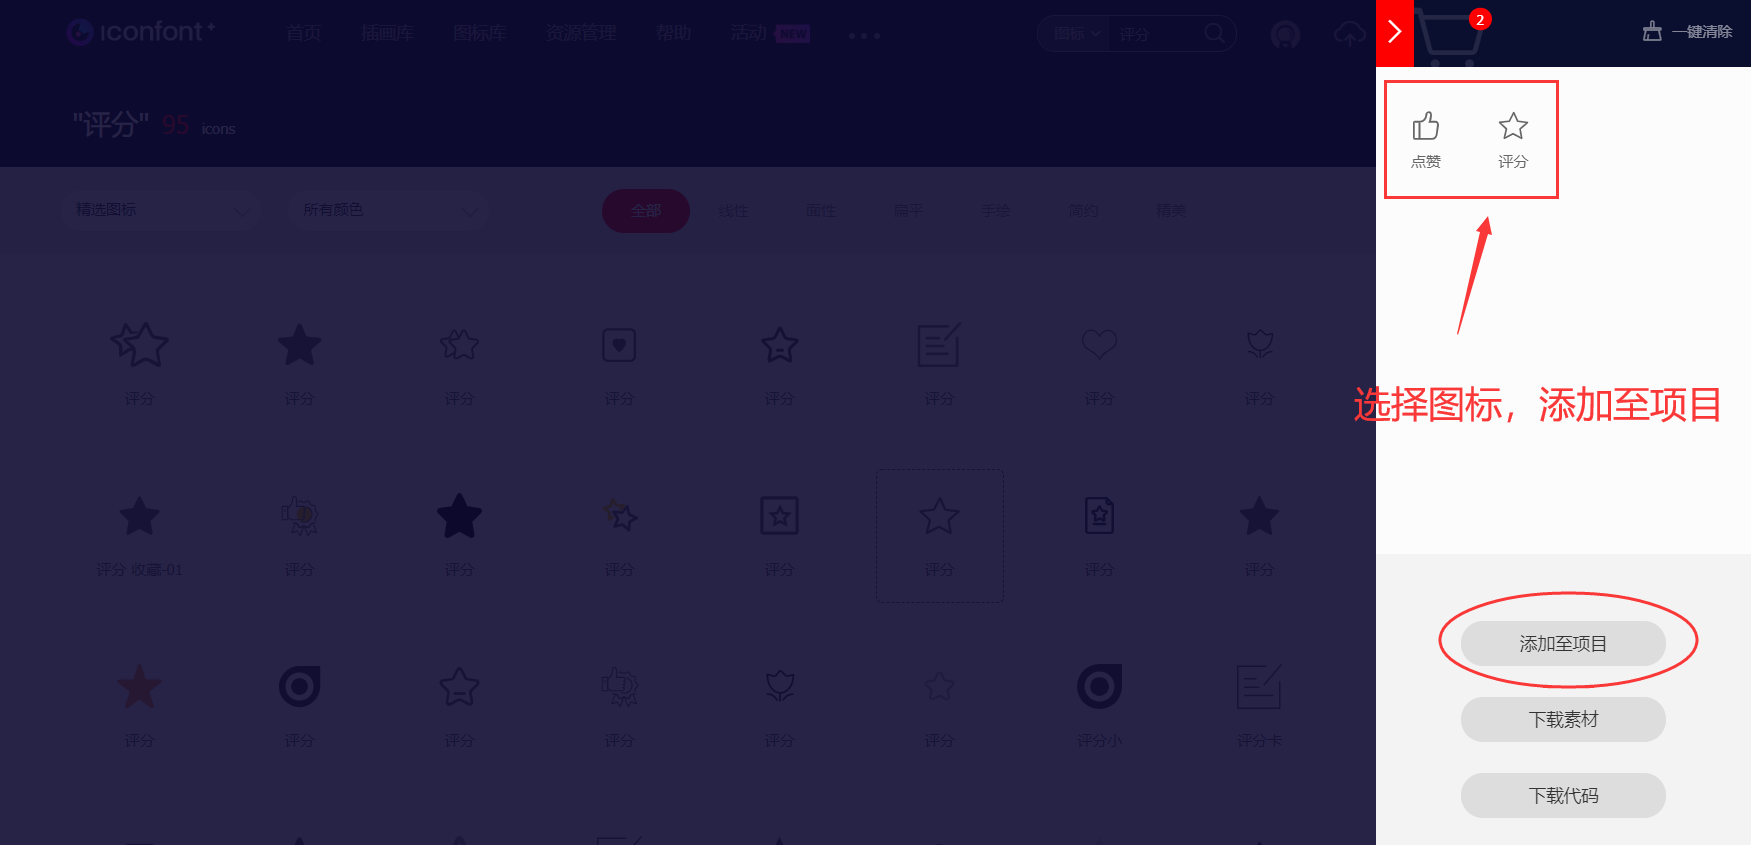
2、生成字体
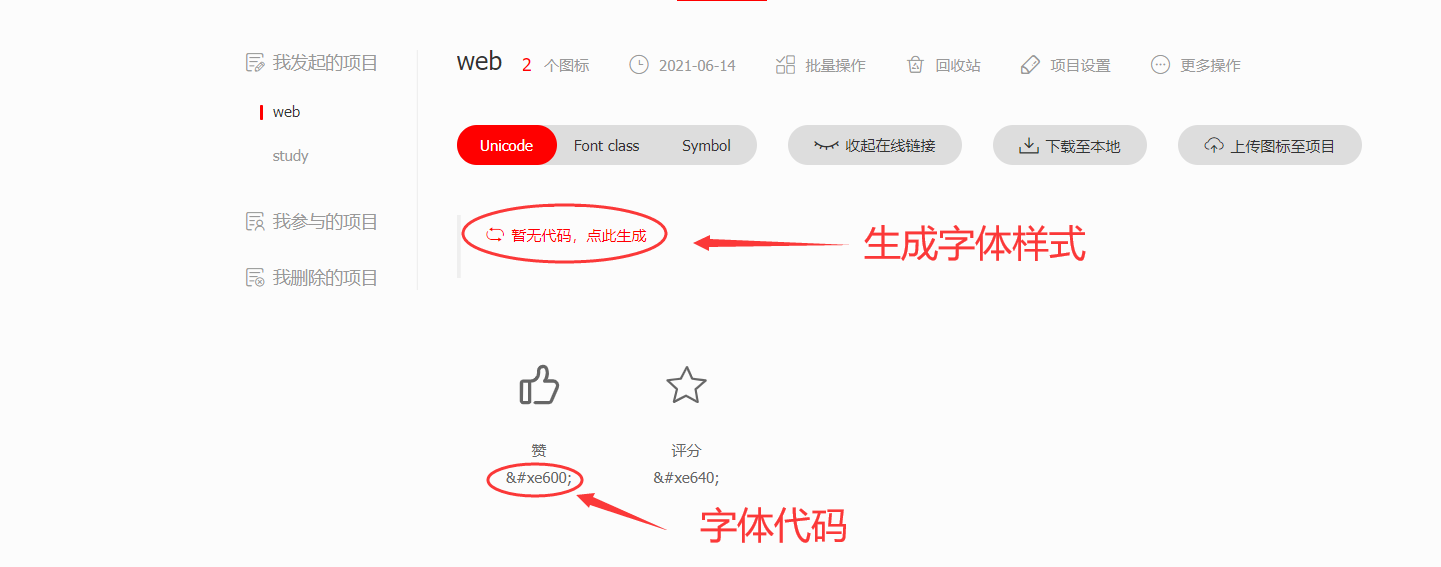
3、引用字体
1
2
3
4
5
6
7
8
9
10
11
12
13
14
15
16
17
18
19
| <style>
@font-face {
font-family: 'iconfont';
src: url('http://at.alicdn.com/t/font_2610481_h9iesu41nx.woff2?t=1623675168381') format('woff2'),
url('http://at.alicdn.com/t/font_2610481_h9iesu41nx.woff?t=1623675168381') format('woff'),
url('http://at.alicdn.com/t/font_2610481_h9iesu41nx.ttf?t=1623675168381') format('truetype');
}
.zan {
font-family:"iconfont" !important;
font-size:16px;
}
</style>
<span class="zan">
赞
</span>
|
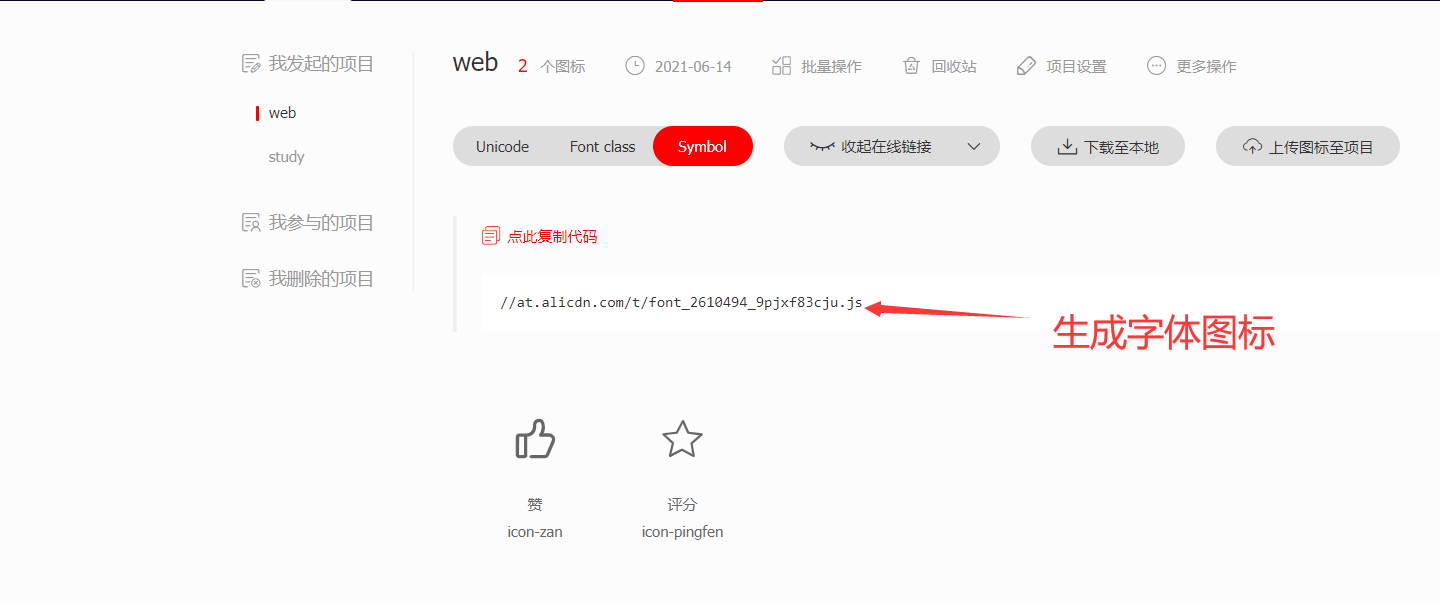
方法二
1、生成字体图标

2、引用字体
1
2
3
4
5
| <link rel="stylesheet" href="http://at.alicdn.com/t/font_2610494_9pjxf83cju.css">
<span class="iconfont icon-zan">
赞
</span>
|
字体样式文件
1
2
3
4
5
6
7
8
9
10
11
12
13
14
15
16
17
18
19
20
21
22
23
|
@font-face {
font-family: "iconfont";
src: url('//at.alicdn.com/t/font_2610494_9pjxf83cju.woff2?t=1623677045090') format('woff2'),
url('//at.alicdn.com/t/font_2610494_9pjxf83cju.woff?t=1623677045090') format('woff'),
url('//at.alicdn.com/t/font_2610494_9pjxf83cju.ttf?t=1623677045090') format('truetype');
}
.iconfont {
font-family: "iconfont" !important;
font-size: 16px;
font-style: normal;
-webkit-font-smoothing: antialiased;
-moz-osx-font-smoothing: grayscale;
}
.icon-zan:before {
content: "\e600";
}
.icon-pingfen:before {
content: "\e640";
}
|
方法三
1、生成字体
2、引用字体
1
2
3
4
5
6
7
8
9
10
11
12
13
14
15
16
| <script src="http://at.alicdn.com/t/font_2610494_9pjxf83cju.js"></script>
<style type="text/css">
.icon {
width: 1em; height: 1em;
vertical-align: -0.15em;
fill: currentColor;
overflow: hidden;
}
</style>
<span>
<svg class="icon" aria-hidden="true">
<use xlink:href="#icon-zan"></use>
</svg>
赞
</span>
|
CSS特性
继承性
1
2
3
4
5
6
7
8
9
10
11
12
13
14
| .container {
color: #f55;
}
<div class="container">
<p>Hello World!</p>
</div>
|
层叠性
1
2
3
4
5
6
7
8
9
10
11
12
13
14
15
16
17
18
19
20
21
22
23
24
25
|
p {
color: red;
}
p {
font-size: 30px;
}
<p>
Hello World!
</p>
p {
color: red;
}
p {
color: red;
}
<p>
Hello World!
</p>
|
优先级
1
2
3
4
5
6
7
8
9
10
11
12
13
14
15
16
17
18
19
20
| 权重
行内 1,0,0,0
id 0,1,0,0
类 0,0,1,0
标签 0,0,0,1
计算方式
.box {
color: red;
}
.box>p {
color: orange;
}
#box>p {
color: blue;
}
<div class="box" id="box">
<p>Hello World!</p>
</div>
|
CSS布局
显示模式
1
| display: block/inline-block/inline/flex
|
水平居中
1
2
| text-align: 控制行内块/行元素居中显示
margin: 0 auto 控制块级元素居中显示
|
垂直居中
盒子模型
1
| (content -> padding -> border) -> margin
|
外边距合并
1
2
3
4
5
6
7
8
9
10
11
12
13
14
15
16
17
18
19
20
21
22
23
| <style>
.main {
width: 600px;
height: 600px;
background-color: #5ff;
overflow: hidden;
}
.box {
width: 300px;
height: 300px;
background-color: #55f;
margin-top: 30px;
}
</style>
<div class="main">
<div class="box">
</div>
</div>
|
注:行内元素没有上下外边距,行内块元素不会产生外边距合并问题
box-sizing
布局方式
标准流
1
| display: block/inline-block/inline
|
浮动流
1
2
3
4
5
6
| float: left/right/none
子元素浮动之后, 如果父元素没有设置高度, 会导致父元素高度为0, 需要给父元素设置属性
overflow: hidden
浮动元素具备行内块特性
|
定位
1
2
3
4
5
6
7
8
9
| position: relative/absolute/fixed/static
top
left
right
bottom
默认是静态定位, 方位词无效
|
flex
1
2
3
4
5
6
7
8
9
10
11
12
| display: flex;
display-decoration: row/col;
justify-content:
align-items:
flex-wrap:
align-content:
flex/flex-grow/flex-shrink
order
align-self
|
2D变换
1
2
3
4
5
6
7
8
|
transform: translate(100px, 200px);
transform: rotate(90deg);
transform: scale(1.5, 1.5);
|
过度动画
1
2
| transform: scale(1.5, 1.5);
transition: transform 2s linear 1s;
|
自定义动画
1
2
3
4
5
6
7
8
9
10
11
12
13
14
15
16
17
18
19
20
21
22
23
24
25
26
27
28
29
30
31
| .card {
width: 100px;
height: 100px;
margin: 20px auto;
background-color: #ff5;
animation: my_animation 2s linear 0s infinite alternate;
animation-fill-mode: forwards;
}
.card:hover {
animation-play-state: paused;
}
@keyframes my_animation {
from {
width: 100px;
height: 100px;
background-color: #ff5;
}
to {
width: 600px;
height: 600px;
background-color: #5f5;
}
}
<div class="card"></div>
|
案例
导航栏制作
1
2
3
4
5
6
7
8
9
10
11
12
13
14
15
16
17
18
19
20
21
22
23
24
25
26
27
28
29
30
31
32
33
34
35
36
37
38
39
40
| <! DOCTYPE html>
<html>
<header>
<meta charset="UTF-8">
<title>网页学习</title>
<style>
ul {
list-style-type: none;
width: 500px;
height: 40px;
border: 1px solid red;
display: flex;
padding: 0;
}
li {
flex: 1;
text-align: center;
line-height: 40px;
}
li:hover {
color: orange;
cursor: pointer;
}
</style>
</header>
<body>
<ul>
<li>PLUS会员</li>
<li>品牌闪购</li>
<li>拍卖</li>
<li>京东家电</li>
<li>京东超市</li>
</ul>
</body>
</html>
|
精灵图
1
2
3
4
5
6
7
8
| .name {
width: 216px;
height: 74px;
background-image: url("https://game.gtimg.cn/images/lol/act/a20210608akl/acticon.png");
background-position: -843px -251px;
}
<div class="name"></div>
|
箭头制作
1
2
3
4
5
6
7
8
9
| .box {
width: 0;
height: 0;
border: 8px solid transparent;
border-right-color: #ff5;
}
<div class="box"></div>
|
去除输入框默认样式
1
2
3
4
5
6
7
8
9
| input {
border: none;
}
input:focus {
outline: none;
}
<input type="text">
|
轮播图
1
2
3
4
5
6
7
8
9
10
11
12
13
14
15
16
17
18
19
20
21
22
23
24
25
26
27
28
29
30
31
32
33
34
35
36
37
38
39
40
41
42
43
44
45
46
47
48
49
50
51
52
53
54
55
56
57
58
59
60
61
62
63
64
65
66
67
68
69
70
71
72
73
74
75
76
77
78
79
80
81
82
83
84
85
86
87
88
89
90
91
92
93
94
95
| <style>
* {
margin: 0;
padding: 0;
}
ul {
list-style: none;
}
ul>li {
width: 100%;
height: 300px;
display: none;
}
ul>li>img {
width: 100%;
height: 100%;
}
ul>li.activated {
display: block;
}
.main {
width: 800px;
height: 300px;
background-color: #55f;
margin: 0 auto;
position: relative;
}
.left,
.right {
width: 30px;
height: 30px;
background-color: rgb(0, 0, 0, 0.5);
text-align: center;
line-height: 30px;
color: #fff;
position: absolute;
top: 50%;
margin-top: -15px;
}
.left {
border-radius: 0 15px 15px 0;
}
.right {
border-radius: 15px 0 0 15px;
right: 0;
}
.list {
width: 100px;
position: absolute;
bottom: 0;
left: 0;
text-align: center;
}
.list>span {
width: 10px;
height: 10px;
background-color: rgba(0, 0, 0, 0.5);
display: inline-block;
text-align: center;
border-radius: 50%;
}
.list>span.activated {
background-color: #fff;
}
</style>
<div class="main">
<ul>
<li class="activated"><img src="https://img12.360buyimg.com/pop/s1180x940_jfs/t1/193657/5/4863/93608/60ac61ffEf1f94d72/1e4bae3d165b7d5e.jpg.webp" alt=""></li>
<li><img src="" alt=""></li>
<li><img src="" alt=""></li>
<li><img src="" alt=""></li>
</ul>
<div class="left"><</div>
<div class="right">></div>
<div class="list">
<span class="activated"></span>
<span></span>
<span></span>
<span></span>
</div>
</div>
|
箭头面板
1
2
3
4
5
6
7
8
9
10
11
12
13
14
15
16
17
18
19
20
21
22
23
24
25
26
27
28
29
30
31
32
33
34
35
36
37
38
39
40
41
42
43
44
45
46
47
48
| <style>
* {
margin: 0;
padding: 0;
}
.main {
width: 160px;
height: 30px;
background-color: #ff5;
margin: 0 auto;
position: relative;
text-align: center;
line-height: 30px;
}
.main:hover>.info {
display: block;
}
.info {
width: 160px;
height: 160px;
background-color: #5f5;
position: absolute;
top: 50px;
left: 0;
display: none;
}
.arrow {
position: absolute;
top: -20px;
border: 20px solid transparent;
border-top: 20px solid #ff5;
}
</style>
<div class="main">
<span>微信公众号</span>
<div class="info">
<div class="arrow"></div>
</div>
</div>
|
课程卡片
1
2
3
4
5
6
7
8
9
10
11
12
13
14
15
16
17
18
19
20
21
22
23
24
25
26
27
28
29
30
31
32
33
34
35
36
37
38
39
40
41
42
43
44
45
46
47
48
49
50
51
52
53
54
55
56
57
58
59
60
61
62
63
64
65
66
67
68
69
70
71
72
73
74
75
76
77
78
79
80
81
82
83
84
| <style>
* {
margin: 0;
padding: 0;
}
body {
background-color: #555;
}
.card {
width: 218px;
height: 252px;
background-color: #ff5;
margin: 10px auto;
display: flex;
flex-direction: column;
border-radius: 10px;
overflow: hidden;
}
.card>.img {
width: 100%;
height: 130px;
position: relative;
}
.card>.img>.hot {
width: 48px;
height: 24px;
background-color: rgba(0, 0, 0, 0.5);
position: absolute;
top: 10px;
left: 0;
color: orange;
text-align: center;
line-height: 24px;
z-index: 1;
}
.card>.img>a {
width: 100%;
height: 100%;
display: block;
overflow: hidden;
}
.card>.img>a>img {
width: 100%;
height: 100%;
transition: all 2s linear 0s;
}
.card>.img>a>img:hover {
transform: scale(1.5, 1.5);
}
.card>.title {
flex: 2;
background-color: #fff;
}
.card>.score {
flex: 1;
background-color: #ff5;
}
.card>.zan {
flex: 1;
background-color: #f5f;
}
.card>.title>span,
.card>.score>span,
.card>.zan>span {
margin: 10px 0 0 10px;
display: block;
}
</style>
<div class="card">
<div class="img">
<div class="hot">热门</div>
<a href="#"><img src="https://ss2.bdstatic.com/70cFvnSh_Q1YnxGkpoWK1HF6hhy/it/u=4055728984,1862500202&fm=26&gp=0.jpg" alt=""></a>
</div>
<div class="title"><span>微信小程序项目实战</span></div>
<div class="score"><span>4.6分</span></div>
<div class="zan"><span>99人好评</span></div>
</div>
|
无限轮播效果
1
2
3
4
5
6
7
8
9
10
11
12
13
14
15
16
17
18
19
20
21
22
23
24
25
26
27
28
29
30
31
32
33
34
35
36
37
38
39
40
41
42
43
44
45
46
47
48
49
50
51
52
53
54
55
56
57
58
59
60
61
62
63
64
65
66
67
68
69
70
71
72
73
74
75
76
77
78
79
80
81
82
83
84
85
86
87
88
89
90
91
92
93
94
95
96
97
98
99
100
101
102
103
104
105
106
107
108
109
110
111
112
113
114
115
116
117
118
119
120
121
122
123
124
125
126
127
128
129
130
| <style>
* {
margin: 0;
padding: 0;
}
.card {
width: 960px;
height: 220px;
margin: 20px auto;
overflow: hidden;
}
.card>ul {
width: fit-content;
list-style: none;
display: flex;
animation: my_animation 15s linear 0s infinite;
overflow: hidden;
}
.card>ul:hover {
animation-play-state: paused;
}
@keyframes my_animation {
from {
margin-left: 0;
}
to {
margin-left: -1280px;
}
}
.card>ul>li {
width: 160px;
height: 220px;
display: flex;
flex-direction: column;
justify-content: space-around;
align-items: center;
}
.card>ul>li:nth-child(2n) {
flex-direction: column-reverse;
}
.card>ul>li>span {
font-size: 14px;
}
.card>ul>li>img {
width: 150px;
}
</style>
<div class="card">
<ul>
<li>
<span>GPS定位 儿童手表</span>
<img src="https://img10.360buyimg.com/ceco/s300x300_jfs/t1/56801/28/11105/128912/5d7f63cfE3a8bd459/fb609a53249ee64e.jpg!q70.jpg.webp" alt="">
</li>
<li>
<span>黄蜜水晶 樱桃</span>
<img src="https://img10.360buyimg.com/ceco/s300x300_jfs/t1/164658/12/14482/96095/6059872cE0f3df763/c0cb8fd5867327ed.jpg!q70.jpg.webp" alt="">
</li>
<li>
<span>舒适手感 游戏手柄</span>
<img src="https://img20.360buyimg.com/ceco/s300x300_jfs/t1/130849/7/1013/292395/5ed4c69bE9a905108/118ef84f15d6c395.png.webp" alt="">
</li>
<li>
<span>茅台 飞天53度</span>
<img src="https://img20.360buyimg.com/mobilecms/s300x300_jfs/t1/100913/13/4760/308674/5de89de6E56b190cd/6c75ef1e28099ad8.png.webp" alt="">
</li>
<li>
<span>七彩虹 3080系列</span>
<img src="https://img13.360buyimg.com/ceco/s300x300_jfs/t1/137457/28/10562/68423/5f682143E03b9f732/54d9f27e782ff77b.jpg!q70.jpg.webp" alt="">
</li>
<li>
<span>轻质跑步鞋</span>
<img src="https://img10.360buyimg.com/ceco/s300x300_jfs/t1/112298/18/5164/86120/5eb219adE7abe6dde/2b807527ac314373.jpg!q70.jpg.webp" alt="">
</li>
<li>
<span>灵芝孢子粉胶囊</span>
<img src="https://img11.360buyimg.com/ceco/s300x300_jfs/t1/149539/8/14646/39293/5fb37d04E92358df0/e643c2269cbec54d.jpg!q70.jpg.webp" alt="">
</li>
<li>
<span>华为 超广角AI慧眼</span>
<img src="https://img10.360buyimg.com/ceco/s300x300_jfs/t1/153165/9/11245/55643/5fe5b70dEeb074aab/32aeb59a442959fe.jpg!q70.jpg.webp" alt="">
</li>
<!-- 实现无缝衔接轮播图 -->
<li>
<span>GPS定位 儿童手表</span>
<img src="https://img10.360buyimg.com/ceco/s300x300_jfs/t1/56801/28/11105/128912/5d7f63cfE3a8bd459/fb609a53249ee64e.jpg!q70.jpg.webp" alt="">
</li>
<li>
<span>黄蜜水晶 樱桃</span>
<img src="https://img10.360buyimg.com/ceco/s300x300_jfs/t1/164658/12/14482/96095/6059872cE0f3df763/c0cb8fd5867327ed.jpg!q70.jpg.webp" alt="">
</li>
<li>
<span>舒适手感 游戏手柄</span>
<img src="https://img20.360buyimg.com/ceco/s300x300_jfs/t1/130849/7/1013/292395/5ed4c69bE9a905108/118ef84f15d6c395.png.webp" alt="">
</li>
<li>
<span>茅台 飞天53度</span>
<img src="https://img20.360buyimg.com/mobilecms/s300x300_jfs/t1/100913/13/4760/308674/5de89de6E56b190cd/6c75ef1e28099ad8.png.webp" alt="">
</li>
<li>
<span>七彩虹 3080系列</span>
<img src="https://img13.360buyimg.com/ceco/s300x300_jfs/t1/137457/28/10562/68423/5f682143E03b9f732/54d9f27e782ff77b.jpg!q70.jpg.webp" alt="">
</li>
<li>
<span>轻质跑步鞋</span>
<img src="https://img10.360buyimg.com/ceco/s300x300_jfs/t1/112298/18/5164/86120/5eb219adE7abe6dde/2b807527ac314373.jpg!q70.jpg.webp" alt="">
</li>
<li>
<span>灵芝孢子粉胶囊</span>
<img src="https://img11.360buyimg.com/ceco/s300x300_jfs/t1/149539/8/14646/39293/5fb37d04E92358df0/e643c2269cbec54d.jpg!q70.jpg.webp" alt="">
</li>
<li>
<span>华为 超广角AI慧眼</span>
<img src="https://img10.360buyimg.com/ceco/s300x300_jfs/t1/153165/9/11245/55643/5fe5b70dEeb074aab/32aeb59a442959fe.jpg!q70.jpg.webp" alt="">
</li>
</ul>
</div>
|
布局
方位:start center end
display
flex
inline-flex
inline-flex 父容器会自适应子容器的宽高
如果父容器设置了宽高,那么会按照父容器的宽高来
flex-direction
row
column
row-reverse
column-reverse
flex-wrap
参考手册
https://www.w3school.com.cn/js/js_strict.asp
html渲染
浏览器有两个渲染引擎,分别是UI渲染引擎和JS执行引擎
UI渲染引擎负责解析html + css代码
JS渲染引擎负责解析JS脚本
浏览器加载html文档顺序
1、代码从上往下,从左往右执行
2、遇到标签,在内存中创建相应的DOM对象
3、遇到script标签,通过js渲染引擎执行
4、渲染已经创建好的DOM树,展示到界面上
等待界面渲染之后再执行JS代码
1
2
3
4
5
| <script>
winndow.onload = function () {
}
</script>
|
JS基础语法
ECMAScript规定了JS的语法规范
两种JS运行环境
1、JavaScript = ECMAScript + 浏览器宿主
2、JavaScript = ECMAScript + Node
字面量
变量
常量
JS数据类型
JS数据类型有以下八种
- undefined
- null
- 布尔值
- 数值
- 数组
- 字符串
- 对象
- 函数
undefined
值为undefined的情况
1
2
3
4
5
6
7
8
9
10
11
12
13
14
|
let a
console.log(a)
let a = undefined
console.log(a)
let person = {
'name': 'xyz'
}
console.log(person.age)
|
Number
parseInt
1
2
3
4
5
6
7
|
let n1 = parseInt("1000", 2)
let n2 = parseInt("1000", 10)
console.log(n1)
console.log(n2)
|
Boolean
判断为假的有以下几种情况,其余情况为真
- null
- undefined
- ‘’
- 0
- NaN
- false
以下代码打印输出1
1
2
3
| if ({}) {
console.log(1)
}
|
字符串
字符串访问的两种方式
1
2
3
4
5
|
let name = 'xyz'
console.log(name[0])
console.log(name.charAt(0))
|
unicode字符串
unicode编码则是采用双字节16位来进行编号,可编65536字符
在线转unicode:https://www.bejson.com/convert/unicode_chinese/
js中可以使用unicode字符串来表示变量名,示例代码如下
1
2
3
4
5
6
7
|
let \u006e\u0061\u006d\u0065 = 'xyz'
console.log(name)
|
字符串编解码
1
2
3
4
5
6
7
8
9
10
11
|
btoa('hello world')
atob("aGVsbG8gd29ybGQ=")
btoa(encodeURIComponent("逍遥子"))
decodeURIComponent(atob("JUU5JTgwJThEJUU5JTgxJUE1JUU1JUFEJTkw"))
|
indexOf
1
2
3
4
5
6
7
8
9
|
var str_ = "hello worllod"
console.log(str_.indexOf("lo"))
console.log(str_.indexOf("k"))
var str_ = "hello worllod"
console.log(str_.lastIndexOf("lo"))
console.log(str_.lastIndexOf("wl"))
|
slice、subString、substr
1
2
3
4
5
6
7
8
9
10
|
let str_ = "hello world"
console.log(str_.slice(1, 2))
console.log(str_.substring(1, 2))
console.log(str_.substr(1, 2))
|
search、match
1
2
3
4
5
6
|
let str_ = "hello world world"
console.log(str_.search('world'))
console.log(str_.match('world'))
|
数组
数组的下标可以是非数字
1
2
3
4
5
6
7
8
9
10
11
12
|
let arr = []
arr[0] = 'hello'
arr['name'] = 'xyz'
console.log(arr)
console.log(arr.length)
arr[100] = 100
console.log(arr.length)
|
数组取值
1
2
3
4
| let arr = [1, 3, 5, 7]
arr[0]
arr[1]
|
数组遍历
1
2
3
4
5
6
7
8
9
10
|
let arr1 = [1, 3, 5, 7, 9]
arr1.forEach((val, index) => {
console.log(val, index)
})
for (val of arr1) {
console.log(val)
}
|
push、pop
1
2
3
4
5
6
7
|
let arr1 = [1, 3, 5, 7, 9]
arr1.push(11)
arr1.pop()
console.log(arr1)
|
unshift、shift
1
2
3
4
5
6
7
|
let arr1 = [1, 3, 5, 7, 9]
arr1.unshift(11)
arr1.shift()
console.log(arr1)
|
indexOf
1
2
3
4
|
let arr1 = [1, 3, 5, 7, 9]
console.log(arr1.indexOf(5))
|
splice
1
2
3
4
5
|
let arr1 = [1, 3, 5, 7, 9]
arr1.splice(1, 1, '0')
console.log(arr1)
|
slice
1
2
3
| let arr = [1, 3, 5, 7, 9]
let newArr = arr.slice(1, 3)
console.log(newArr)
|
filter
1
2
3
4
5
6
7
8
9
10
11
| let arr1 = [1, 3, 5, 7, 9]
let newArr = arr1.filter((val) => {
if (val % 3 === 0) {
return true
} else {
return false
}
})
console.log(newArr)
|
join
1
2
3
4
5
6
|
let arr1 = [1, 3, 5, 7, 9]
let str_ = arr1.join("+")
console.log(str_)
|
map
1
2
3
4
5
6
7
8
|
let arr1 = [1, 3, 5, 7, 9]
let newArr = arr1.map((val) => {
return val * 2
})
console.log(newArr)
|
reduce
1
2
3
4
5
6
7
8
|
let arr1 = [1, 3, 5, 7, 9]
let res = arr1.reduce((prevVal, curentVal) => {
return prevVal + curentVal
})
console.log(res)
|
对象
对象两种访问方式
1
2
3
4
5
6
7
8
|
let person = {
'name': 'xyz',
'age': 18
}
console.log(person.name)
console.log(person['age'])
|
查看对象所有属性
1
2
3
4
5
6
7
|
let person = {
'name': 'xyz',
'age': 18
}
console.log(Object.keys(person))
|
判断属性是否存在
1
2
3
4
5
6
7
8
|
let person = {
'name': 'xyz',
'age': 18
}
console.log('name' in person)
|
函数
函数的定义
1
2
3
4
5
6
7
8
9
10
11
|
function sum(x, y) {
return x + y
}
sum = function (x, y) {
return x + y
}
sum = new Function ('x', 'y', 'return x + y')
|
函数作用域
JS中只有全局和函数作用域
1
2
3
4
5
6
7
8
9
10
11
12
13
14
|
function max(x, y) {
if (x>=y) {
var z = true
return z
}
console.log(z)
z = false
return z
}
console.log(max(1, 2))
|
函数参数
1
2
3
4
5
6
7
8
9
10
|
function sum(a, b) {
console.log(arguments)
console.log(arguments[2])
console.log(a)
console.log(b)
}
sum(1, 2, 3)
|
值传递
1
2
3
4
5
6
7
8
9
10
|
function sum(a, b) {
a = 10
console.log(a)
console.log(b)
}
a = 5
sum(5)
console.log(a)
|
地址传递(对象,数组,函数)
1
2
3
4
5
6
7
8
9
|
function push(arr) {
arr.push(7)
}
arr = [1, 3, 5]
push(arr)
console.log(arr)
|
函数立即调用
1
2
3
4
5
6
7
8
9
10
11
12
13
14
15
16
|
let res = function (a, b) {
return a + b
}(1, 2)
console.log(res)
!function sum(a, b) {
console.log(a, b)
}(1, 2)
(function sum(a, b) {
console.log(a, b)
}(1, 2))
|
JS面向对象
类和对象
1
2
3
4
5
6
7
8
9
10
11
12
13
|
let Person = function (name, age) {
this.name = 'xyz'
this.age = 18
}
Person.prototype.eat = function() {
console.log('人会吃')
};
p = new Person('xyz', 18)
console.log(p.name)
|
拷贝对象
1
2
3
4
5
6
7
8
9
10
|
p1 = {
'name': 'xyz',
'age': 18
}
p2 = Object.create(p1)
console.log(p2.age)
|
this指向
1
2
3
4
5
6
7
8
9
10
11
12
13
14
15
16
17
18
19
20
21
|
function n1 () {
console.log(this)
!function n2 () {
console.log(this)
}()
}
n1()
obj = {
name: "xyz",
run: function () {
console.log(this)
!function n () {
console.log(this)
}()
}
}
obj.run()
|
更改this指向
1
2
3
4
5
6
7
8
9
10
11
12
13
14
15
| o1 = {
name: 'xyz',
run: function() {
console.log(arguments)
console.log(this)
console.log(this.name)
}
}
o2 = {
name: 'gmbjzg'
}
o1.run.call(o2, 1, 2)
o1.run.apply(o2, [1, 2])
|
继承
1
2
3
4
5
6
7
8
9
10
11
12
13
14
15
16
17
18
19
20
21
22
23
|
function Father (name, age) {
this.name = name
this.age = age
}
Father.prototype.eat = function() {
console.log('eat')
};
function Son (name, age) {
Father.call(this, name, age)
}
Son.prototype = Object.create(Father.prototype)
Son.prototype.constructor = Son
let s = new Son('xyz', 18)
console.log(s.name)
|
四种创建对象的方式
1
2
3
4
5
6
7
8
9
10
11
12
13
14
15
16
17
18
19
20
21
22
23
24
25
|
let o1 = {
'name': 'xyz',
'age': 18,
'eat': function () {
console.log('eat')
}
}
let o2 = new Object();
o2.name = 'xyz'
function createObj(name, age) {
let obj = {}
obj.name = name
obj.age = age
return obj
}
let o3 = createObj('xyz', 18)
function CreateObj(name, age) {
this.name = name
this.age = age
}
let o4 = new CreateObj('xyz', 18)
|
构造函数
1
2
3
4
5
6
7
8
9
10
|
Object Array Function
function Person(name, age) {
this.name = name
this.age = age
}
let p = Person('xyz', 18)
|
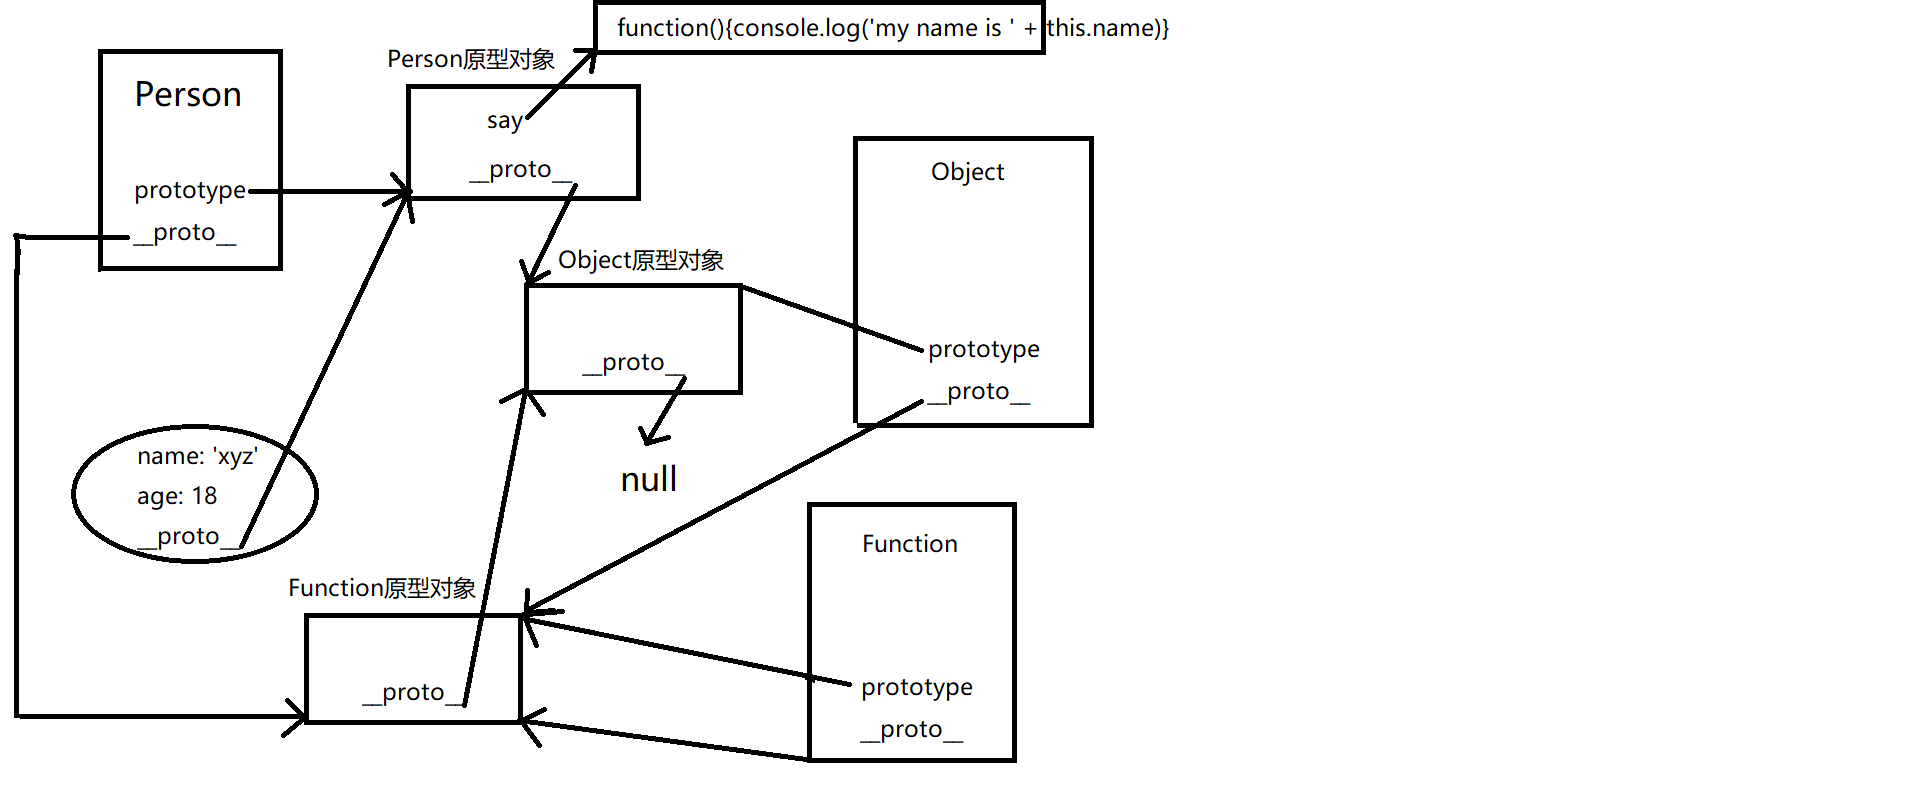
prototype和__proto__
prototype是函数对象身上的一个属性
__proto__ 是对象身上的一个属性
例子
1
2
3
4
5
6
7
8
9
10
11
12
13
14
| function Person(name, age){
this.name = name;
this.age = age
}
Person.prototype.say = function () {
console.log('my name is ' + this.name)
}
let p = new Person('xyz', 18)
console.log(Person.prototype === p.__proto__)
|
图解如下
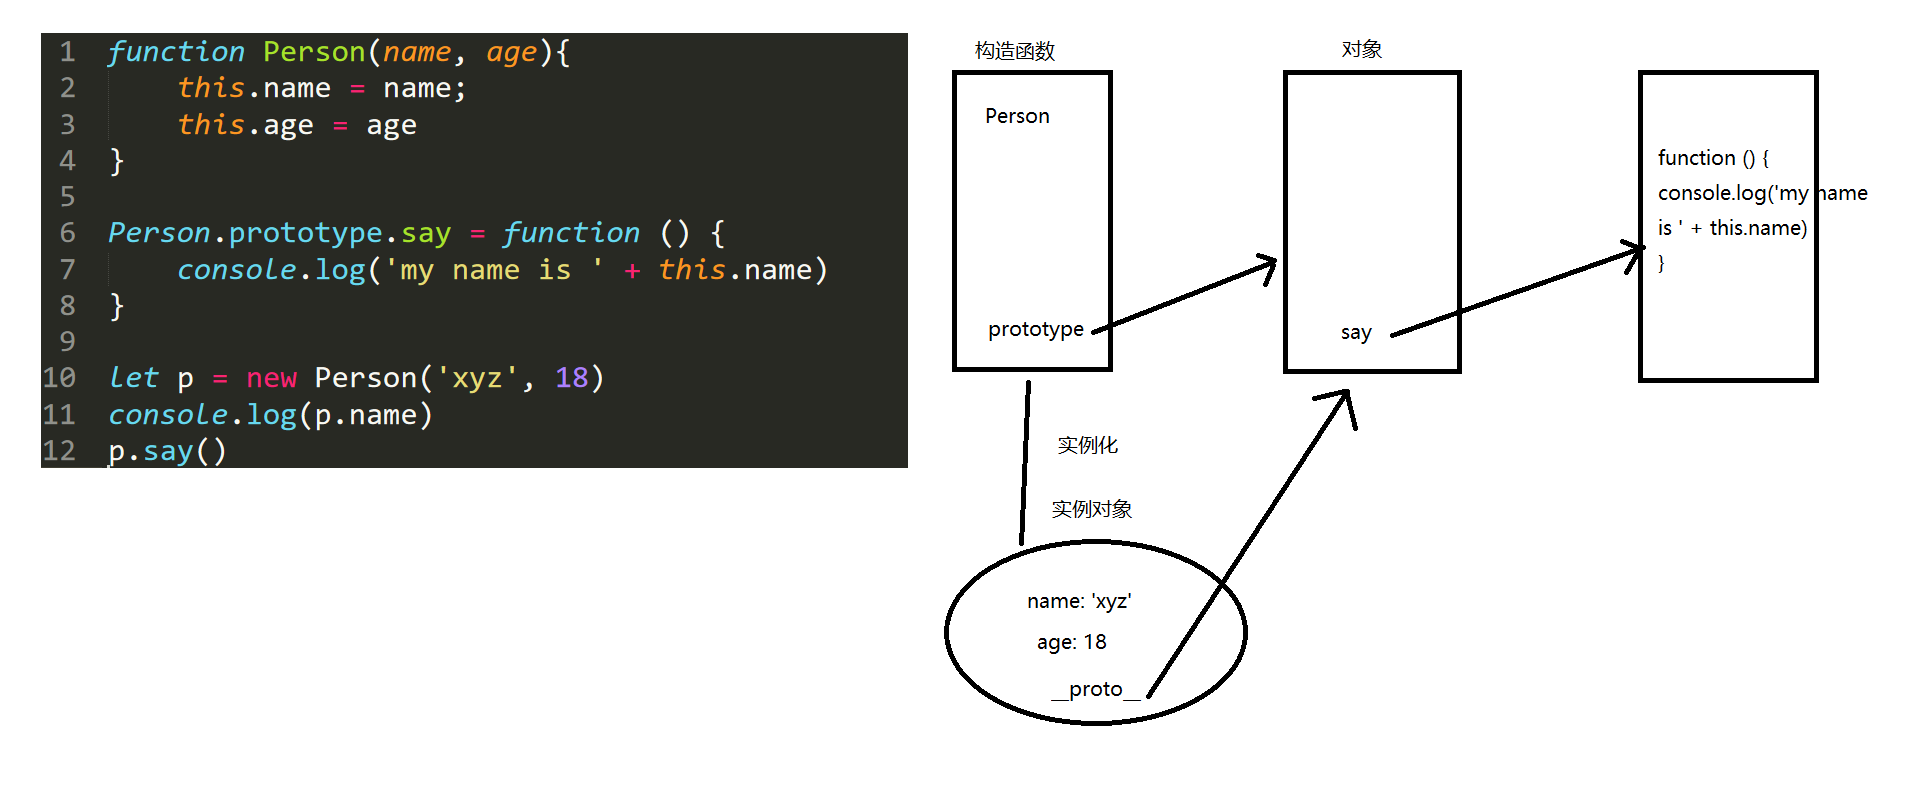
__proto__ 指向所属构造函数prototype对象
对象属性的访问机制
示例代码如下
1
2
3
4
5
6
7
8
9
10
| function Person(name, age){
this.name = name;
this.age = age
}
Person.prototype.say = function () {
console.log('my name is ' + this.name)
}
let p = new Person('xyz', 18)
|
Function是自身的实例对象,自己创造自己
1
2
| console.log(Object.prototype.__proto__)
console.log(Function.__proto__.__proto__.__proto__)
|
constructor
原型对象上的属性
查看构造函数
1
2
3
| console.log(Function.__proto__.constructor)
console.log(new Number.constructor)
|
数据类型判断
1
2
3
4
5
6
7
8
9
10
11
12
|
console.log(typeof(1))
console.log([].constructor === Array)
console.log([] instanceof Array)
console.log(Object.prototype.toString.call([]))
|
对象遍历
1
2
3
4
5
6
7
8
9
10
11
12
13
14
15
16
17
18
19
| function Person(name, age){
this.name = name
this.age = age
}
Person.prototype.say = function(){
console.log('my name is ' + this.name)
}
p = new Person('xyz', 18)
for(key in p){
console.log(key)
}
console.log(p.hasOwnProperty('name'))
console.log(p.hasOwnProperty('say'))
|
数据劫持
1
2
3
4
5
6
7
8
9
10
11
12
13
14
15
16
17
18
19
20
21
22
23
24
25
26
27
28
29
30
31
32
33
34
35
36
37
38
39
40
41
42
43
| function Person(name, age){
this.name = name
this.age = age
}
p = new Person('xyz', 18)
Object.defineProperty(p, 'height', {
enumerable: true,
get: function(){
console.log('get')
},
set: function(val){
console.log('set', val)
return val
}
})
for (key in p){
console.log(key)
}
|
JS混淆原理
对象属性访问
1
2
3
4
| let name = "xyz";
console.log(name.length);
console.log(name["length"]);
|
十六进制字符串
1
2
3
4
5
6
7
8
| let str = "abc";
code = str.charCodeAt(0)
hex = "\\x" + code.toString(16)
console.log(hex)
|
Unicode
1
2
3
4
5
6
7
8
9
| let str = "abc";
code = str.charCodeAt(0)
new_str = "0000" + code.toString(16)
unicode_str = "\\u" + new_str.substring(new_str.length - 4)
console.log(unicode_str)
|
ASCII
1
2
3
4
5
6
7
8
9
10
11
| let str = "abc";
code = str.charCodeAt(0)
origin_str = String.fromCharCode(code)
console.log(origin_str)
s1 = String.fromCharCode(97, 98)
console.log(s1)
|
字符串编码
1
2
3
4
|
btoa("xyz")
atob("eHl6")
|
数值加密
1
2
3
4
5
6
7
8
9
10
|
let a = 1
let b = 1
let c = a ^ b
console.log(c)
console.log(c ^ b)
|
数组混淆
1
2
3
4
| arr = ["getFullYear"]
year = new Date()[arr[0]]()
console.log(year)
|
数组乱序
1
2
3
4
5
6
7
8
9
10
11
12
13
14
15
16
17
18
19
20
21
22
23
24
25
26
27
28
29
30
31
|
arr = ["getFullYear", "getMonth", "getDay"]
function upset(arr, num){
for(let i=0; i<num; i++){
arr.unshift(arr.pop())
}
console.log(arr)
}
function recover(arr, num){
for(let i=0; i<num; i++){
arr.push(arr.shift())
}
console.log(arr)
}
year = new Date()[arr[0]]()
month = new Date()[arr[1]]() + 1
day = new Date()[arr[2]]()
console.log(year)
console.log(month)
console.log(day)
|
代码膨胀
1
2
3
4
5
6
7
8
9
10
11
12
13
14
15
16
17
18
19
|
function add1(n1, n2){
return add2(n1, n2);
}
function add2(n1, n2){
return add3(n1, n2)
}
function add3(n1, n2){
return n1 + n2;
}
let a = 1;
let b = 2;
let c = add1(a, b)
console.log(c);
|
流程控制
1
2
3
4
5
6
7
8
9
10
11
12
13
14
15
16
17
18
19
20
21
22
23
24
25
26
27
28
29
30
31
32
33
34
35
36
37
|
function sum(n1){
a = n1 + 1;
b = a + 2;
c = b + 3;
d = c + 4;
e = d + 5;
return e;
}
function sum(n1){
arr = "1|3|5|2|4".split("|")
i = 0
while(arr[i]){
switch(arr[i]){
case '1':
a = n1 + 1;
break;
case '2':
d = c + 4;
break;
case '3':
b = a + 2;
break;
case '4':
e = d + 5;
return e;
case '5':
c = b + 3;
break;
}
i++
}
}
|
逗号表达式
1
2
3
4
5
6
7
8
9
10
11
12
13
14
15
16
17
18
19
20
|
function sum(n1){
a = n1 + 1;
b = a + 2;
c = b + 3;
d = c + 4;
e = d + 5;
return e;
}
function sum(n1){
return a = n1 + 1,
b = a + 2,
c = b + 3,
d = c + 4,
e = d + 5
}
console.log(sum(0))
|
AST抽象语法树
ast 抽象语法树
网址:https://astexplorer.net/
代码结构
1
2
3
4
5
6
7
8
9
10
11
12
13
14
15
16
17
|
const fs = require("fs");
const parse = require("@babel/parser");
const traverse = require("@babel/traverse").default;
const type = require("@babel/types");
const generator = require("@babel/generator").default;
const jscode = fs.readFileSync("code.js", {encoding: "utf-8"})
let ast = parse.parse(jscode)
console.log(ast)
let code = generator(ast).code
fs.writeFile("newcode.js", code, (err) => {})
|
parser&generator
1
2
3
4
5
6
7
8
9
10
11
12
| JS源代码 -> AST
let ast = parse.parse(jscode, {
sourceType: "module"
})
let code = generator(ast, {
retainLines: true,
comments: true,
compact: fasle
}).code
|
traverse&visitor
1
2
3
4
5
6
7
8
9
10
11
12
13
14
15
16
17
18
19
20
21
22
23
24
25
26
27
28
29
30
31
32
33
34
35
36
37
38
39
40
41
42
43
44
45
46
47
48
49
50
51
52
53
54
|
visitor = {
FunctionDeclaration(path){
console.log("function")
}
}
visitor = {
FunctionDeclaration: {
enter(path){
console.log("进入节点")
},
exit(path){
console.log("退出节点")
}
}
}
function f1(){
console.log("f1")
}
function f2(){
console.log("f2")
}
visitor = {
FunctionDeclaration: {
enter: [f1, f2],
exit(path){
console.log("退出节点")
}
}
}
traverse(ast, visitor)
const nodeVistor = {
Identifier(path){
if (path.node.name === this.paramName){
path.node.name = "a"
}
}
}
visitor = {
FunctionDeclaration(path){
const paramName = path.node.params[0].name;
path.traverse(nodeVistor, {
paramName
})
}
}
|
types
全局变量
console
1
2
3
4
5
6
7
8
9
10
11
12
|
console.log()
console.warn()
function sum(a, b) {
return a + b;
}
console.time()
sum()
console.timeEnd()
|
__dirname/__filename
1
2
3
|
console.log(__dirname)
console.log(__filename)
|
定时器/超时器
1
2
3
4
5
6
7
8
9
10
11
12
|
let i = 1
setInterval(() => {
console.log(i);
}, 1000)
let i = 1
setTimeout(() => {
console.log(i);
}, 1000)
|
模块和包
模块导出与导入
1
2
3
4
5
6
7
8
9
10
11
12
13
14
15
16
17
18
19
20
21
22
23
24
|
module.exports = {}
exports = module.exports
return module.exports
let i = 1;
let j = 2;
module.exports = {
i,
j
}
const test = require('./test');
console.log(test)
const fs = require("fs")
|
包
1
2
3
4
5
6
7
8
9
10
11
12
13
14
15
16
17
18
19
20
|
{
"name": "request",
"version": "1.0.0",
"main": "index.js",
"scripts": {
"test": "echo \"Error: no test specified\" && exit 1"
},
"keywords": [],
"author": "",
"license": "ISC",
"description": ""
}
npm init -y
const request = require('./request')
|
核心模块
文件操作
1
2
3
4
5
6
7
8
9
10
11
12
13
14
15
16
17
18
19
20
21
22
23
24
25
26
27
28
29
30
31
32
33
34
35
36
37
38
39
40
41
42
43
44
45
| const fs = require("fs");
let result = fs.readFileSync('.txt')
console.log(result.toString())
fs.readFile('.txt', (error, data) => {
if (error) {
console.log(error)
return
}
console.log(data.toString())
})
obj = {
'name': 'xyz'
}
fs.writeFileSync('tset.json', JSON.stringify(obj))
obj = {
'name': 'chen'
}
fs.writeFile('test.json', JSON.stringify(obj), (error) => {
if (error) {
console.log(error)
return
}
})
let result = fs.appendFileSync('.txt', '4\r\n')
console.log(result)
fs.appendFile('.txt', '5', (error) => {
if (error) {
console.log(error)
}
})
|
路径操作
1
2
3
4
5
6
7
8
9
10
| const path = require("path");
console.log(path.join(__dirname, __filename))
console.log(path.resolve(__dirname, ".txt"))
console.log(path.extname(__filename))
|
三方模块
包管理工具yarn 或 npm
安装yarn管理工具
yarn包使用
初始化一个包
安装
卸载
升级
如果别人想要安装对应的依赖环境,只需要复制yarn.lock 、package.json、index.js
执行命令
yarn清除缓存
Express Web框架
服务器搭建
1
2
3
4
5
6
7
8
9
10
11
12
13
14
15
16
17
18
19
20
21
| const express = require('express')
app = express()
app.get('/', (req, resp, next) => {
console.log(req)
resp.send({
"name": "xyz",
"age": 18
})
})
app.listen(5002, () => {
console.log("服务器启动成功...")
})
|
Express框架维护着一张中间件表, 只有匹配到,才会进入处理函数
| 序号 |
请求方式 |
路径 |
处理函数 |
| 1 |
get |
/ |
(req, resp, next) => {} |
| 2 |
post |
/article |
(req, resp, next) => {} |
路由
GET请求
静态路由
1
2
3
4
5
6
7
8
9
10
11
12
13
14
| http:
app.get('/article', (req, resp, next) => {
console.log(req.params)
resp.send({
"name": "xyz",
"age": 18
})
}
参数接收 req.query
|
动态路由
1
2
3
4
5
6
7
8
9
10
11
12
13
14
| http:
app.get('/article/:id', (req, resp, next) => {
console.log(req.params)
resp.send({
"name": "xyz",
"age": 18
})
}
参数接收:req.params
|
POST请求
1
2
3
4
5
6
7
8
|
app.use(express.json())
app.use(express.urlencoded({extend: true}))
参数获取
req.body
|
req
1
2
3
4
5
6
| req.headers
req.body
req.params
req.query
req.method
req.path
|
resp
1
2
3
4
5
6
7
8
9
10
11
12
|
resp.setStutus(200)
resp.set({})
resp.setHeader(key, value)
1.字符串
2.[]
3.{}
resp.sendFile(path)
|
中间件
日志中间件
404中间件
Error错误处理中间件
邮件报警系统中间件
静态资源中间件
文件上传中间件
官方文档
https://reactjs.org/
基本使用
示例代码如下
1
2
3
4
5
6
7
8
9
10
11
12
13
14
15
16
17
18
19
20
21
22
23
24
25
26
27
28
29
30
31
32
33
34
35
36
37
38
| <!DOCTYPE html>
<html lang="en">
<head>
<meta charset="UTF-8">
<meta name="viewport" content="width=device-width, initial-scale=1.0">
<title>Document</title>
<script src="https://unpkg.com/react@17/umd/react.development.js"></script>
<script src="https://unpkg.com/react-dom@17/umd/react-dom.development.js"></script>
<script src="https://unpkg.com/babel-standalone@6/babel.min.js"></script>
</head>
<body>
<div id="root"></div>
</body>
<script type='text/babel'>
// 1.创建虚拟DOM对象
// let v_dom = React.createElement(
// 'div',
// {
// onClick: ()=>{console.log(1)}
// },
// '点击我'
// )
// 借助JSX语法创建虚拟DOM对象
let v_dom = <div onClick={()=>{console.log(1)}}>
点击我
</div>
// 2.将虚拟DOM对象映射到真实DOM对象
ReactDOM.render(v_dom, document.getElementById('root'))
</script>
</html>
|