Java语言介绍 Java语言诞生于1995年, 起初是为了占领电子消费产品市场, James Gosling领导团队开发的一种编程语言。
JDK JDK: Java Development Kits
下载地址:http://www.oracle.com
JDK、JRE、JVM三者间的关系 JDK:Java开发工具箱 (Java Development Kit)
JRE:Java的运行时环境 (Java Runtime Environment)
JVM:Java虚拟机 (Java Virtual Machine)
三者间的关系
JDK = JRE + 工具(javac)
JRE = JVM + Java核心类库
JDK > JRE > JVM
Java三大版本 Java三大版本
JavaSE(java PIatform Standard Edition):JavaSE是Java的标准版本,是整个Java语言的基础和核心
JavaEE(java PIatform Enterprise Edition):JavaEE是企业版, 主要应用于企业级程序开发
JavaME(java PIatform Micro Edition):用于嵌入式系统的开发
Java语言特性 (1)面向对象
(2)可移置性(一次编译, 到处运行)
(3)简单性
(4)多线程
(5)跨平台
(6)健壮性(自动垃圾回收机制GCC)
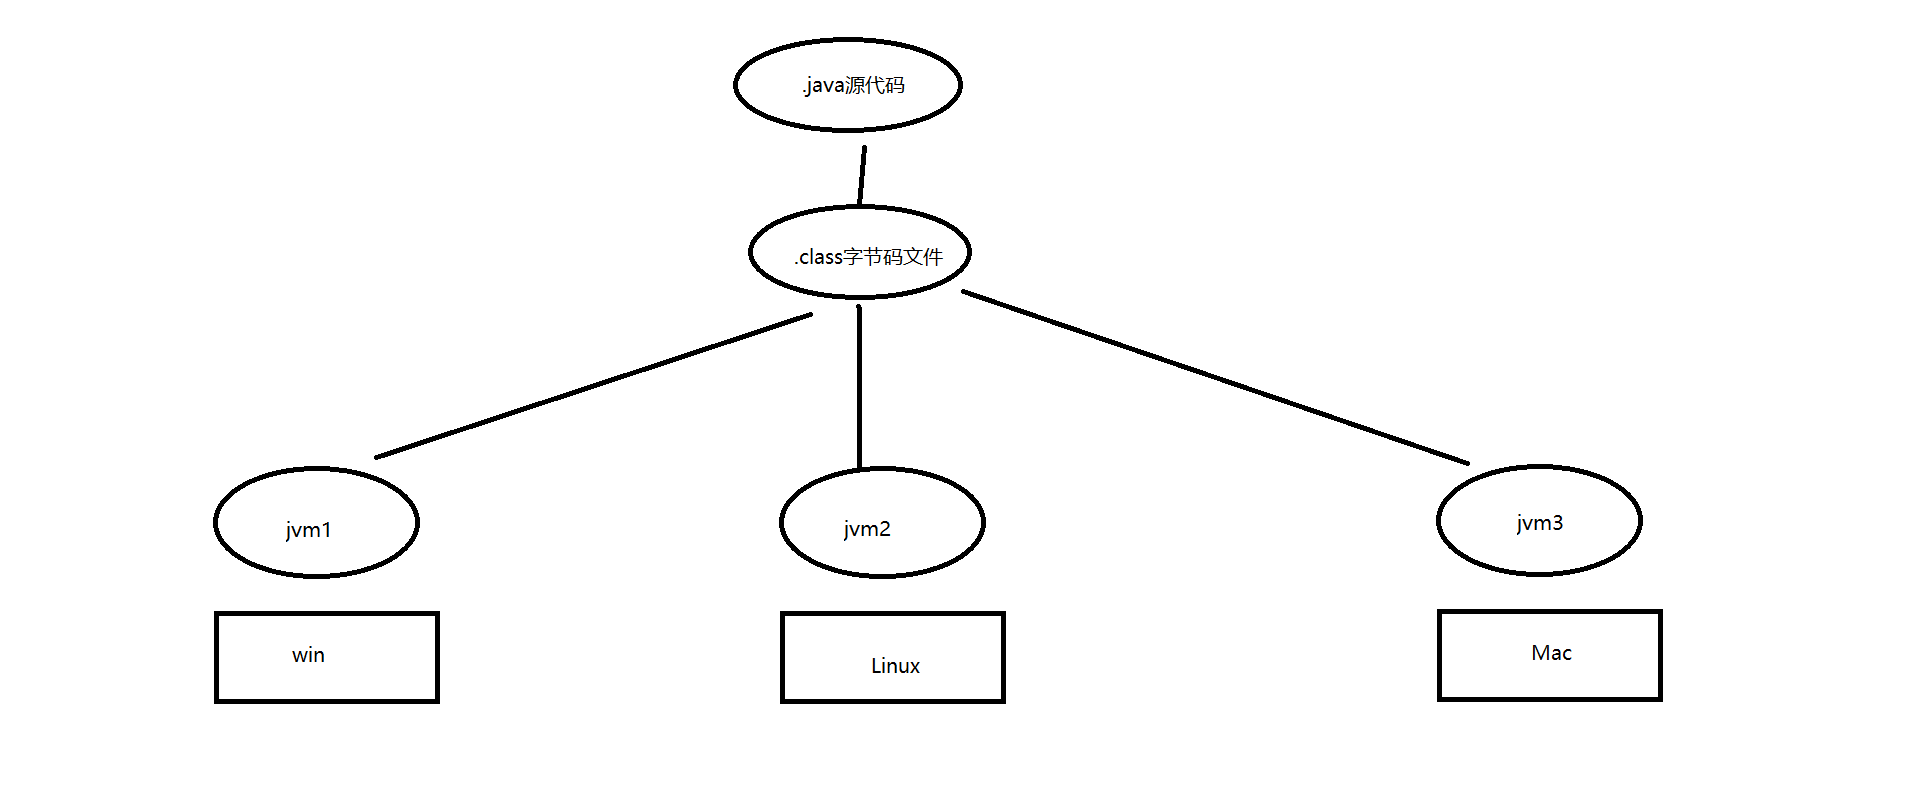
Java语言如何实现跨平台
Java的加载与执行 Java程序运行包含两个阶段:编译阶段和运行阶段
1.编译生成字节码文件
2.字节码文件加载到JVM虚拟机中运行
1 .java ->class ->
JDK下载 下载JDK
下载地址:https://www.oracle.com/java/technologies/downloads/#java8
安装 上传到服务器/opt目录下
在/usr/local新建目录java
解压
配置环境变量
编辑/etc/profile
添加如下
1
2
3
4
export JAVA_HOME=/usr/local/java/jdk1.8.0_311
重新加载配置文件
测试
windows
1.下载jdk
官网下载地址:https://www.oracle.com/java/technologies/javase/javase-jdk8-downloads.html
下载需要登录Oracle账号
账号:2696671285@qq.com
密码:Oracle123
2.配置环境变量
第一种配置方式
Path添加javac.exe所在路径
1 C :\Users\gmbjzg\software\java\jdk-8 u281\bin
第二种配置方式(推荐)
添加JAVA_HOME环境变量
1 C :\Users\gmbjzg\software\java\jdk-8 u281
Path添加
第一个Java程序 1 2 3 4 5 public class HelloWorld {public static void main (String[] args) {"Hello World" );
编译
命令: javac 源文件路径
运行
命令:java 类名
注:在java语言中, 一个java文件中只能定义一个被public修饰的类,且被public修饰的类的类名、必须和Java文件的文件名相同
标识符 数字、字母、下划线、$且不能以数字开头
区分大小写
Java目前有且仅有两个保留字
const
goto
命名规范 1.包命名规则
单词全部小写(域名反转形式来命名包)
域名:cxy.csx
包层级结构:csx > cxy
2.类和接口命名规则
驼峰命名法
类:WetcharPay
变量和方法命名规则
第一个单词小写,其余单词首字母大写
变量:checkLogin
3.常量命名
所有字母大写,单词之间以下划线分割
常量:PI,MAX_AGE
变量 对于一个变量来说,包括三要素:变量的数据类型 、变量的名字 、变量中保存的值
类型+名字+值
类型决定空间的大小
起个名字是为了以后方便访问。(以后在程序中访问这个数据是通过名称来访问的)
值是变量保存的数据
在java语言中有一个规定,变量必须先声明,再赋值才能访问
变量可以重新赋值,但在同一个作用域当中,不能重复声明
变量的定义 数据类型 变量名 = 值
示例代码如下
1 2 3 4 byte byteValue = 127 ;long longValue = 10000L ;float floatValue = 3.0F ;double doubleValue = 314.0 ;
局部变量 方法体中定义的变量
局部变量必须声明并赋值
局部变量只在方法体当中有效,方法体执行结束该变量的内存就释放了
1 2 3 4 5 6 7 8 9 10 11 12 13 14 public class HelloWorld {static int j = 10 ;public static void main (String[] args) {int i = 1 ;
成员变量 类体中定义的变量
成员变量中变量如果没有赋值,会有默认值
1 2 3 4 5 6 7 8 9 10 public class HelloWorld {static int j;public static void main (String[] args) {
变量的作用域 通过**{}**界定
数据类型 数据类型有什么用呢?
不同的数据类型,在内存中分配的空间大小不同。也就是说,Java虚拟机到底给这个数据分配多大的空间,主要还是看这个变量的数据类型。根据不同的类型,分配不同大小的空间。
基本数据类型 1.整型
byte 占1个字节 数的表示范围:-128 至 127
short 占2个字节 数的表示范围:-32768 至 32767
int 占4个字节 数的表示范围:-2147483648 至 2147483647
long 占8个字节 数的表示范围:-2^63 至 (2^63 - 1)
整数默认为int类型,小数为double类型
2.浮点型
float 占4个字节
double 占8个字节
3.布尔类类型
true
false
在内存中一个boolean类型变量当作int处理,占4个字节,而在boolean数组当成byte数组处理,一个boolean元素占1个字节
4.字符类型
char 占2个字节 数的表示范围:0 - 665535
java采用unicode编码来表示一个字符
数据类型的取值范围
数据类型
字节长度
大小(位)
取值范围
byte 1字节
8bit
-128 ~ 127
short 2字节
16bit
-32768 ~ 32767
int 4字节
32bit
long 8字节
64bit
float 4字节
32bit
double 8字节
64bit
字面值
(1)字面值常量互相做运算结果仍然是常量,它的运算结果是编译器可以确定的,无需程序运行
(2)对于一个普通的整数字面值常量,编译器会默认当作int进行处理,而编译器是能够认识该整数的大小的
(3)对于处在byte、short、char类型范围内的整数字面值常量,编译器会自动强转为对应类
(4)一旦表达式中存在任何一个变量,整个表达式都不能当作常量,编译器就不能自行处理它了
常量
常量可分为字面值常量以及自定义常量两种
int 在任何情况下,整数型的“字面值”默认被当做int类型处理。如果希望该“整数型字面值”被当做long类型来处理,需要在“字面量”后面添加L/l
char 1、char占用2个字节
2、char的取值范围:[0-65535]
3、char采用unicode编码方式
4、char类型的字面量使用单引号括起来
5、char可以存储一个汉字(汉字占用2个字节)
以下代码编译报错
byte 当这个整数型字面量没有超出byte的取值范围,那么这个整数型字面量可以直接赋值给byte类型的变量
注:
byte、char、short做混合运算的时候,各自先转换成int再做运算
多种数据类型做混合运算的时候,最终的结果类型 是”最大容量”对应的类型
1 2 int temp = 10 / 3 ;
引用数据类型 1 2 3 String= "xyz"
数据类型转换 数据类型转换转换规则
1.除boolean类型外,剩余7种类型都可以互相转换
2.不同的数据类型做运算,先转换为大容量的数据类型再做运算 (重点)
3.小容量->大容量
1 2 byte -> short -> int -> long -> float -> double char ->
short和char都占用两个字节
short表示的范围是-32768~32767
char表示的范围是0~655355
4.大容量->小容量不可以,编译会报语法错误需强制类型转换,但有可能造成精度损失
特别地: int类型字面值赋值给byte/short/char数据类型,只要不超出数据范围可以编译,不会报错
1 2 byte n1 = 100 ; byte n1 = 128 ;
下面代码编译通过
这个java语句是允许的,并且输出的结果是’a’
当一个整数赋值给char类型变量的时候,会自动转换成char字符型
强制类型转换
1 2 byte n1 = (byte )198 ;
类型转换
boolean类型不参与类型转换
(1)byte、short、char之间不互相转换,一旦发生运算,一律自动转换为int进行运算,结果是int
(2)byte、short、char任何数据类型与int进行计算,一律自动转换为int进行计算,结果是int
转义字符
转义字符
含义
ASCII码值(十进制)
\b
退格(BS) ,将当前位置移到前一列
008
\n
换行(LF) ,将当前位置移到下一行开头
010
\r
回车(CR) ,将当前位置移到本行开头
013
\ddd
1到3位八进制数所代表的任意字符
Unicode编码前256个字符
\0
空字符,什么都没有
000
\uxxxx
4位十六进制所代表的任意字符
Unicode编码前65536个字符
\u0000
空字符,什么都没有
000
运算符
操作符
描述
细节
<<
左移
低位补0
>>
右移
高位正数补0,负数补1
>>>
无符号右移
无符号右移动的时候,无论是正数负数,最高位是0还是1,被移除的低位丢弃,右移后最高位空缺位补0
&
按位与
^
按位异或
|
按位或
&&
短路与
||
短路或
!
取反
〜
按位取反
算术运算符
/
%
++
–
取模运算公式
a / b => a - b * (a / b)
关系运算符
<
=
<=
==
!=
关系运算符比较原理:值的比较
运算结果是布尔值
逻辑运算符 &
|
!
^ 两边算子不一样为true
&& 短路与
|| 短路非
两边的算子都是布尔类型,运算结果为布尔类型
赋值运算符 =
*=
/=
+=
三元运算符 1 2 3 4 5 int a = 1 ;int b = 2 ;int c = a > b ? a : b;
语句 判断语句 示例代码
1 2 3 4 5 6 7 8 9 10 11 12 13 14 15 16 17 18 19 20 21 22 23 24 25 26 27 28 29 30 int a = 1 ;int b = 2 ;if (a > b) {"a > b" );switch (int / String) {case : int /String:break ;default : int /String:break ;int day = 1 ;switch (day) {case 1 :"星期一" );break ;default :"其他" );
循环语句 示例代码如下
1 2 3 4 5 6 7 8 9 10 11 12 13 14 15 16 17 18 for (int i=1 ; i<10 ; i++){int a = 1 ;int b = 2 ;while (a > b){"a > b" );int i = 1 ;do {while (i < 10 );
Java当中是不能在嵌套的块中定义同名变量的,以下定义是错误的
1 2 3 4 5 6 {int a = 10 ;int a = 10 ;
switch语句
1 2 3 4 5 6 7 8 9 10 11 12 switch (expression){case value1:break ;case value2:break ;default :break ;
expression只能是int或String数据类型
如果是byte、short、char会自动转换成int类型
两种死循环写法
写法一
写法二
键盘输入输出 1 2 3 4 5 6 7 8 Scanner s = new java .util.Scanner(System.in);String score = s.next();
(1)nextInt()
遇见第一个有效字符(非空白字符)时,开始扫描,当遇见第一个分隔符或结束符(空白)时,结束扫描,获取扫描到的内容。即获得第一个扫描到的不含空格、换行符的单个字符串
(2)nextLine()
nextLine()方法碰到回车就结束扫描
方法(函数) 方法定义在类体中,方法体中不能定义方法。
方法调用:类名.方法(),类名省略,默认从当前类查找
形参是局部变量
修饰符列表 :修饰符列表不是必须的,可以为空不写,默认为public static
String[] 是一种数据类型
示例代码如下
1 2 3 4 5 6 7 8 9 10 11 12 13 14 public class HelloWorld {public static void main (String[] args) {int res = sum(1 , 2 );public static int sum (int n1, int n2) {return n1 + n2;
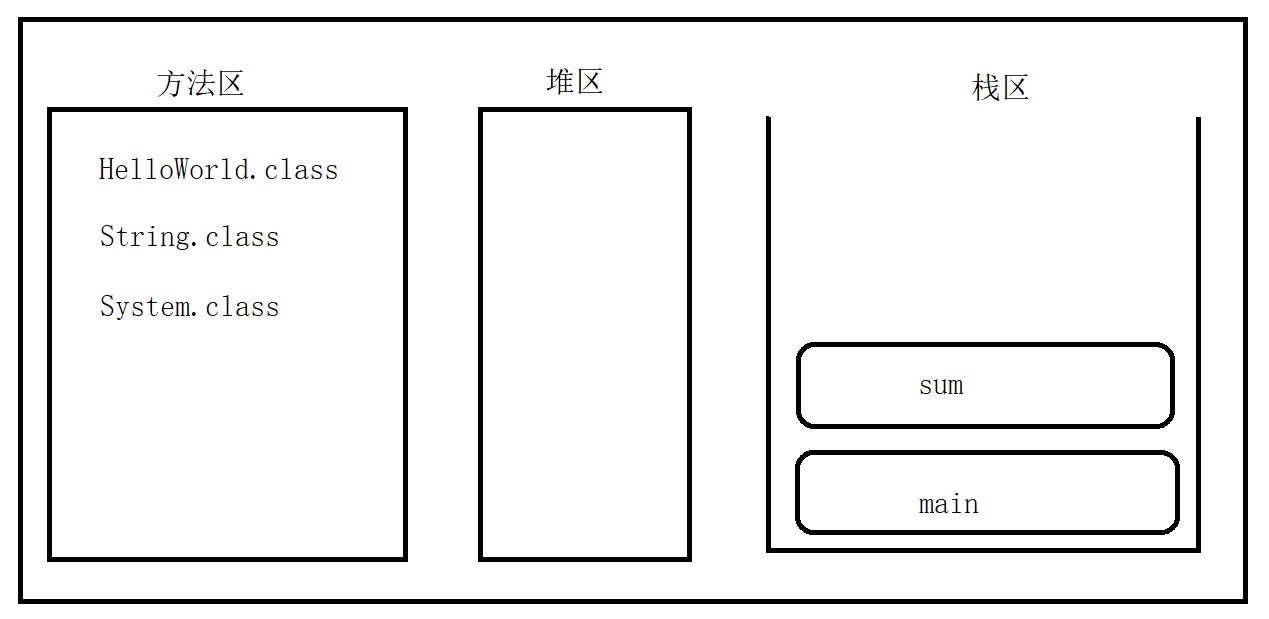
方法在JVM中内存分配 方法只定义,不调用,不会在JVM中分配内存空间。
JVM虚拟机之后,会启动类加载器,将字节码文件装载到内存中。内存中主要有三个区域,方法区、堆区和栈区。代码片段存储在方法区中。
计算两数之和,示例代码如下:
1 2 3 4 5 6 7 8 9 10 11 12 13 14 public class HelloWorld {public static void main (String[] args) {int res = sum(1 , 2 );public static int sum (int n1, int n2) {return n1 + n2;
内存图解
方法重载 方法重载,只与方法名和参数列表有关,与函数返回值无关。
1 2 3 4 5 6 7 8 9 10 11 12 13 14 public static void main (String[] args) {int r1 = sum(1 , 2 );double r2 = sum(1.0 , 2.0 )public static int sum (int n1, int n2) {return n1 + n2;public static double sum (double n1, double n2) {return n1 + n2;
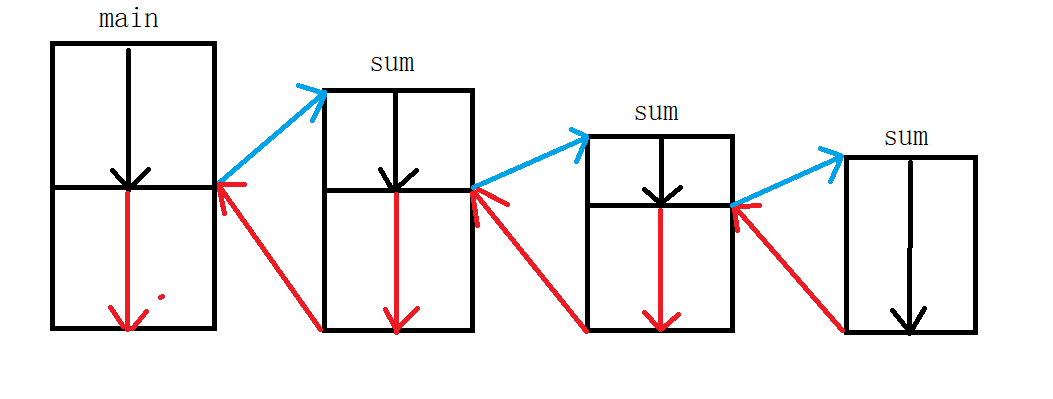
方法递归 计算数字累加,示例代码如下
1 2 3 4 5 6 7 8 9 10 11 int r = sum(4 );public static int sum (int n1) {return n1 == 1 ? 1 : n1 + sum(n1 - 1 );
图解
数组 数组长度为0和数组是null以及数组未初始化,有啥区别?
尚未初始化,无法使用
数组长度为0
1 2 3 4 5 6 7 8 9 int [] arr = new int [0 ];int [] arr = {};int [] arr = new int []{};
数组为null
1 2 int [] arr = null ;
二维数组
二维数组几种声明方式
示例代码
1 2 3 4 5 6 7 8 9 10 11 12 int [][] arr1 = new int [][]{{}, {}}int [][] arr2 = {{}, {}}int [][] arr3 = new int [m][n]int [][] arr3 = new int [m][]int [][] arr1 = new int [2 ][]; 0 ] = new int []{1 , 3 , 5 , 7 };1 ] = new int []{1 , 3 , 5 };
二维数组长度
通过数组名点length获取(arr.length)
列数(arr[0].length)
可变参数 (1)调用方法时,如果有一个固定参数的方法匹配的同时,也可以与可变参数的方法匹配,则选择固定参数的方法
(2)调用方法时,如果出现两个可变参数的方法都能匹配,则报错,这两个方法都无法调用了
(3)一个方法只能有一个可变长参数,并且这个可变长参数必须是该方法的最后一个参数
(4)Java只存在值传递
示例代码
1 2 3 4 5 6 7 8 9 10 11 12 13 14 15 16 17 18 19 20 21 22 public class Demo {public static void main (String[] args) {int [] arr1 = {1 , 3 , 5 , 7 , 9 };int [] arr2 = {0 , 2 , 4 , 6 , 8 };public static void swapArray (int [] arr1, int [] arr2) {int [] temp;
成员变量赋值的几种方式 默认初始化
显式赋值
构造代码块
构造方法
静态成员变量赋值的几种方式 默认初始化,具有默认值
显式赋值
静态代码块
代码块 (1)局部代码块
在方法体中定义的代码块
以下代码是不合法的
1 2 3 4 5 6 {int a = 10 ;int a = 20 ;
以下是合法的
1 2 3 4 5 6 {int a = 20 ;int a = 10 ;
(2)构造代码块
以下代码是合法的
(3)静态代码块
类加载的时机 (1)执行某个类的main方法,一定会触发该类类加载
(2)创建某个类的对象,一定会触发该类类加载
(3)访问某个类的静态成员,一定会触发该类类加载(常量除外)
下面这个例子不会触发类加载
1 2 3 4 5 6 7 8 9 10 11 12 13 14 15 public class Demo {public static void main (String[] args) {class A {public static final int age = 18 ;static {"A Class Loader" );
几个细节
(1)普通方法在命名时,允许和类名保持一致,但是不要这样做
(2)void的包装类型是Void
(3)只存在静态成员变量,不存在“静态局部变量”,包括静态方法中也没有“静态局部变量”
包和模块 包声明
1 package com.cskaoyan.onepackge;
导类
1 import com.cskaoyan.anotherpackage.A
静态导入
1 import static com.cskaoyan.anotherpackage.A.age;
访问权限修饰符 (1)public
公开的,任意位置都可访问
(2)protected
不同包下,子类能访问
(3)default(不加权限修饰符)
只能在同包下访问
(4)private
只能在本类中访问
类的权限把控只能是private或默认
封装 封装实现了对属性的隐藏
1 2 3 4 5 6 7 8 9 10 11 12 13 public class Demo {public static void main (String[] args) {Person p = new Person ();200 ;class Person {int age;
这样数据是极其不安全的。我们通过权限控制对代码进行封装。
1 2 3 4 class Person {private String name;private int age;
经过封装之后的代码
1 2 3 4 5 6 7 8 9 10 11 12 13 14 15 16 17 18 19 20 public class Demo {public static void main (String[] args) {Person p = new Person ();200 );class Person {private int age;public int getAge () {return age;public void setAge (int age) {this .age = age;
可以看到,我们仍然可以在外部设置 age 的属性值为200。这跟我们开始写得代码根本没 有区别,没有达到我们封装之后想要的效果。我们还需要在 setter 方法对数据进行检 查,如果数据不合法,则无法赋值成功。
1 2 3 4 5 6 7 8 9 10 11 12 13 14 15 16 17 18 19 20 21 22 23 24 public class Demo {public static void main (String[] args) {Person p = new Person ();200 );class Person {private int age;public int getAge () {return age;public void setAge (int age) {if (age < 0 || age > 200 ) {"你提供的数据不合法..." );return ;this .age = age;
继承 程序是对现实世界的模拟,来看一下代码的继承又是如何体现的。
1 2 3 4 5 6 7 8 9 10 11 12 13 14 15 16 17 18 19 20 21 22 23 24 25 26 27 public class Demo {public static void main (String[] args) {new A ().b);new A ().test();class A {private int a = 1 ;int b = 2 ;static int c = 3 ;public static void staticTest () {"staticTest方法..." );public void test () {"test方法..." );class B extends A {
除了构造方法不能继承之外,父类所有属性和方法都可以被继承。 注意:这里所的是除了构造方法不能被继承外,父类所有属性和方法都可以被继承,与私有或非私有无关。 但是我们会发现,无法访问私有属性 a 。当然无法访问,但是不能说明A没有继承父类B的 私有属性。 我们可以通过在父类中定义一个getA方法 来验证私有属性 a是否被继承。如果继承了,那么还是可以访问到a的值
1 2 3 4 5 6 7 8 9 10 11 12 13 14 15 16 17 18 19 20 21 22 23 24 25 26 27 28 29 30 31 32 33 34 35 36 public class Demo {public static void main (String[] args) {new A ().b);new A ().test();new A ().getA()); class A {private int a = 1 ;int b = 2 ;static int c = 3 ;public static void staticTest () {"staticTest方法..." );public void test () {"test方法..." );public int getA () {return this .a;class B extends A {
被static、final、private修饰的父类方法无法被重写, 无法重写的原因不同。
构造方法 不用写void,构造方法其实是有返回值的,返回值是构造方法所在类的类型。但程序员不用编写
方法名与类名一致
构造方法支持方法重载机制
语法:new 构造方法名()
示例代码如下
1 2 3 4 5 6 7 8 9 10 11 12 13 14 15 16 17 18 19 20 21 22 23 24 public class HelloWorld {public static void main (String[] args) {Person p = new Person ("xyz" , 18 );class Person {int age;public Person (String name, int age) {"执行了构造方法" );this .name = name;this .age = age;
final final表示最终的,不可变的
Java默认final修饰的类有
String
Math
System
八种基本数据类型对应的包装类型,以及Void
this关键字 谁调用,this就指向谁
1 2 3 4 5 6 7 8 9 10 11 12 13 14 15 16 17 18 19 20 21 22 23 24 25 public class HelloWorld {public static void main (String[] args) {Person p = new Person ("xyz" , 18 );class Person {int age;public Person (String name, int age) {"执行了构造方法" );this .name = name;this .age = age;this ()
为了代码得到复用,可以使用this()来调用构造方法
请看以下代码
1 2 3 4 5 6 7 8 9 10 11 12 13 14 15 16 17 18 19 20 21 22 23 24 25 26 27 28 29 30 31 32 public class HelloWorld {public static void main (String[] args) {Person p = new Person ();class Person {int age;public Person (String name, int age) {"执行了构造方法" );this .name = name;this .age = age;public Person () {this ("xyz" , 18 );
下面代码还存在疑问
1 2 3 4 5 6 7 8 9 10 11 12 13 14 15 16 17 18 19 20 21 22 23 24 25 26 27 28 29 30 31 32 33 34 35 36 37 38 39 40 public class HelloWorld {public static void main (String[] args) {Person p = new Person ();null ; class Person {int age;public Person (String name, int age) {"执行了构造方法" );this .name = name;this .age = age;public Person () {this ("xyz" , 18 );public static void test () {"执行了test方法" );
static关键字 类
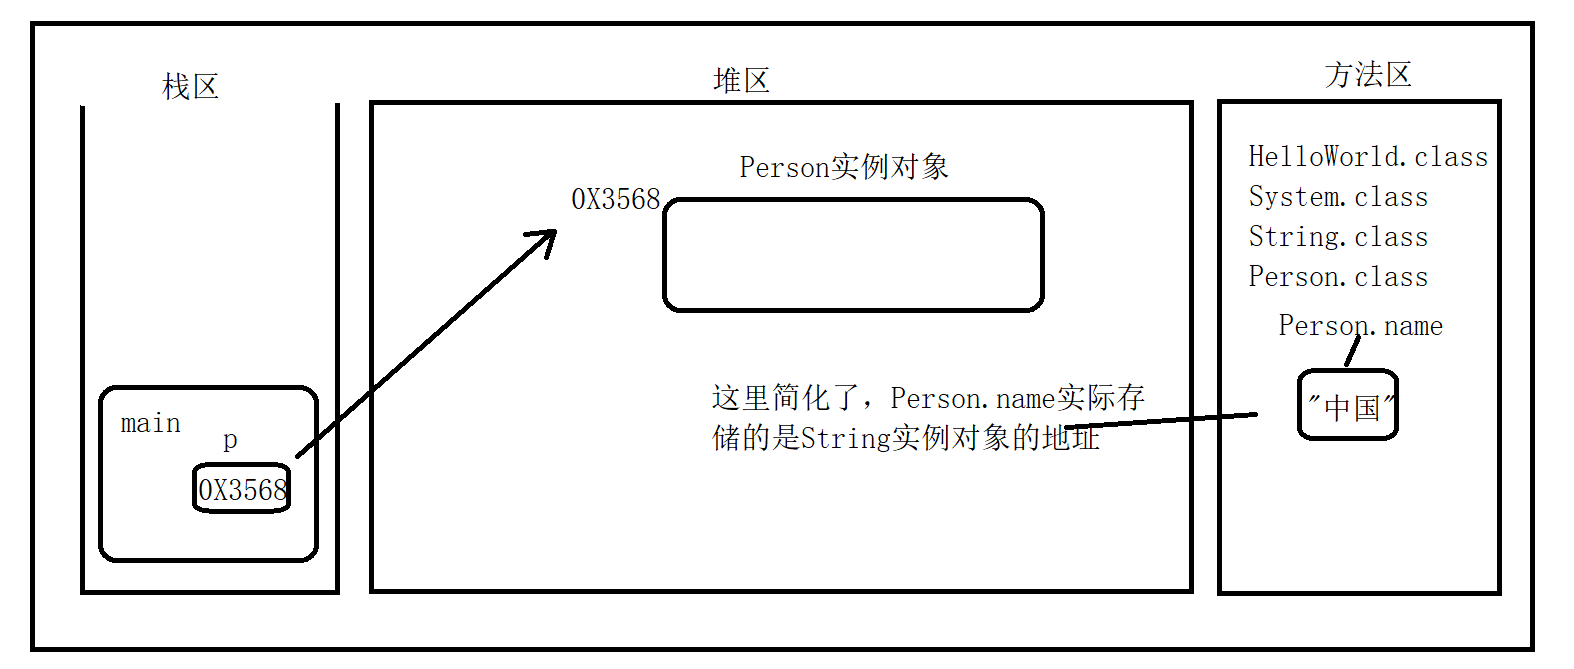
静态变量存储在方法区中
示例代码如下
1 2 3 4 5 6 7 8 9 10 11 12 13 14 15 16 17 public class HelloWorld {public static void main (String[] args) {Person p = new Person ();class Person {static String name = "xyz" ;
图解如下
静态代码块
在类加载的时候执行,并且只执行一次。可以编写多个静态代码块
语法规则
示例代码如下
1 2 3 4 5 6 7 8 9 10 11 public class HelloWorld {static {"类加载的时候执行..." );public static void main (String[] args) {
实例代码块
每创建一个实例对象都会执行一遍,在构造方法之前执行。
1 2 3 4 5 6 7 8 9 10 11 12 13 14 15 16 17 18 19 20 21 public class HelloWorld {public static void main (String[] args) {Person p = new Person ();class Person {"实例代码块..." );static {"类加载的时候执行..." );
静态方法(类方法)又称为静态上下文
封装 示例代码如下
1 2 3 4 5 6 7 8 9 10 11 12 13 14 15 16 17 18 19 20 21 22 23 24 25 26 27 28 29 30 31 32 public class HelloWorld {public static void main (String[] args) {Person p = new Person ();10 );class Person {private String name;private int age;public void setAge (int age) {this .age = age;public int getAge () {return this .age;
继承 有了继承,才有了方法覆盖和多态,**java**只支持单继承
父类又称为基类,超类(superclass)
子类又称为派生类(subclass)
构造方法和私有的都不继承
默认继承Object类
示例代码如下
1 2 3 4 5 6 7 8 9 10 11 12 13 14 15 16 17 18 19 20 21 22 public class HelloWorld {public static void main (String[] args) {Student s = new Student ();class Person {public void eat () {"人会吃饭..." );class Student extends Person {
多态 多种形态,如动物有很多种,猫、狗啊
向上转型(子类 -> 父类)
向下转型(父类 -> 子类)需要添加强制类型转换符
以下代码解释了什么叫做多态
1 2 3 4 5 6 7 8 9 10 11 12 13 14 15 16 17 18 19 20 21 22 23 24 25 26 27 28 29 30 31 32 33 34 35 36 37 38 39 40 41 42 public class HelloWorld {public static void main (String[] args) {Dog d = new Dog ();Cat c = new Cat ();class Animal {public void jiao () {"动物会叫..." );class Cat extends Animal {public void jiao () {"喵喵喵..." );class Dog extends Animal {public void jiao () {"汪汪汪..." );
多态的应用
不同动物有自己独有的方法…
1 2 3 4 5 6 7 8 9 10 11 12 13 14 15 16 17 18 19 20 21 22 23 24 25 26 27 28 29 30 31 32 33 34 35 36 37 38 39 40 41 42 43 44 45 46 47 48 49 50 51 52 53 54 55 56 57 58 59 60 61 62 63 64 65 66 67 68 69 70 71 72 73 74 75 76 77 78 79 80 81 82 public class HelloWorld {public static void main (String[] args) {Dog d1 = new Dog ();Cat c1 = new Cat ();Person p = new Person ();Animal a3 = new Dog ();Dog d2 = (Dog)a3;class Person {public void feed (Animal a) {class Animal {public void jiao () {"动物会叫..." );class Cat extends Animal {public void jiao () {"喵喵喵..." );class Dog extends Animal {public void jiao () {"汪汪汪..." );public void kanMen () {"狗看门..." );
方法覆盖 方法覆盖又称为方法重写
静态方法不存在覆盖
1 2 3 4 5 6 7 8 9 10 11 12 13 14 15 16 17 18 19 20 21 22 23 24 25 26 27 public class HelloWorld {public static void main (String[] args) {Student s = new Student ();class Person {public void eat () {"人会吃饭..." );class Student extends Person {public void eat () {"学生在吃饭..." );
final关键字 final修饰的方法/类无法被继承或覆盖
请看下面的例子
1 2 3 4 5 6 7 8 9 10 11 12 13 14 15 16 17 18 19 20 21 public class HelloWorld {public static final int i = 18 ;public static void main (String[] args) {final c
包机制 包命名规范
域名反转 + 项目名 + 模块名 + 功能名
全部小写
1 2 3 4 5 6 7 8 9 10 11 12 13 14 15 16 17 18 19 20 21 22 23 package com.dxzlkedu.demo;import java.util.Date;import com.dxzlkedu.util.*;public class HelloWorld {public static void main (String[] args) {Date date = new Date ();Test01 t = new Test01 ();"Hello World" );
引入包管理机制之后,类名发生改变。
如:java com.dxzlkedu.demo.HelloWorld
编译
输出字节码文件到指定目录下
1 javac -d C :\Users\gmbjzg\Desktop\Java\com\dxzlkedu\demo HelloWorld.java
一个java文件表明属于一个包,会在该包目录下生成字节码文件。
运行
权限控制 修饰符分为以下两种
访问权限修饰符 : (default默认权限)public , protected, private
非访问权限修饰符 :final, abstract, static, synchronized
类只能使用public 或 缺省
BeanFactory 示例
1 2 3 4 5 6 7 8 9 10 11 12 13 14 15 16 17 18 19 20 21 22 23 24 25 26 package com.csx.cxy;import com.csx.cxy.entity.User;import java.io.InputStream;import java.util.Properties;public class BeanFactory {public static Object getBean (String name) {try {InputStream inputStream = BeanFactory.class.getClassLoader().getResourceAsStream("config.properties" );Properties properties = new Properties ();Class clazz = Class.forName(properties.getProperty(name));catch (Exception e) {throw new RuntimeException (e);return obj;
config.properties
1 2 user =com.csx.cxy.entity.User product =com.csx.cxy.entity.Product
IO流 抽象类 (1) OutputStream
(2) InputStream
(3) Writer
(4) Reader
按功能划分 FileInputStream、FileOutputStream、FileWriter、FileReader
BufferedOutputStream、BufferedInputStream、BufferedWriter、BufferReader
DataOutputStream、DataInputSteam
PrintStream、PrintWriter
ObjectOutputStream、ObjectInputStream
InputStreamWriter、InputStreamReader
变量自增 示例代码如下
1 2 3 4 5 6 7 8 9 public static void main (String[] args) {int i = 1 ;int j = i++; int k = i + ++i * i++; "i=" + i); "j=" + j); "k=" + k);
单例设计模式 单例设计的几种方式
饿汉式 (1)示例代码
1 2 3 4 5 6 7 8 9 class Singleton {public static final Singleton INSTANCE = new Singleton ();private Singleton () {
(2)示例代码
1 2 3 enum Singleton {
(3)示例代码
1 2 3 4 5 6 7 8 9 10 11 12 13 class Singleton {public static final Singleton INSTANCE;static {new Singleton ();private Singleton () {
懒汉式 (1)示例代码
非线程安全
1 2 3 4 5 6 7 8 9 10 11 12 13 14 15 16 17 class Singleton {static Singleton instance;public static Singleton getINSTANCE () {if (instance == null ){new Singleton ();return instance;private Singleton () {
线程安全
1 2 3 4 5 6 7 8 9 10 11 12 13 14 15 16 17 18 19 20 21 22 class Singleton {private static Singleton instance;public static Singleton getINSTANCE () {if (instance == null ){synchronized (Singleton.class){if (instance == null ){new Singleton ();return instance;return instance;private Singleton () {
(2)示例代码
1 2 3 4 5 6 7 8 9 10 11 12 13 14 15 16 17 class Singleton {private static class Inner {private static final Singleton INSTANCE = new Singleton ();public static Singleton getINSTANCE () {return Inner.INSTANCE;private Singleton () {
类和对象初始化 示例代码
1 2 3 4 5 6 7 8 9 10 11 12 13 14 15 16 17 18 19 20 21 22 23 24 25 26 27 28 29 30 31 32 33 34 35 36 37 38 39 40 41 42 43 44 45 46 47 48 49 50 51 52 53 54 55 56 57 58 59 60 61 62 63 64 65 66 67 68 69 70 71 72 73 74 75 76 77 78 79 80 81 82 83 class Father {private int i = test();private static int j = method();static {"(1)" );"(2)" );"(3)" );public int test () {"(4)" );return 1 ;public static int method () {"(5)" );return 1 ;class Son extends Father {private int i = test();private static int j = method();static {"(6)" );super ();"(7)" );"(8)" );public int test () {"(9)" );return 1 ;public static int method () {"(10)" );return 1 ;public static void main (String[] args) {Son son = new Son ();Son son1 = new Son ();
反射机制 什么是反射机制呢?大白话就是创建实例对象的一种手段
获取字节码文件对象的三种方式
示例代码如下
1 2 3 Class.forName("java.lang.String" )
通过反射实例化对象
示例代码如下
1 2 Class c = Class.forName("java.lang.String" )String s = s.newInstance()
注意
通过Class.forName方式获取字节码文件对象,会触发类加载
示例代码如下
1 2 3 4 5 6 7 Class.forName("Student" )class Student {static {"静态代码块执行了..." )
Java操作Json字符串 Java操作JSON字符串
Gson
示例1
Java对象转JSON字符串
1 2 3 4 5 6 7 User user = new User ();"zs" );18 );Gson gson = new Gson ();String s = gson.toJson(user);
示例2
JSON字符串转Java对象
1 2 3 4 5 String str = "{\"name\":\"zs\",\"age\":18}" ;Gson gson = new Gson ();User user = gson.fromJson(str, User.class);
示例三
Java集合转JSON字符串
1 2 3 4 5 6 7 8 9 10 11 12 13 14 15 16 17 18 ArrayList<User> users = new ArrayList <>();User u1 = new User ();User u2 = new User ();"zs" );18 );"ls" );23 );Gson gson = new Gson ();String s = gson.toJson(users);
示例四
JSON字符串转Java对象
1 2 3 4 5 6 7 8 9 10 11 12 13 14 15 16 String str = "[{\"name\":\"zs\",\"age\":18},{\"name\":\"ls\",\"age\":23}]" ;Gson gson = new Gson ();new ArrayList <>();JsonElement jsonElement = JsonParser.parseString(str);JsonArray jsonArray = jsonElement.getAsJsonArray();for (JsonElement element : jsonArray) {User user = gson.fromJson(element, User.class);
七牛云文件上传和下载 文件上传 七牛云对象存储
https://portal.qiniu.com/kodo/bucket
文件上传步骤
(1)新建存储空间
(2)新建Maven项目,导入依赖
1 2 3 4 5 6 7 8 9 10 11 12 13 14 15 16 17 18 19 20 21 22 23 24 25 26 27 28 29 30 31 <dependencies>7.7 .0 </version>3.14 .2 </version>2.8 .5 </version>0.1 .6 </version>4.12 </version>
(3)文件上传示例代码如下
1 2 3 4 5 6 7 8 9 10 11 12 13 14 15 16 17 18 19 20 21 22 23 24 25 26 27 28 29 30 31 32 33 34 35 @Test public void testUpload () {Configuration cfg = new Configuration (Region.autoRegion());UploadManager uploadManager = new UploadManager (cfg);String accessKey = "" ;String secretKey = "" ;String bucket = "" ;String localFilePath = "" ;String key = null ;Auth auth = Auth.create(accessKey, secretKey);String upToken = auth.uploadToken(bucket);try {Response response = uploadManager.put(localFilePath, key, upToken);DefaultPutRet putRet = new Gson ().fromJson(response.bodyString(), DefaultPutRet.class);catch (QiniuException ex) {Response r = ex.response;try {catch (QiniuException ex2) {
说明
accessKey以及secretKey的获取方式如下
bucket为存储空间的名称
文件下载 域名图片资源标识
我们只要拿到图片的唯一标识再拼接上域名即可访问图片
Stream API 实体类
1 2 3 4 5 6 7 8 @Data @Accessors(chain = true) public class User {private String name;private Integer age;
filter 1 2 3 4 List<User> collect = users18 )
map 1 2 3 List<Integer> collect = users.stream()
groupingBy 1 2 3 Map<Integer, List<User>> collect = users
allMatch 1 2 boolean flag = users.stream()18 );
noneMatch 1 2 boolean flag = users.stream()25 );
anyMatch 1 2 boolean flag = users.stream()23 );
sorted 1 2 3 4 List<User> collect = users
distinct 1 2 3 4 List<Integer> collect = users.stream()
Java面试题 &与&&的区别 &&,具有短路功能
&还可以作为位与运算,如 1&2 = 0
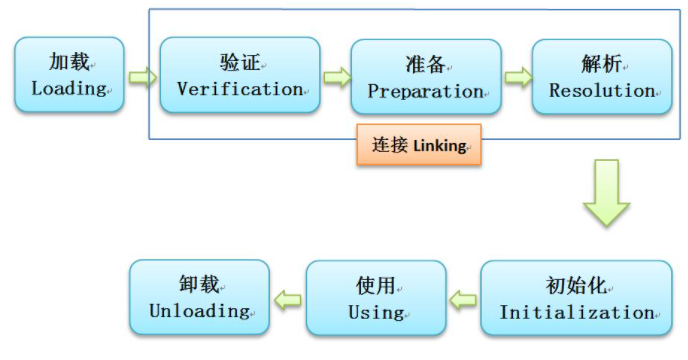
类生命周期 类加载包含七个过程:加载、验证、准备、解析、初始化、使用、卸载。其中验证、准备、解析称之为Link连接。
JVM启动类加载器,类加载器加载字节码文件到内存,接下来验证字节码格式是否符合JVM规范,准备(静态成员变量赋初始值,如果静态成员变量被final修饰,直接赋值),解析(将符号引用直接替换为直接引用),初始化(静态成员变量显示赋值,执行静态代码块,成员变量赋初始值)
JVM内存结构图 JVM主要分为五大区域
(1)栈
(2)堆
(3)本地方法栈
(4)PC寄存器
(5)方法区
元空间和永久代都是方法区的一种具体实现方式,jdk1.7之前是永久代,jdk1.8之后是元空间Java创建对象的几种方式
Java创建对象的几种方式方式一
使用new关键字
示例代码
1 Student s = new Student ()
方式二
通过反射加载字节码文件,创建对象
示例代码
1 2 Class c = Class.forName(全限定类名)Student s = (Student)c.newInstance()
或者
1 2 3 Class c = Class.forName(全限定类名)Constructor constructor = c.getConstructor()Student s = (Student)constructor.newInstance()
方式三
通过克隆对象方式,创建对象
1 2 Student s1 = new Student ()Student s2 = s1.clone()
方式四
通过反序列化方式创建对象
1 2 3 4 5 6 7 8 Student s = new Student ();ObjectOutputStream out = new ObjectOutputStream (new FileOutputStream ("data.obj" ));ObjectInputStream in = new ObjectInputStream (new FileInputStream ("data.obj" ));Student s = (Student) in.readObject();
Java中 Math.round(-1.5) 的结果是? 答案是-1, 向右取整
String str = “i” 与 String str = new String(“i”) 一样吗? 请问以下代码的执行结果是
1 2 3 4 5 6 7 8 9 10 11 12 public class StringTest { public static void main (String[] args) {String str1 = "abc" ;String str2 = "abc" ;String str3 = new String ("abc" );String str4 = new String ("abc" );
s+=1与s = s + 1有区别? 请问以下代码的执行结果是
1 2 3 short s = 1 1
以下代码的执行结果又是什么?
1 2 3 short s = 1 1
final、finally、finalize 的区别 final:声明属性、方法和类,分别表示属性不可变、方法不可覆盖、被其修饰的类不可继承
finally:异常处理语句结构的一部分
finallize:Object类的一个方法,在对象被销毁之前执行
try-catch-finally 中, finally是否一定会执行 不一定
(1)try-catch之前代码已经出现异常,根本就不会执行到finally代码块
(2)在finally执行之前,调用System.exit()方法,退出虚拟机。
示例代码
1 2 3 4 5 6 7 8 9 10 11 System.out.println(1 / 0 ); try {int a = 1 ;int b = 2 ;catch (Exception e){"catch代码块执行..." );finally {"finally代码块执行..." );
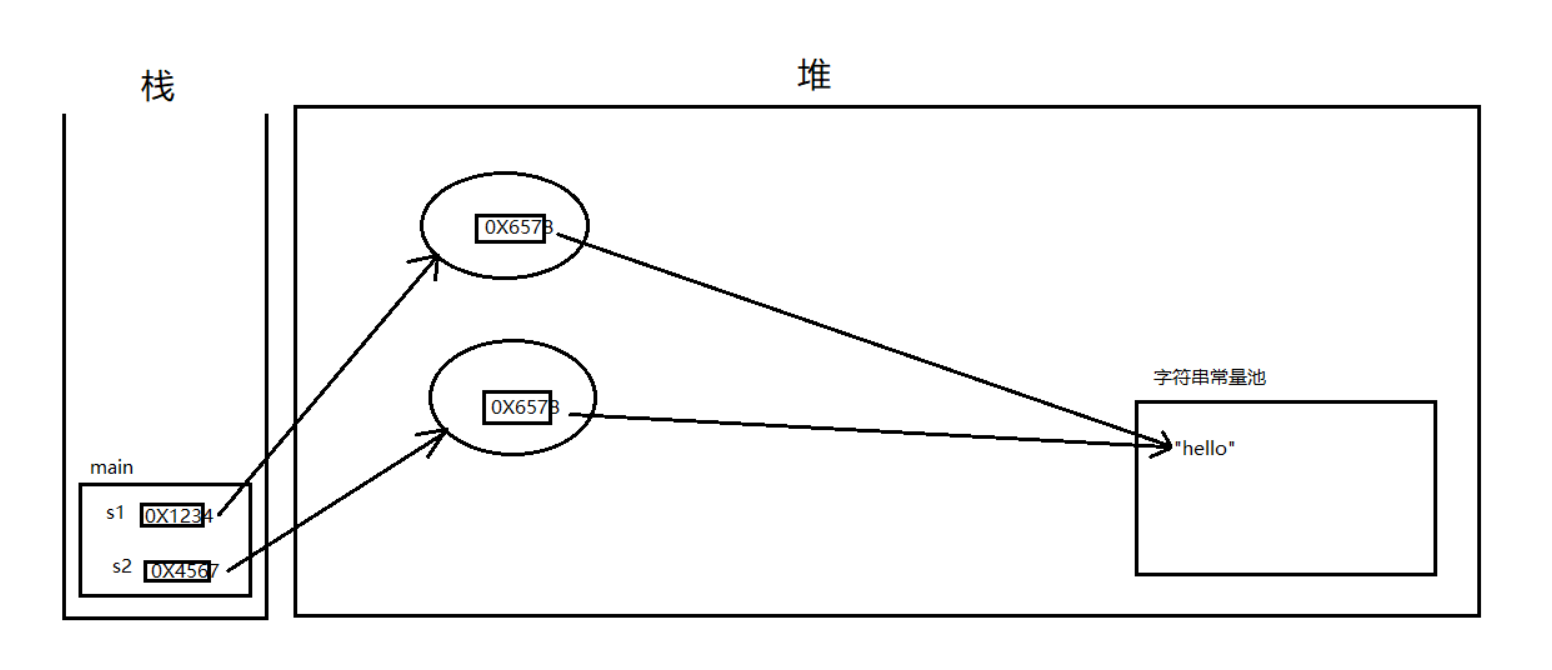
字符串比较 1 2 3 4 5 String s1 = new String ("hello" );String s2 = new String ("hello" );
图解如下
双亲委派机制 基础题
String str = “i” 与 String str = new String(“i”) 一样吗?
不一样,因为内存的分配方式不一样。String str = “i” 的方式,Java 虚拟机会将其分配到常量池中;而 String str = new String(“i”) 则会被分到堆内存中。
示例代码
1 2 3 4 5 6 7 8 9 10 11 12 public class StringTest { public static void main (String[] args) {String str1 = "abc" ;String str2 = "abc" ;String str3 = new String ("abc" );String str4 = new String ("abc" );
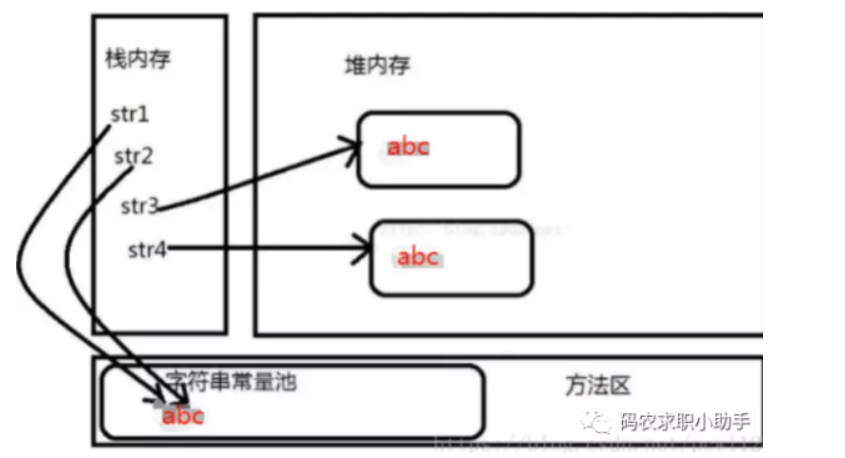
在执行 String str1 = “abc” 的时候,JVM 会首先检查字符串常量池中是否已经存在该字符串对象,如果已经存在,那么就不会再创建了,直接返回该字符串在字符串常量池中的内存地址;如果该字符串还不存在字符串常量池中,那么就会在字符串常量池中创建该字符串对象,然后再返回。所以在执行 String str2 = “abc” 的时候,因为字符串常量池中已经存在“abc”字符串对象了,就不会在字符串常量池中再次创建了,所以栈内存中 str1 和 str2 的内存地址都是指向 “abc” 在字符串常量池中的位置,所以 str1 = str2 的运行结果为 true。
而在执行 String str3 = new String(“abc”) 的时候,JVM 会首先检查字符串常量池中是否已经存在“abc”字符串,如果已经存在,则不会在字符串常量池中再创建了;如果不存在,则就会在字符串常量池中创建 “abc” 字符串对象,然后再到堆内存中再创建一份字符串对象,把字符串常量池中的 “abc” 字符串内容拷贝到内存中的字符串对象中,然后返回堆内存中该字符串的内存地址,即栈内存中存储的地址是堆内存中对象的内存地址。String str4 = new String(“abc”) 是在堆内存中又创建了一个对象,所以 str 3 str4 运行的结果是 false。str1、str2、str3、str4 在内存中的存储状况如下图所示:
JVM内存模型
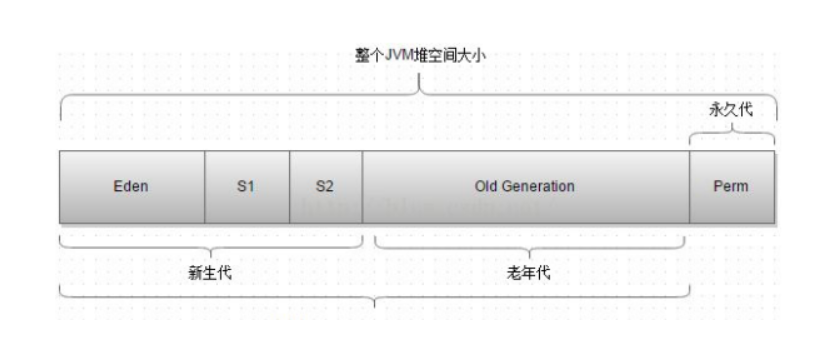
JVM中堆空间可以分成三个区,新⽣代、⽼年代、永久代
新⽣代可以划分为三个区,Eden区,两个Survivor区,在HotSpot虚拟机Eden和Survivor的⼤⼩⽐例为8:1
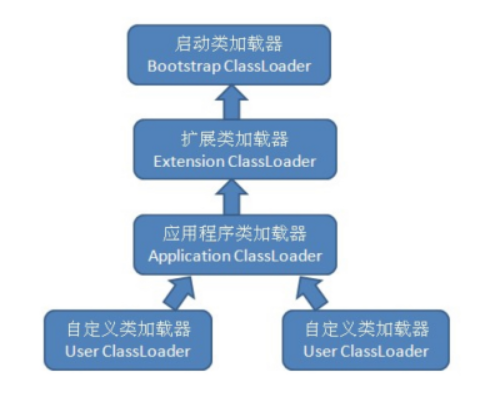
双亲委派模型 BootStrap ClassLoader
Extension ClassLoader
App ClassLoader
Custom ClassLoader
除了BootStrap ClassLoader,每个ClassLoader都有⼀个Parent作为父亲
自顶向下尝试加载类
自底向上检查类是否已经加载
双亲委派机制
当⼀个类收到了类加载请求,⾸先不会尝试⾃⼰去加载这个类,⽽是把这个请求委派给⽗类去完成,每⼀个层次类加载器都是如此,因此所有的加载请求都应该传送到启动类加载器中,只有当⽗类加载器反馈⾃⼰⽆法完成这个请求的时候 (在它的加载路径下没有找到所需加载的Class),⼦类加载器才会尝试⾃⼰去加载
垃圾回收机制 (1) 引⽤计数法
原理 :对于⼀个对象A,只要有任何⼀个对象引⽤了A,则A的引⽤计数器就加1,当引⽤失效时,引⽤计数器就减1,只要对象A的引⽤计数器的值为0,则对象A就会被回收
缺点 :引⽤和去引⽤伴随加法和减法,影响性能
存在循环引用的问题
(2)标记清除法
表单重复提交 业务背景
用户连续点击提交按钮,出现重复提交表单数据,造成数据库保存多条记录
实现思路 自定义校验注解 + AOP +Redis缓存解决思路
自定义注解
1 2 3 4 5 6 7 8 9 10 11 @Target(ElementType.METHOD) @Retention(RetentionPolicy.RUNTIME) public @interface NoRepeatSubmit {int time () default 3 * 1000 ;
AOP切面
1 2 3 4 5 6 7 8 9 10 11 12 13 14 15 16 17 18 19 20 21 22 23 24 25 26 27 28 29 30 31 32 33 34 35 36 37 38 39 40 41 42 43 44 45 46 47 48 49 50 51 52 53 54 55 56 57 58 59 60 61 62 63 64 65 66 67 68 69 70 71 package com.csx.cxy.aop;import cn.hutool.extra.servlet.ServletUtil;import com.csx.cxy.annotation.NoRepeatSubmit;import com.csx.cxy.common.R;import com.csx.cxy.constants.HeaderConstant;import com.csx.cxy.constants.RedisConstant;import com.csx.cxy.utils.RedisUtil;import lombok.extern.slf4j.Slf4j;import org.aspectj.lang.ProceedingJoinPoint;import org.aspectj.lang.annotation.Around;import org.aspectj.lang.annotation.Aspect;import org.springframework.beans.factory.annotation.Autowired;import org.springframework.stereotype.Component;import org.springframework.web.context.request.RequestContextHolder;import org.springframework.web.context.request.ServletRequestAttributes;import javax.servlet.http.HttpServletRequest;import java.util.HashMap;import java.util.Objects;@Slf4j @Aspect @Component public class NoRepeatSubmitAop {@Autowired private RedisUtil redisUtil;@Around("execution(* com.csx.cxy.controller.*Controller.*(..)) && @annotation(noRepeatSubmit)") public Object doAround (ProceedingJoinPoint pjp, NoRepeatSubmit noRepeatSubmit) {try {HttpServletRequest request = ((ServletRequestAttributes) Objects.requireNonNull(RequestContextHolder.getRequestAttributes())).getRequest();String ip = ServletUtil.getClientIP(request);String url = request.getRequestURL().toString();String token = request.getHeader(HeaderConstant.REQUEST_HEADERS_TOKEN);long now = System.currentTimeMillis();String key = RedisConstant.REQUEST_FROM + ip;if (redisUtil.hasKey(key)) {long lastTime = Long.parseLong(redisUtil.get(key));if ((now - lastTime) > noRepeatSubmit.time()) {return pjp.proceed();else {return R.SUCCESS("请勿重复提交!" );else {return pjp.proceed();catch (Throwable e) {return null ;
SpringBoot中返回null处理, 字符串转空串,数组集合转[],对象转{} Spring Boot Web自带序列化jaskon包
当前端小伙伴偶尔想后端吐槽的时候,你他妈就不能给我返回一个[]数组吗?不要返回为null
那就处理一下吧!!!
全局jackson序列化处理
null值处理
1 2 3 4 5 6 7 8 9 10 11 12 13 14 15 16 17 18 19 20 21 22 23 24 25 26 27 28 29 30 31 32 33 34 35 36 37 38 39 40 41 42 43 44 45 46 47 48 49 50 51 52 53 54 55 56 57 58 59 60 61 62 63 64 65 66 67 68 69 70 71 72 package com.csx.cxy.config.jacksonconfig;import com.fasterxml.jackson.core.JsonGenerator;import com.fasterxml.jackson.databind.JsonSerializer;import com.fasterxml.jackson.databind.SerializerProvider;import io.swagger.models.auth.In;import java.io.IOException;import java.util.Collection;public class NullValueSerializer {public static class NullArrayJsonSerializer extends JsonSerializer <Object> {@Override public void serialize (Object value, JsonGenerator jsonGenerator, SerializerProvider serializerProvider) throws IOException {public static class NullStringJsonSerializer extends JsonSerializer <Object> {@Override public void serialize (Object value, JsonGenerator jsonGenerator, SerializerProvider serializerProvider) throws IOException {"" );public static class NullNumberJsonSerializer extends JsonSerializer <Object> {@Override public void serialize (Object value, JsonGenerator jsonGenerator, SerializerProvider serializerProvider) throws IOException {0 );public static class NullBooleanJsonSerializer extends JsonSerializer <Object> {@Override public void serialize (Object value, JsonGenerator jsonGenerator, SerializerProvider serializerProvider) throws IOException {false );public static class NullObjectJsonSerializer extends JsonSerializer <Object> {@Override public void serialize (Object value, JsonGenerator jsonGenerator, SerializerProvider serializerProvider) throws IOException {
配置类
1 2 3 4 5 6 7 8 9 10 11 12 13 14 15 16 17 18 19 20 21 22 23 24 25 26 27 28 29 30 31 32 33 34 35 36 37 38 39 40 41 42 43 44 45 46 47 48 49 50 51 52 53 54 55 56 57 58 59 60 61 package com.csx.cxy.config.jacksonconfig;import com.csx.cxy.config.jacksonconfig.NullValueSerializer;import com.fasterxml.jackson.databind.*;import com.fasterxml.jackson.databind.module .SimpleModule;import com.fasterxml.jackson.databind.ser.BeanPropertyWriter;import com.fasterxml.jackson.databind.ser.BeanSerializerModifier;import com.fasterxml.jackson.datatype.jsr310.JavaTimeModule;import com.fasterxml.jackson.datatype.jsr310.ser.LocalDateTimeSerializer;import org.springframework.beans.factory.annotation.Value;import org.springframework.context.annotation.Bean;import org.springframework.context.annotation.Configuration;import java.text.SimpleDateFormat;import java.time.LocalDateTime;import java.time.format.DateTimeFormatter;import java.util.Collection;import java.util.List;@Configuration public class JacksonConfig {@Bean public ObjectMapper objectMapper () {ObjectMapper objectMapper = new ObjectMapper ();new BeanSerializerModifier (){@Override public List<BeanPropertyWriter> changeProperties (SerializationConfig config, BeanDescription beanDesc, List<BeanPropertyWriter> beanProperties) {for (BeanPropertyWriter writer : beanProperties) {if (clazz.isArray() || Collection.class.isAssignableFrom(clazz)) {new NullValueSerializer .NullArrayJsonSerializer());else if (CharSequence.class.isAssignableFrom(clazz) || Character.class.isAssignableFrom(clazz)) {new NullValueSerializer .NullStringJsonSerializer());else if (Boolean.class.equals(clazz)) {new NullValueSerializer .NullBooleanJsonSerializer());else if (Number.class.isAssignableFrom(clazz)) {new NullValueSerializer .NullNumberJsonSerializer());return beanProperties;new NullValueSerializer .NullObjectJsonSerializer());return objectMapper;
数据库存的是01,返回字符 Service层
示例代码
1 2 3 4 5 public List<UserRsp> getUser () {return users;
Mapper层
示例代码
1 2 3 <select id ="getUser" resultType ="com.example.demo.rsp.UserRsp" > </select >
返回实体类UserRsp
实体类
1 2 3 4 5 6 7 8 9 10 11 @Data public class UserRsp {private Integer id;private String name;private Integer age;private UserEnum sex;
枚举类UserEnum
示例代码
1 2 3 4 5 6 7 8 9 10 11 12 13 14 15 16 17 18 19 20 21 22 public enum UserEnum {0 , "男" ),1 , "女" );@EnumValue private Integer code;@JsonValue private String label;this .code = code;this .label = label;public Integer getCode () {return code;public String getLabel () {return label;
Mybatis Plus配置
1 2 3 mybatis-plus:.baomidou .mybatisplus .core .handlers .MybatisEnumTypeHandler
Http网络请求 依赖
1 2 3 4 5 <dependency > <groupId > com.dtflys.forest</groupId > <artifactId > forest-spring-boot-starter</artifactId > <version > 1.5.32</version > </dependency >
配置
1 2 3 4 5 forest: max-connections: 1000 connect-timeout: 3000 read-timeout: 3000
接口
1 2 3 4 5 6 7 8 9 10 11 12 13 14 15 16 17 18 package com.csx.cxy.http;import com.dtflys.forest.annotation.DataVariable;import com.dtflys.forest.annotation.Get;import java.util.Map;public interface GaoDeHttpClient {@Get(url = "https://movie.douban.com/j/search_subjects?type=movie&tag=%E6%9C%80%E6%96%B0&page_limit=50&page_start=0") getLocation () ;
全局异常处理 测试
1 2 3 4 5 6 7 8 9 10 11 12 13 14 15 16 17 18 19 20 21 22 23 24 package com.csx.cxy;import com.csx.cxy.http.GaoDeHttpClient;import org.junit.jupiter.api.Test;import org.springframework.boot.test.context.SpringBootTest;import javax.annotation.Resource;import java.util.Map;@SpringBootTest public class TestGaoDeHttp {@Resource @Test public void test () {Map location = gaoDeHttpClient.getLocation();
全局异常处理
1 2 3 4 5 6 7 8 9 10 11 12 13 14 15 package com.csx.cxy.handel;import org.springframework.web.bind.annotation.ExceptionHandler;import org.springframework.web.bind.annotation.RestControllerAdvice;@RestControllerAdvice public class GlobalExceptionHandel {@ExceptionHandler(Exception.class) public String handel () {return "服务器异常" ;
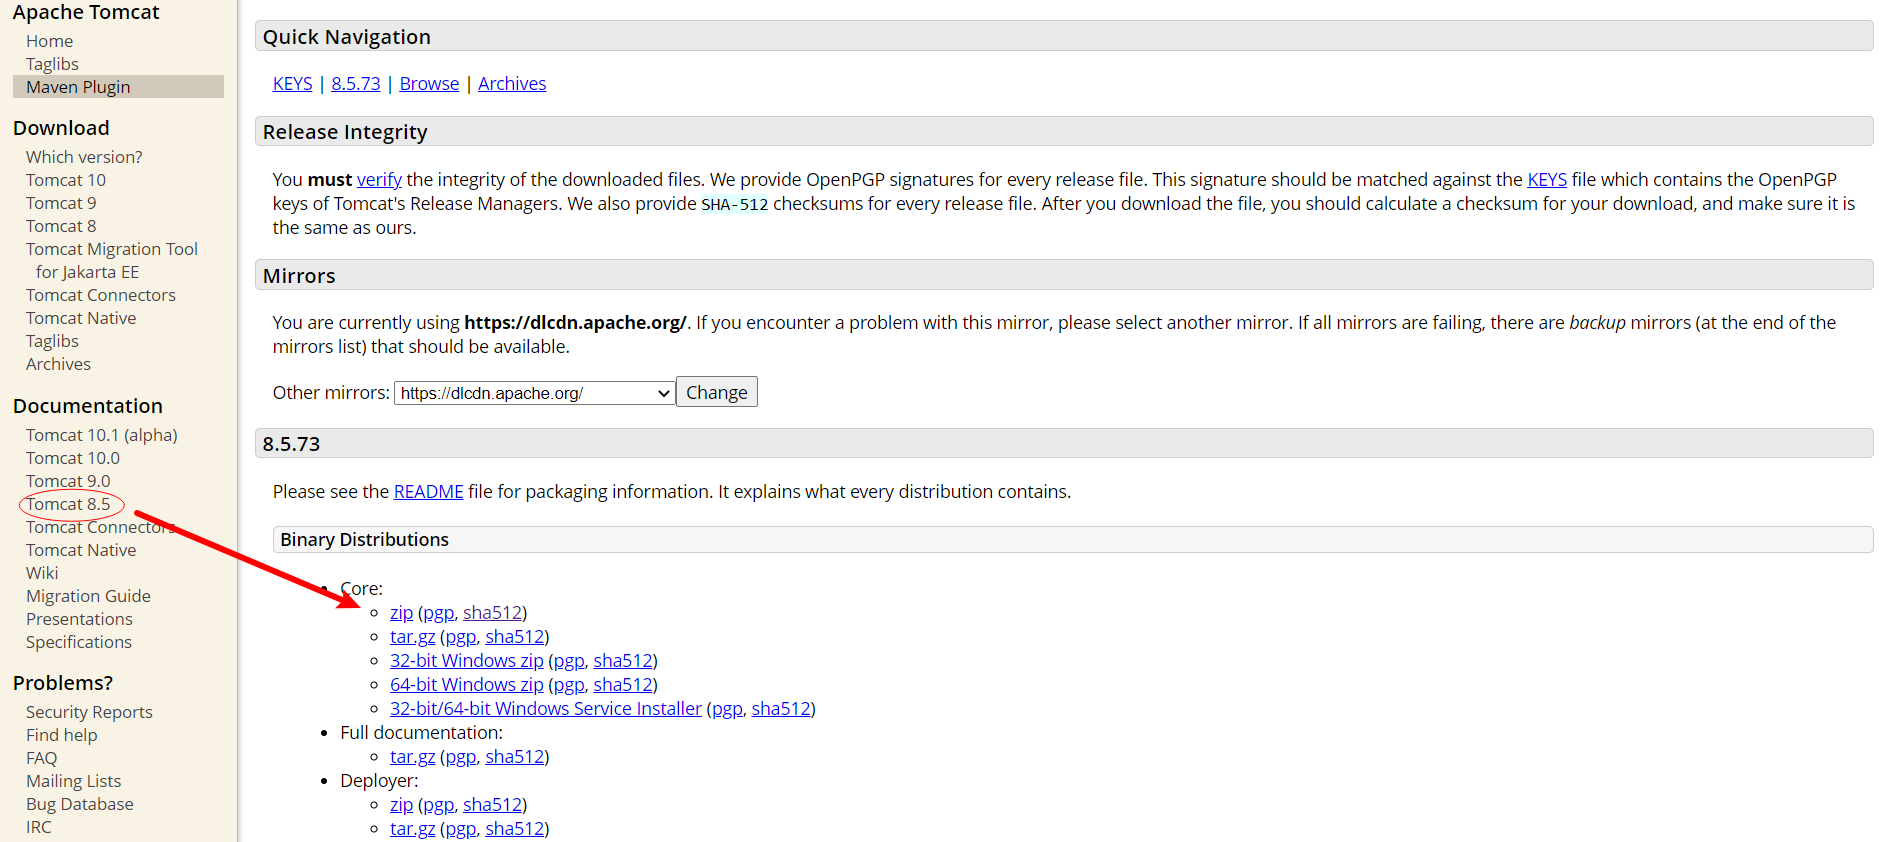
Tomcat安装/启动/关闭 下载地址:https://tomcat.apache.org/download-80.cgi
直接解压安装
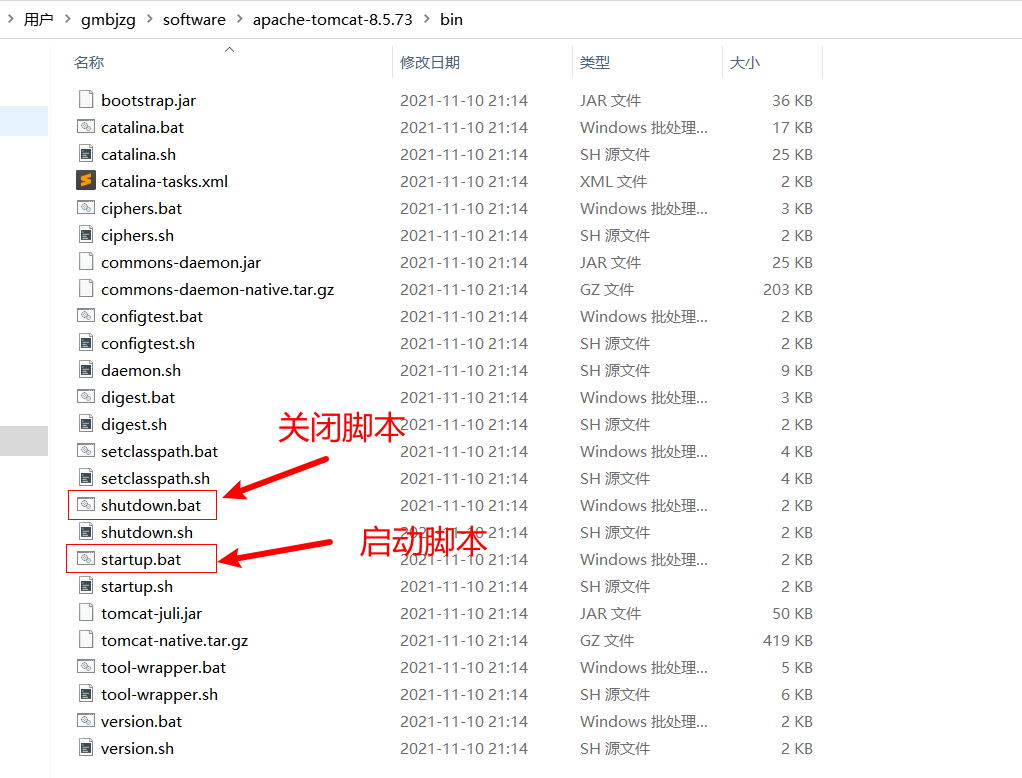
启动
关闭
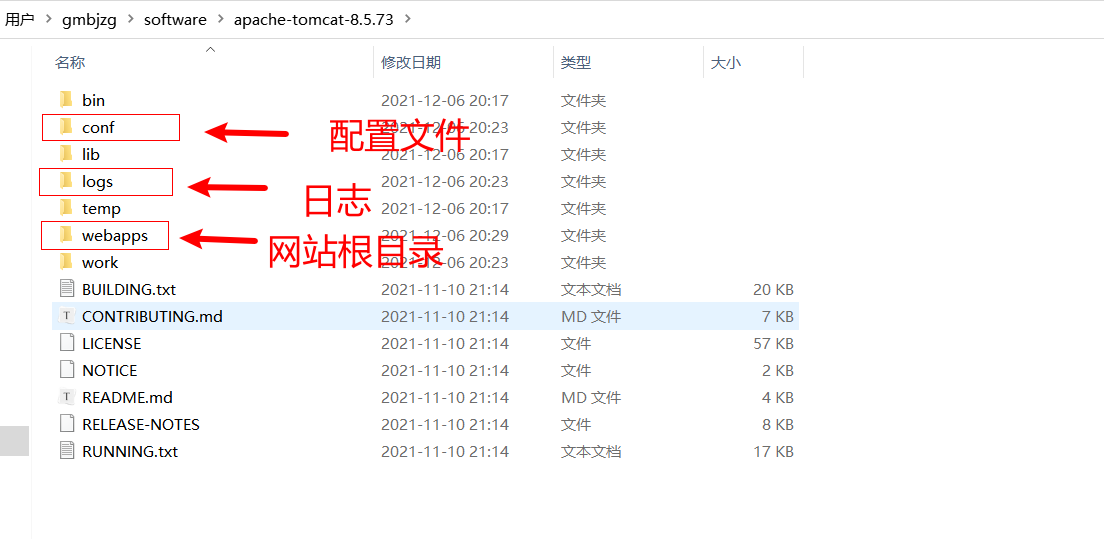
目录结构
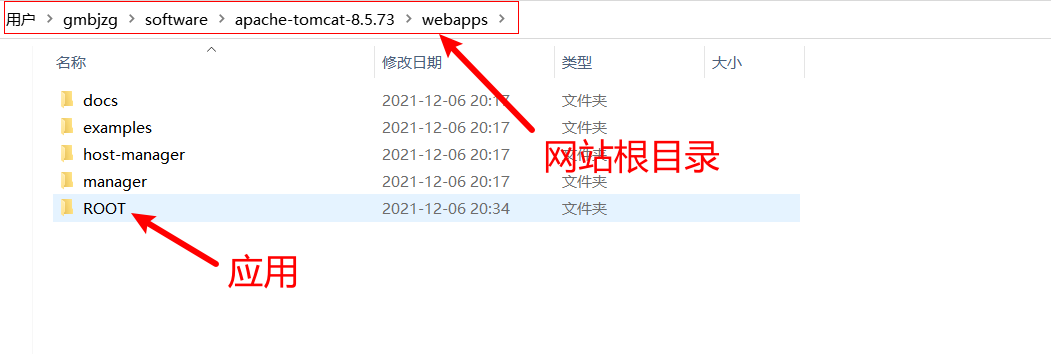
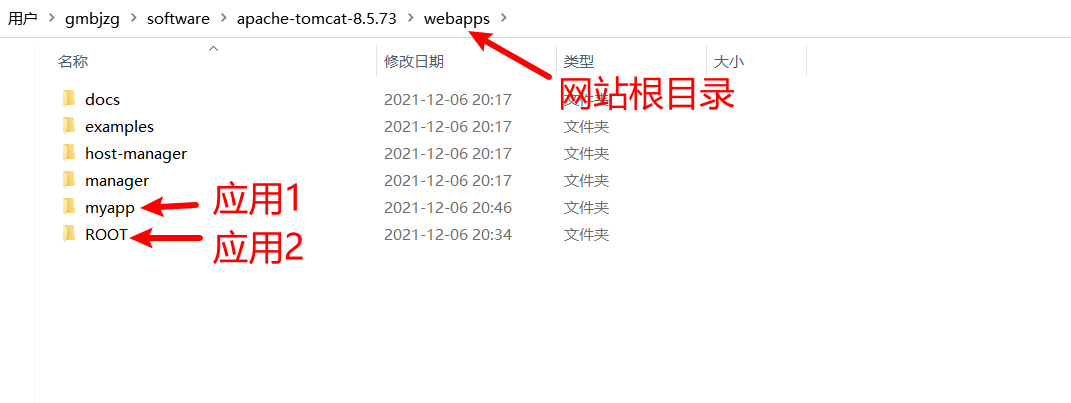
网站根目录
应用部署
方式一 在apache-tomcat-8.5.73\webapps目录下新建文件夹(应用),新建index.html
访问:http://127.0.0.1:8080/myapp/
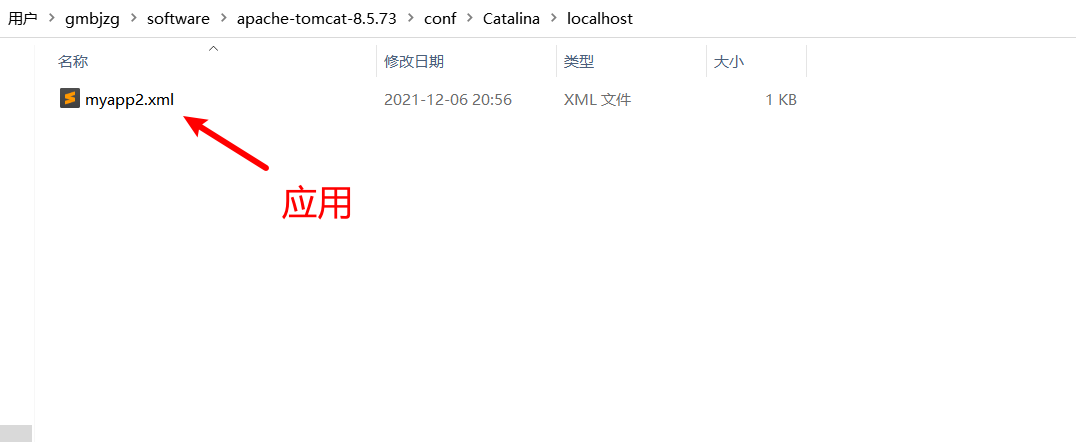
方式二 在apache-tomcat-8.5.73\conf\Catalina\localhost目录下
新建xml文件,如下图所示
myapp2.xml
1 2 <?xml version="1.0" encoding="UTF-8" ?> <Context docBase ="C:\Users\gmbjzg\Desktop\hello" />
访问:http://127.0.0.1:8080/myapp2/1.jpg
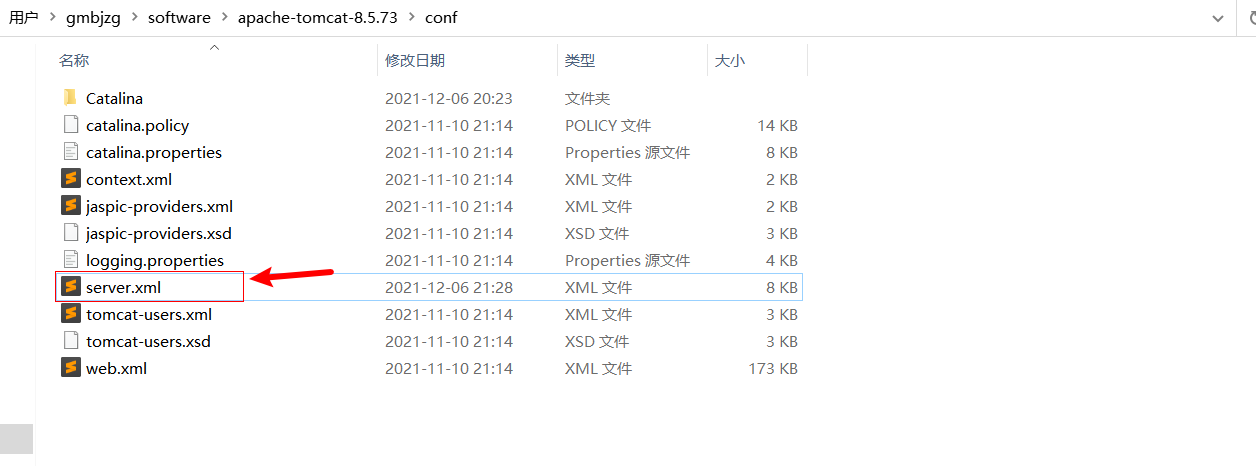
方式三 在apache-tomcat-8.5.73\conf\server.xml Host节点下配置
1 <Context path ="/myapp3" docBase ="C:\Users\gmbjzg\Desktop\myapp3" />
访问:http://127.0.0.1:8080/myapp3/1.jpg
配置文件 端口
在apache-tomcat-8.5.73\conf\server.xml
Service节点下配置
1 2 3 4 <Connector port ="80" protocol ="HTTP/1.1" connectionTimeout ="20000" redirectPort ="8443" />
默认文件加载优先级 在apache-tomcat-8.5.73\conf\web.xml中配置
index.html > index.htm > index.jsp
1 2 3 4 5 <welcome-file-list > <welcome-file > index.html</welcome-file > <welcome-file > index.htm</welcome-file > <welcome-file > index.jsp</welcome-file > </welcome-file-list >
Servlet开发 目录结构
classes 用于存放生成的字节码文件
lib 第三方jar包
web.xml 配置文件
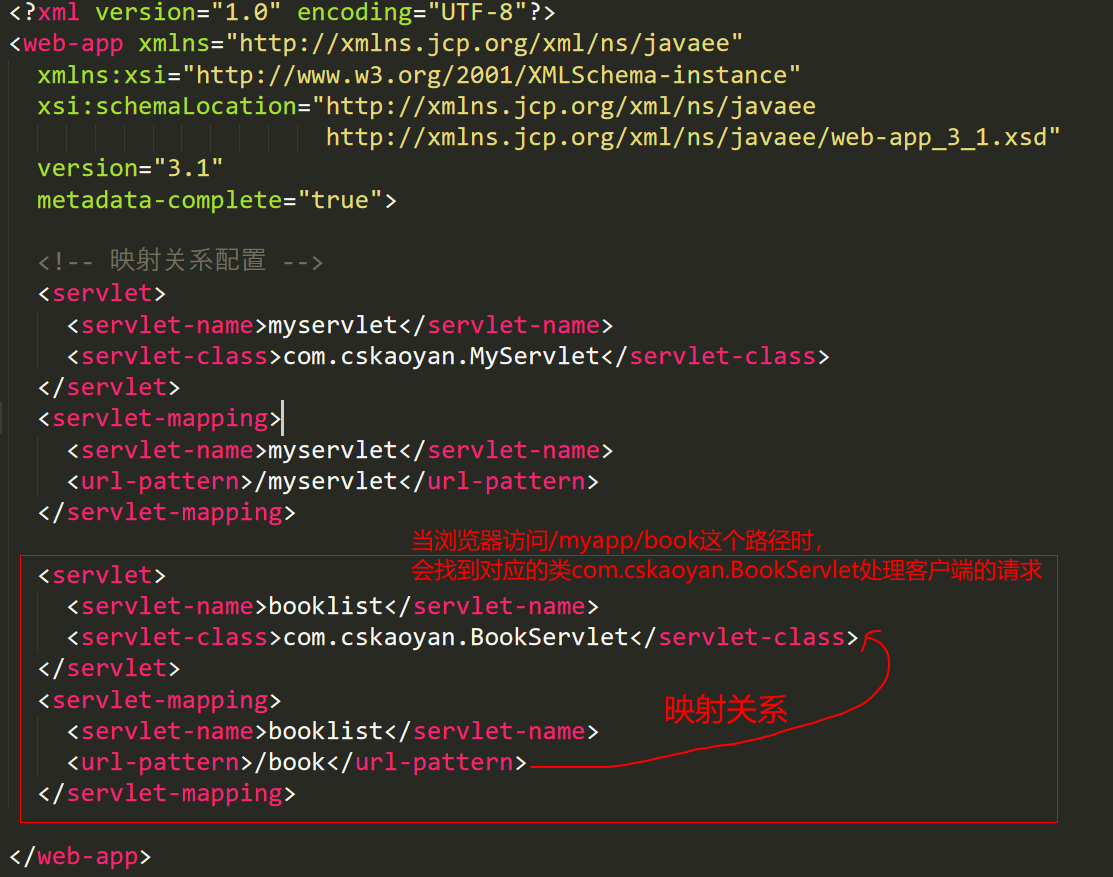
1 2 3 4 5 6 7 8 9 10 11 12 13 14 15 16 17 18 19 <?xml version="1.0" encoding="UTF-8" ?> <web-app xmlns ="http://xmlns.jcp.org/xml/ns/javaee" xmlns:xsi ="http://www.w3.org/2001/XMLSchema-instance" xsi:schemaLocation ="http://xmlns.jcp.org/xml/ns/javaee http://xmlns.jcp.org/xml/ns/javaee/web-app_3_1.xsd" version ="3.1" metadata-complete ="true" > <servlet > <servlet-name > myservlet</servlet-name > <servlet-class > com.cskaoyan.MyServlet</servlet-class > </servlet > <servlet-mapping > <servlet-name > myservlet</servlet-name > <url-pattern > /myservlet</url-pattern > </servlet-mapping > </web-app >
一个app下可以有多个servlet,一个servlet就是一个程序,用于响应客户端的请求
当浏览器访问http://127.0.0.1/myapp/myservlet时,会交给对应的类`com.cskaoyan.MyServlet`去处理,响应客户端的请求
Servlet开发流程
(1)新建一个java源文件
1 2 3 4 5 6 7 8 9 package com.cskaoyan;import javax.servlet.*;public class BookServlet extends GenericServlet {public void service (ServletRequest req, ServletResponse res) {"book list" );
(2)编译生成字节码文件的三种方式
方式一
配置CLASSPATH环境变量
方式二
临时设置classpath
1 set classpath =C:\Users\gmbjzg\software\apache-tomcat-8.5.73\lib\servlet-api.jar
编译
1 javac -d . BookServlet.java
方式三
编译时指定jar包
1 javac -classpath C:\Users\gmbjzg\software\apache-tomcat-8 .5 .73 \lib\servlet-api.jar -d . BookServlet.java
将生成的包手动部署到classes文件夹下
(3)配置路径和类的映射关系
Java日期比较, 忽略时分秒 示例代码如下
1 2 3 4 5 6 7 8 9 10 11 12 13 14 15 16 17 18 19 20 public class DateUtils {public static int compareDatesWithoutTime (Date date1, Date date2) {Calendar cal1 = Calendar.getInstance();Calendar cal2 = Calendar.getInstance();return cal1.compareTo(cal2);private static void resetTime (Calendar calendar) {0 );0 );0 );0 );
MybatisPlus代码生成 导包依赖 依赖
1 2 3 4 5 6 7 8 9 10 11 <dependency > <groupId > com.baomidou</groupId > <artifactId > mybatis-plus-boot-starter</artifactId > <version > 3.5.3.1</version > </dependency > <dependency > <groupId > com.baomidou</groupId > <artifactId > mybatis-plus-generator</artifactId > <version > 3.5.3.1</version > </dependency >
代码生成器
1 2 3 4 5 6 7 8 9 10 11 12 13 14 15 16 17 18 19 20 21 22 23 24 25 26 27 28 29 30 31 32 33 34 35 36 public static void main (String[] args) {"baomidou" ) "D://" ); int typeCode = metaInfo.getJdbcType().TYPE_CODE;if (typeCode == Types.SMALLINT) {return DbColumnType.INTEGER;return typeRegistry.getColumnType(metaInfo);"com.baomidou.mybatisplus.samples.generator" ) "system" ) "D://" )); "t_table" ) "t_" , "c_" ) new FreemarkerTemplateEngine ())
配置文档
https://www.baomidou.com/pages/981406/
短信发送 引入依赖 jar包
1 2 3 4 5 <dependency > <groupId > org.dromara.sms4j</groupId > <artifactId > sms4j-spring-boot-starter</artifactId > <version > 2.0.0 </version > </dependency >
配置 1 2 3 4 5 6 7 8 9 10 11 12 13 14 15 16 17 18 19 20 21 22 23 24 25 sms: tencent: accessKeyId: xxx accessKeySecret: xxx signature: 程序员陈师兄个人网 templateId: 1883314 templateName: 1 connTimeout: 60 sdkAppId: 1400844272
使用 1 2 3 4 5 6 7 8 9 10 11 12 13 14 15 16 package com.csx.cxy;import org.dromara.sms4j.comm.enumerate.SupplierType;import org.dromara.sms4j.core.factory.SmsFactory;import org.junit.jupiter.api.Test;import org.springframework.boot.test.context.SpringBootTest;@SpringBootTest public class TestSms {@Test public void test () {"15018707754" ,"123456" );
Multimap数据类型 Multimap<String, String> 是 Google Guava 库中的一个接口,它表示一个键可以映射到多个值的数据结构。ArrayListMultimap.create() 是 Guava 提供的一种实现 Multimap 接口的方法,用于创建一个基于 ArrayList 的 Multimap 实例。
示例代码
1 2 3 4 5 6 7 8 9 10 11 12 13 14 15 16 17 18 19 20 21 22 23 24 25 26 27 28 29 30 31 32 33 34 35 36 37 38 39 import com.google.common.collect.ArrayListMultimap;import com.google.common.collect.Multimap;public class MultimapExample {public static void main (String[] args) {"Node1" , "Code1" );"Node1" , "Code2" );"Node2" , "Code3" );"Node3" , "Code4" );"Node3" , "Code5" );"Node1 codes: " + nodeCodeMap.get("Node1" ));"Node2 codes: " + nodeCodeMap.get("Node2" ));"Node3 codes: " + nodeCodeMap.get("Node3" ));for (String key : nodeCodeMap.keySet()) {"Key: " + key + ", Values: " + nodeCodeMap.get(key));"Contains key 'Node1': " + nodeCodeMap.containsKey("Node1" ));"Contains key 'Node4': " + nodeCodeMap.containsKey("Node4" ));"Contains value 'Code1': " + nodeCodeMap.containsValue("Code1" ));"Contains value 'Code6': " + nodeCodeMap.containsValue("Code6" ));"Node1" , "Code2" );"Node1 codes after removal: " + nodeCodeMap.get("Node1" ));
运行结果
1 2 3 4 5 6 7 8 9 10 11 Node1 codes: [Code1 , Code2 ]Node2 codes: [Code3 ]Node3 codes: [Code4 , Code5 ]Key: Node1, Values: [Code1 , Code2 ]Key: Node2, Values: [Code3 ]Key: Node3, Values: [Code4 , Code5 ]Contains key 'Node1': true Contains key 'Node4': false Contains value 'Code1': true Contains value 'Code6': false Node1 codes after removal: [Code1 ]
Sa-Token Sa-Token 是一个轻量级 Java 权限认证框架,主要解决:登录认证 、权限认证 、单点登录 、OAuth2.0 、分布式Session会话 、微服务网关鉴权 等一系列权限相关问题。
Sa-Token 旨在以简单、优雅的方式完成系统的权限认证部分。
原作者的文档写得非常清晰,笔者通读了一遍之后,于是推荐给大家。
官方文档地址:https://sa-token.cc/doc.html
消息中间件 RocketMQ作用
异步、解耦、削峰
Redis 5种基本数据类型
String
Hash
List
Set
Sorted Set
测试
1 2 3 4 5 6 7 8 9 10 11 12 13 14 15 16 17 18 19 20 21 22 23 24 25 Stringset name zs1 name zs age 18 1 1 nameList 1 content011 content020 9 Set "192.168.1.100" "192.168.1.101" Set 2000 user15000 user23000 user30 2 WITHSCORES
字符串 线程安全性:
StringBuffer 是线程安全的,它的方法都被 synchronized 关键字修饰StringBuilder 是非线程安全的,它的方法没有使用 synchronized 关键字
深拷贝&浅拷贝&引用拷贝
Spring IOC和AOP IOC(控制反转):
IOC 是一种设计原则,它将传统的程序设计中对象的创建和依赖关系的管理责任从应用代码中转移到了容器(通常指 Spring 容器)中。在传统的编程模型中,当一个对象需要依赖其他对象时,需要自己负责创建和管理依赖对象。而在 IOC 容器中,对象的创建和依赖关系由容器负责管理,对象只需要声明需要哪些依赖,而不需要关心依赖对象的具体实现。这种反转了依赖关系的控制过程,因此称为控制反转。
在 Spring 中,通过配置文件或注解,我们可以告诉 Spring 容器需要创建哪些 Bean(对象),以及它们之间的依赖关系。Spring 容器在启动时读取配置信息,根据配置创建相应的 Bean,并将它们注入到其他 Bean 中,从而完成对象的创建和依赖的管理。
AOP(面向切面编程):
AOP 是一种编程范式,它是对传统的面向对象编程的补充和扩展。在面向对象编程中,我们将功能划分到各个对象中,每个对象负责完成一部分功能。而 AOP 是将一个系统的功能划分为多个关注点(Concerns),每个关注点分散在各个对象中,不同对象之间可能共享某些关注点。
AOP 的目标是解耦关注点的逻辑,使得系统中的功能能够更好地复用、维护和扩展。它通过横向切割对象,将相同关注点的逻辑划分为一个独立的模块,并通过特定的方式将这些关注点织入到对象中。
在 Spring 中,AOP 是通过代理模式实现的。Spring 提供了面向切面编程的功能,允许我们在不修改原有业务逻辑代码的情况下,将额外的功能(比如日志记录、事务管理、安全检查等)横向切割到业务逻辑中。这样可以实现对横切逻辑的复用,并且避免将非业务相关的代码污染到业务代码中。
Mybatis xml映射文件中,除了常见的select、insert、.update、delete标签之 外,还有哪些标签?
**resultMap**用于定义结果映射规则,将查询结果集中的列映射到 Java 对象的属性上
association 和 collection:
if、choose、when、otherwise:
sql:
foreach:
include:
示例
1 2 3 4 5 6 7 8 9 10 11 12 13 14 15 16 17 18 19 20 21 22 23 24 25 26 <select id ="getUserList" resultMap ="userResultMap" > <where > <if test ="username != null" > </if > <if test ="email != null" > </if > <choose > <when test ="status != null and status == 'ACTIVE'" > </when > <when test ="status != null and status == 'INACTIVE'" > </when > <otherwise > </otherwise > </choose > </where > </select >
在上面的示例中,我们使用了 if 标签来判断是否传入了 username 或 email 参数,如果传入了,则拼接相应的查询条件。然后使用 choose、when 和 otherwise 标签来处理 status 参数。根据不同的 status 值,我们拼接不同的查询条件,如果没有传入 status 参数,则默认查询所有用户。
在实际使用过程中,通过这样的动态 SQL 拼接,我们可以根据不同的查询条件生成不同的 SQL 语句,从而实现更灵活和定制化的数据查询。这样可以减少代码重复,使 SQL 查询更加直观和易于维护。
